LaCinema Classic Bridge
Setting Up the LaCinema Classic Bridge
User Manual
page 15
3.1.2. Option B: Install an Internal Hard
Drive
IMPORTANT NOTE:
The LaCinema Classic Bridge is compat-
ible only with disks formatted in FAT32. If you attempt to install a
disk formatted in NTFS or HFS+, files will not be available when
the drive is connected to the television. Refer to section
5. Refor-
matting the LaCinema Classic Bridge
for formatting information.
The FAT32 file system is compatible with almost all computers but
file size is limited to 4GB and partition size of more than 32GB is
not properly supported. Windows users should use the Formatter
Utility included on the CD-ROM, which will allow them to format
their drive in one large FAT32 partition.
IMPORTANT NOTE:
Install only a 3.5” SATA hard disk. Disks
with 5400 RPM are strongly recommended. Check lacie.com for
a list of compatible drives. LaCie cannot guarantee that drives not
on this list will be compatible with the LaCinema Classic Bridge.
Drive Installation
CAUTION:
If you are replacing a drive, make sure that it has
cooled before touching it.
1. Make sure the power cable is disconnected.
2. Turn the drive over so the rubber feet are pointing up.
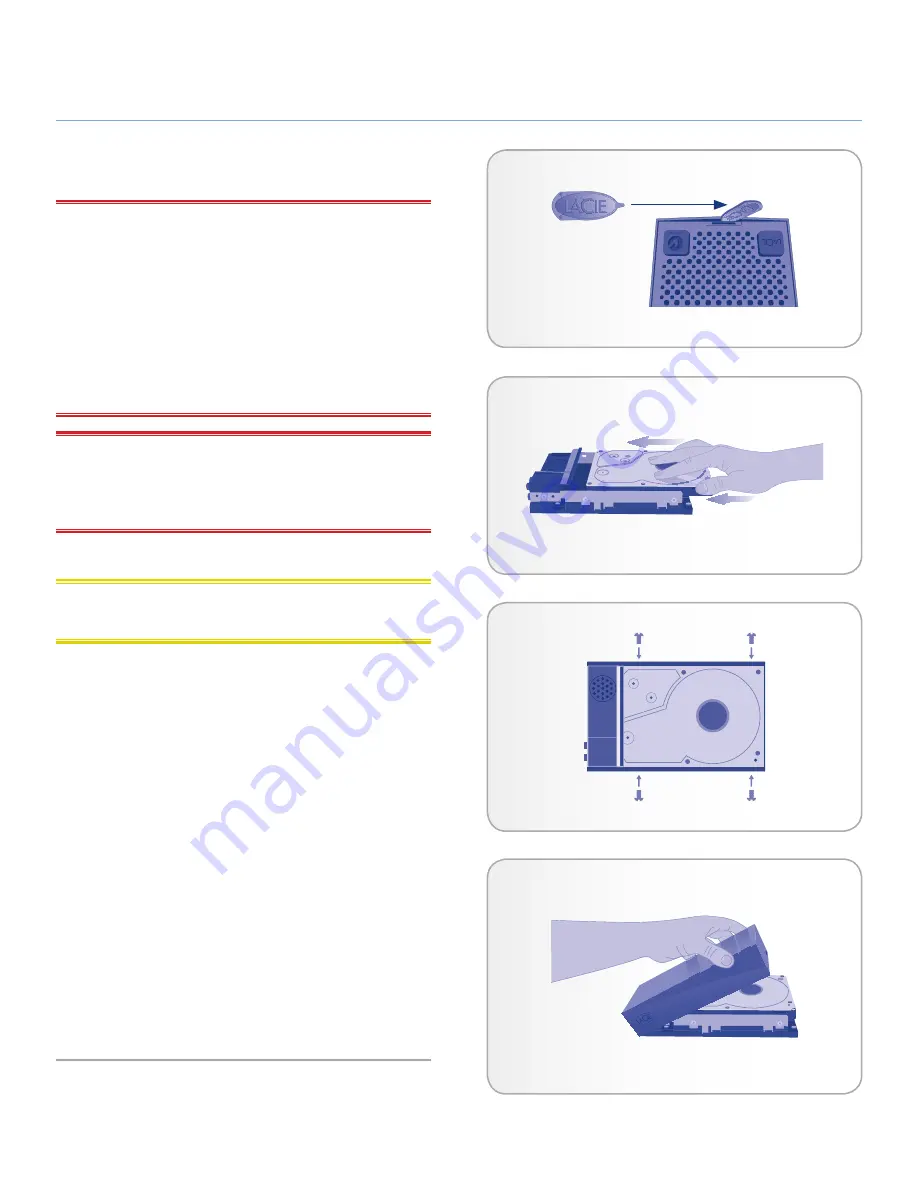
3. Opening the casing be wedging the included Case Opening
Tool into the seam between the bottom plate and the top shell
and gently pry them apart (
Fig. 09
).
4. Turn the drive over and remove the top shell.
5. Slide the drive, label facing up, onto the bottom plate until
the SATA connector plugs into the LaCinema Classic Bridge’s
internal SATA port (
Fig. 10
).
6. Secure the disk drive in the casing by inserting the four screws
(included) as indicated (
Fig. 11
).
7. Replace the casing by first aligning the video ports on the bot-
tom plate with the cutouts on the top shell and then pressing
down until it clicks (
Fig. 12
).
Proceed to section
3.2. Step 2: Transfer Files to the Hard Drive
.
case
opening
tool
Fig. 09
Fig. 11
Fig. 10
Fig. 12


