INSTRUCTIONS FOR THE INSTALLER
10
2.
120mm. Pipes can be fitted from these
outlets to other rooms. If you intend to do
this, bear the following points in mind.
•
The air ducts must always be
heat insulated and smooth
inside (not corrugated).
•
The pipes must always have an
upward slant to facilitate
movement by air density.
•
On routes with a lot of load loss
(a
lot
of
retention),
air
movement can be forced along
the ducts using a motor or fan,
provided that it is designed to
withstand such temperature
conditions.
Bear in mind that air ducts mean that
noise travels more easily from one room to
another.
The following table shows the heat
output of the air from the hot-air outlets
with the appliance working at Nominal
Heat Output:
Output
(kW)
C
3.3
Figure No.6 -
Table showing heat output of the
air leaving the appliance
Note:
The values shown in the above
table were measured at the appliance
output point and based on tests performed
at nominal heat output and maximum fan
speed.
All hot-air ducts lose heat, meaning that
the heat output obtained at the end of
piping always depends on its design.
2.3.7.
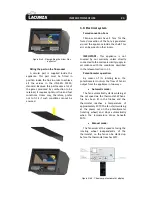
Piping air to the firebox
On this model, it is possible to pipe air
to the appliance for combustion straight
from outdoors. We recommend that, if
possible, air be drawn from outdoors for
combustion via a non-closable pipe with a
diameter of 120mm leading to the nozzle
on the bottom-front of the appliance. This
is the best option because it means that
draughts are not created in and oxygen is
not consumed from the room in which the
appliance is fitted. A further advantage is
that there is no danger of downdraught
which may hinder the correct updraught of
the appliance when an extractor or
mechanical ventilation appliance is used in
the same room as the central-heating
appliance or in another one alongside it.
If this is not possible, ensure that the
appliance receives air for combustion via
the relevant grille at the bottom of the
hood (in addition to the hood ventilation
grilles).
Important:
if the appliance is not installed
with piped air input, DO NOT remove the
part at the rear which ensures the right
distance between the rear wall and the
appliance. This must be more than 3 cm
Summary of Contents for Titanium Plus
Page 1: ...Titanium Plus Instruction Book...
Page 26: ...BASIC BREAKDOWNS 25 6 BASIC BREAKDOWNS...
Page 27: ...BASIC BREAKDOWNS 26 6...
Page 28: ...BASIC BREAKDOWNS 27 6...
Page 29: ...DECLARATION OF PERFORMANCE 28 7 DECLARATION OF PERFORMANCE...
Page 30: ...DECLARATION OF PERFORMANCE 29 7...
Page 31: ...CE MARK 30 8 CE MARK...


