background image

18

www.LAEGENDARY.com

Troubleshooting

PROBLEM

SOLUTION

Wheels are not 

spinning properly

1. Tighten the locknuts (Part Number TR-WJ02) that are 

holding the wheels in place. 

2. If all parts are intact, the differential may be broken and 

needs to be replaced. 

2. Keep the remote and the car a few feet away from each 

other while pairing.

3. Keep the remote and the car away from large metal 

objects while pairing so there is no interference.

Stripping sound upon 

accelerating

1. Inspect the car and make sure all the pieces are in place 

and no foreign objects were caught up in it. 

Please refer to the schematic in this User Manual to properly 

check the parts.

2. Check the front and rear differentials 

(Part Number TR-ZJ06) if they are functioning properly with 

both the axels and main drive shaft. 

Make sure that the gears of either the differential and/or 

main drive shaft (Part Number TR-ZJ05) are not stripped.  

Battery/charger 

not working

1. Solid red light on the charger – charger is plugged in.

2. Blinking red light – charger is defective.

3. Blinking green light on the charger – battery is plugged 

in and charging.

4. Solid green light on the charger – battery is fully charged.

5. Blinking green light after 3-4hrs of charging – battery 

is defective.

6. Please try charging the battery using the second USB 

charger to determine which is defective.

Replacement batteries and chargers can be purchased 

through our website 

www.laegendary.com

Rebinding the remote 

control with the car

Turn on the remote control first and within 3 seconds turn 

on the car as well in order to rebind them; if not successful, 

repeat this action 2-3 times. If the pairing is still not 

successful, the remote and/or the ESC needs to be replaced.

Summary of Contents for Triton

Page 1: ......

Page 2: ......

Page 3: ...erms of Use Safety Precautions What s in the Box Quick Start Getting up to Speed Operation and Troubleshooting Replacement Parts CE Compliance FCC 4 5 6 8 9 10 15 16 18 19 23 Anatomy of the TRITON 24...

Page 4: ...s all the necessary setup and operating procedures that will allow you to unlock the performance potential that LAEGENDARY engineers designed into your model Also be sure to read and follow the precau...

Page 5: ...f the assembly installation or use of their products or any accessory or chemical required to use their products By the act of operating using the product the user accepts all resulting liability and...

Page 6: ...any other source of ignition If a battery gets hot to the touch during the charging process disconnect the battery from the charger and discontinue charging immediately ALWAYS unplug the charger and...

Page 7: ...will be running the model to ensure that you have range that covers the area you want to drive After range testing drive slowly in the area at first to make sure there is no interference that can cau...

Page 8: ...Stop immediately and install new batteries Most importantly use good common sense at all times SPEED CONTROL Your model s electronic speed control ESC is an extremely powerful electronic device capab...

Page 9: ...9 www LAEGENDARY com What s in the box WHAT S IN THE BOX 2 Batteries USB charger Plug adaptor User manual Remote control TOP DESIGN MAY VARY DEPENDING ON THE MODEL YOU PURCHASED...

Page 10: ...ories are properly attached remove the protection film from the body before turning on the truck 1 USB Charger Lights Indicator a The power light turns solid red when plugged in the outlet b The green...

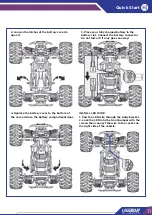
Page 11: ...Connect the battery connector Do not force it It only goes one way 4 Replace the battery cover to the bottom of the car and close the battery compartment door INSTALL LED WIRE 1 Pass the LED wire thro...

Page 12: ...ing the cover off in the direction of the arrow Figure 1 2 Install 3 x 1 5V AA batteries not included in correct polarities Figure 2 3 Slide back the battery cover Figure 3 NOTICE 1 When installing ba...

Page 13: ...input current higher than 2A When the input current is higher than 2A the USB charger will enter into the protection mode and all the lights will turn off TIGHTEN THE WHEEL Tighten the wheel nuts bef...

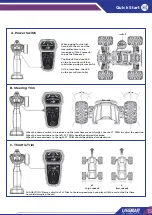
Page 14: ...14 www LAEGENDARY com Quick Start TRANSMITTER INSTRUCTIONS A Power Switch B Steering Trim C Throttle Trim low speed to high speed 1 Forward 2 Brake 3 Left 4 Right 5 Backward...

Page 15: ...ould be adjusted anticlockwise C Throttle Trim SUGGESTION Please adjust the TH Trim to the low speed when you play with the car for the first time to avoid damaging the car H high speed L low speed A...

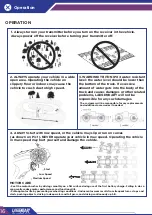
Page 16: ...t be responsible for any such damages The customer will be responsible for any replacements and additional accessories if needed 4 ALWAYS start with low speed or the vehicle may slip or run on curves...

Page 17: ...airs with the remote then the servo might be the problem 6 Servo and remote controller can be ordered through our website www laegendary com Reverse command not responding When the car is moving forwa...

Page 18: ...h both the axels and main drive shaft Make sure that the gears of either the differential and or main drive shaft Part Number TR ZJ05 are not stripped Battery charger not working 1 Solid red light on...

Page 19: ...Car shell 1x1 Product Name Remarks Quantity Specifications No TR SJ05 Rear bumper block 1x1 Product Name Remarks Quantity Specifications No TR SJ08 Front lower arm 1x2 Product Name Remarks Quantity S...

Page 20: ...15 A Chassis cover 1x1 Product Name Remarks Quantity Specifications No TR SJ16 Batteries compartment 1x1 2 batteries compartment Product Name Remarks Quantity Specifications No TR SJ17 Batteries cover...

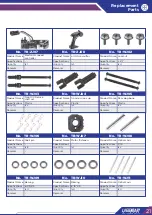
Page 21: ...ct Name Remarks Quantity Specifications No TR WJ02 Locknut 1x4 2 6 7 Product Name Remarks Quantity Specifications No TR WJ11 Optical axis 1x4 2 30 Product Name Remarks Quantity Specifications No TR WJ...

Page 22: ...duct Name Remarks Quantity Specifications No TR LS03 Round head screw 1x10 2 8 PBHO Product Name Remarks Quantity Specifications No TR LS04 Round headed screw 1x10 2 3 8 PBHO Product Name Remarks Quan...

Page 23: ...Remarks Quantity Specifications No TR DJ04 Battery connector 1x1 Product Name Remarks Quantity Specifications No TR DJ03 USB Charger 1x1 7 4V Product Name Remarks Quantity Specifications No TR DJ05 P...

Page 24: ...TR SJ10 TR LS11 TR W J14 TR LS11 TR LS03 TR W J09 TR LS07 TR ZJ03 TR SJ04 TR LS09 TR SJ08 TR SJ06 TR W J12 TR SJ09 TR W J09 TR W J13 TR W J09 TR W J04 TR SJ11 TR SJ07 TR W J05 TR W J03 TR W J11 TR LS...

Page 25: ...TR LS03 TR LS07 TR ZJ03 TR LS09 TR W J11 TR LS09 TR W J11 TR SJ05 TR LS02 TR LS07 TR ZJ03 TR SJ07 TR SJ09 TR W J12 TR W J13 TR SJ10 TR SJ11 TR ZJ02 TR ZJ02 TR W J09 TR W J09 TR SJ08 TR SJ13 TR W J03 T...

Page 26: ...tomy of the TRITON TR LS02 TR LS02 TR LS02 TR LS06 TR SJ16 TR SJ15 A TR LS02 TR LS02 TR LS06 TR SJ03 TR LS10 TR LS02 TR LS10 TR SJ17 TR LS06 TR LS02 TR SJ03 TR SJ12 TR LS10 TR LS10 TR LS05 TR LS06 TR...

Page 27: ...TON TR LS06 TR WJ07 TR WJ10 TR WJ10 TR ZJ05 TR WJ10 T R L S 0 1 T R L S 0 1 T R D J 0 1 T R Z J 0 7 T R D J 0 1 T R Z J 0 5 T R S J 1 4 T R W J 1 0 T R Z J 0 6 TR LS01 TR SJ13 TR WJ10 TR ZJ06 TR WJ10...

Page 28: ...o be purchased separately or as small sets to allow you to get years of use from your RC truck The bodyshell is not just for looks it is also designed to protect vital areas of the running gear and el...

Page 29: ...ly approved by the party responsible for compliance could void the user s authority to operate the equipment NOTE This equipment has been tested and found to comply with the limits for a Class B digit...

Page 30: ......

Page 31: ......

Page 32: ......

Reviews: