E
N
G
L
IS
H
Photo 14
3. Insert a new chest drain module.
4. Replace the chest skin over the torso being sure to secure the skin at
the shoulders and both sides.
Maintenance:
Cleaning
1. Clean with mild soap and water; do not submerse the manikin or parts in
cleaning fluids or water.
2. Use only on clean surface. Avoid felt tipped markers, ink pens, acetone,
iodine or other staining products and avoid placing the manikin on
newsprint or inked lines of any kind.
3. To ensure longevity, each manikin should be cleaned after each training
session and a general inspection should be conducted regularly.
4. Modules and all other parts should be drained and air-dried thoroughly
before storage and disinfected when needed. After use of injection pads
(use water only), accumulated water should be squeezed out.
Do not
store wet foam pads in the skin.
To prevent mildew or mold, pads
can be soaked in a mild solution of disinfectant and water or bleach and
water. Squeeze excess solution from pads, allow them to dry, then store
or reinsert in manikin.
5. Articulating parts will benefit from a light application of talcum powder
prior to training sessions.
To extend the cleanliness of your manikin:
1. Use a small towel and lightly dust the manikin head and chest with a
small amount of powder (provided). Wipe away any excess.
2. Use gloves when handling the manikin.
3. Avoid felt tipped markers, ink pens, iodine and newsprint, these will stain
the manikin.
Laerdal Recommends
Use only on clean surface. Avoid felt tipped markers, ink pens, acetone,
iodine or other staining products and avoid placing the manikin on
newsprint or inked lines of any kind. These will stain the manikin.
Attaching/Removing arms:
1. Remove deltoid injection pad from upper arm.
2. Detach chest skin from tabs at shoulders and back.
3. Remove skin to reveal internal portion of upper chest.
4. Lift hard chest plate to reveal inside sockets for arm connections.
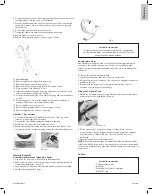
5. Place one washer on threaded 4 ½” bolt.
6. Insert threaded bolt through upper arm and through torso so that it is
visible in chest cavity. (Figure 5)
Fig. 5
7. From inside of chest area, slip a washer, a spring and another washer on
bolt.
8. Screw a wing nut on bolt and tighten until desired articulation is achieved.
9. Replace hard chest plate.
10. Pull chest skin back onto shoulder area.
11. Connect chest skin to torso at shoulder and back tabs.
12. Replace deltoid injection pad on upper arm.
To remove arms(s), reverse procedure.
IV Arm:
Replacing Skin and Veins:
Laerdal Recommends
When excessive leaking occurs at the puncture sites, either a new vein
system or skin should be installed to reduce loss of fluid.
We recommend working at a basin when replacing skin and veins.
Replacing skin:
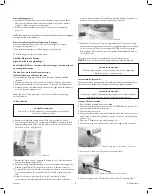
1. Cut off skin. This can be done with a sharp knife or scalpel. (Figure 6)
2. Discard skin.
Fig. 6
Replacing veins: (Keeping skin)
1. Lubricate inside of skin with liquid detergent; let it flow down into the
finger area.
2. Begin at top of arm and slowly pull skin down and remove from arm.
Do
not roll, as that will cause skin to bind.
Thumb will detach with skin.
3. Remove tubing from track in mandrel. Glue may need to be scraped away.
4. Rinse and dry vein grooves well and swab with alcohol. Be sure to
remove any excess glue.
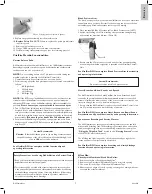
Fig. 7
5. Place new veins along grooves, (Figure 7) spot gluing as needed. (We
recommend a fast-drying glue applied sparingly every 2 to 3 inches.)
6. Generously lather arm mandrel with liquid soap.
Laerdal Recommends
Heat arms skins before replacing on mandrel.
This can be done with a hair-dryer.
7. Slide hand into skin. (Photo 15)
Photo 15
ALS Simulator
9
Laerdal


