background image


FLTL-001-UOM-001, Rev.1.1 


2.2.4


Muscle Compartments 

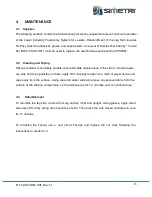
There are four muscle compartments in the lower extremity. 

Figure 4

 displays (from left to right) 

(1)  the  deep  posterior  compartment,  (2)  the  superficial  posterior  compartment,  (3)  the  lateral 
compartment, and (4) the anterior compartment. The end labeled with a number indicates the top, 
or  superior,  part  of  the  muscle  assembly.  The  deep  posterior  compartment  includes  the 
neurovascular bundle and the lateral compartment includes the superficial perennial nerve. 


Figure 4. Muscle Compartment 


2.2.5


Nerves and Veins 

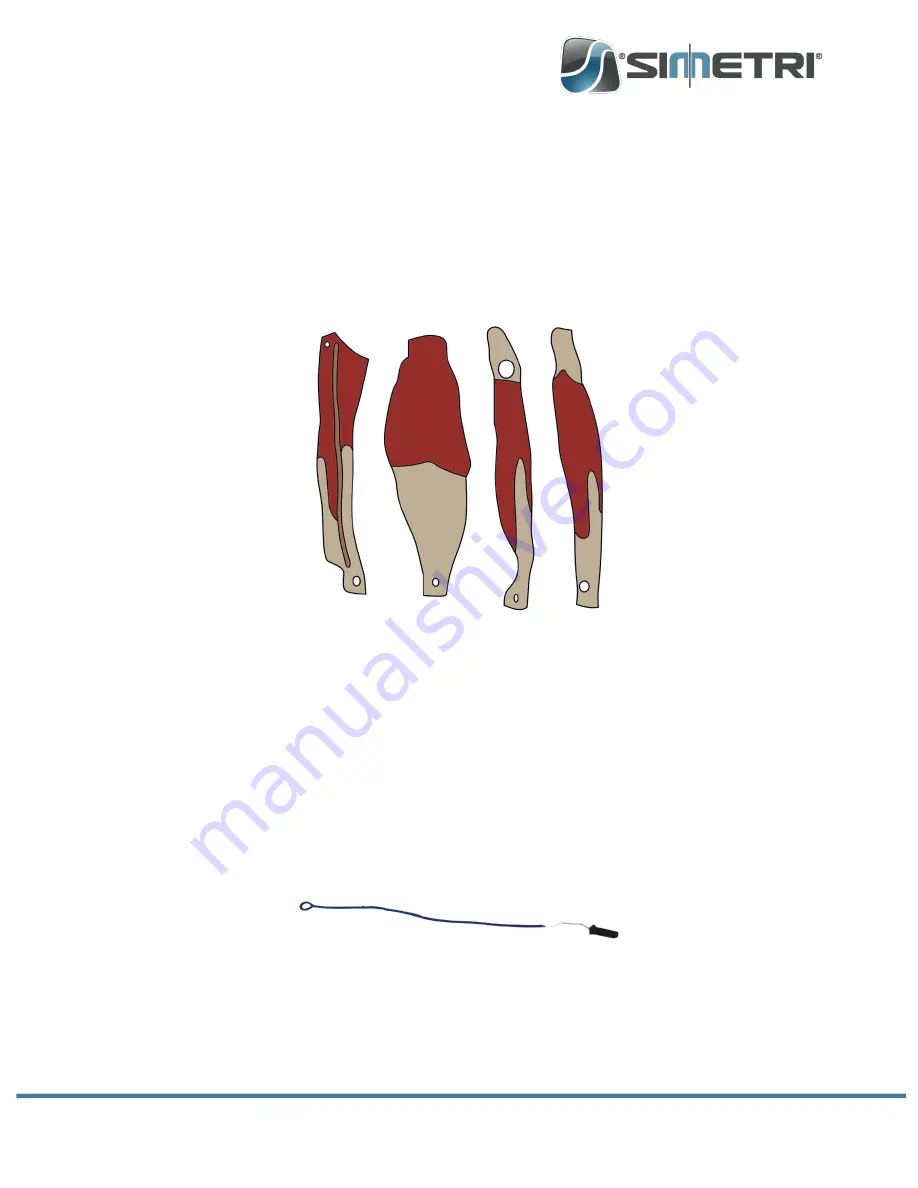
There are two simulated vasculature attachments. The neurovascular bundle is adhered to the 
deep posterior compartment (muscle #1). 

Figure 5

 shows the great saphenous vein and its 1 

point of attachment. The loop attaches to the metal hook. The 3 branches, from left to right, 
attach to the corresponding pegs: posterior branch (peg #2), main branch (peg #1), and the 
anterior branch (peg #4).  


Figure 5. Great Saphenous Vein 

 
2.2.6


Skin Layer 

The skin layer, shown in 

Figure 6

, is applied after the fascia-covered muscles have been 

Summary of Contents for SIMETRY 212-55190

Page 1: ...Lower Extremity Fasciotomy System for Laerdal SimMan 3G Laerdal Product No 212 55190 212 55200 212 55210 User Manual Rev 1 1...

Page 2: ...4 2 2 5 NERVES AND VEINS 4 2 2 6 SKIN LAYER 4 2 3 PREPARATION FOR USE 5 3 USER INSTRUCTIONS 11 3 1 INSTALLATION PROCESS 11 3 2 FASCIOTOMY PROCEDURE 13 3 2 1 LATERAL INCISION FASCIOTOMY PROCEDURE 13 3...

Page 3: ...METRI developed a training system compatible with the Laerdal SimMan manikin that helps train in treating compartment syndrome of the lower leg The Lower Leg Fasciotomy training system s reliability a...

Page 4: ...of a support assembly at the top of the trainer and the simulated bones extending downward from the hardware enclosure The support assembly includes 3 built in circular attachment points and 1 metal...

Page 5: ...partment Fascia 2 is the fascia for the superficial posterior compartment and divided into three components the fascia marked with L on the top left corner is the left third component of Fascia 2 the...

Page 6: ...le and the lateral compartment includes the superficial perennial nerve Figure 4 Muscle Compartment 2 2 5 Nerves and Veins There are two simulated vasculature attachments The neurovascular bundle is a...

Page 7: ...ou become familiar with the components that make up the system follow the steps below to prepare the Lower Extremity Fasciotomy System for Laerdal for use 1 Identify all components for the System Figu...

Page 8: ...2 left third with Fascia L e Pair lateral compartments 3 with Fascia section 3 f Pair anterior compartments 4 with Fascia section 4 3 Place fascia over corresponding muscle by matching the number on t...

Page 9: ...mly to remove creases Flip the muscle over to adhere the remaining fascia Repeat for each muscle Figure 9 Placing Fascia on Muscle c To adhere muscle 3 and 4 together Figure 10 place a two sided adhes...

Page 10: ...r each muscle see order of application below Each muscle compartment will have a circular opening at the inferior end which will slide in its corresponding magnetic peg on the bottom of the tibia Agai...

Page 11: ...be attached to anchor point 3 and 4 on the top and peg 3 and 4 respectively Figure 14 Make to fit the fibular head through the opening in the lateral muscle compartment Figure 14 Attaching Lateral and...

Page 12: ...the skin down and around the heel of the foot as seen in Figure 16 then place the foot portion of the base unit inside the foot skin Once the foot portion of the base unit is securely inside the foot...

Page 13: ...tallation Process In order to install the Lower Extremity Fasciotomy System for Laerdal remove the existing limb from the manikin If replacing a leg first unzip the chest skin and lay the skin open to...

Page 14: ...Leg Amputation attachment Figure 19 Remove Metal Leg Pin Insert the Fasciotomy Trainer orienting it so that the metal leg pipe is located closest to the pelvic region of the manikin Make sure the hol...

Page 15: ...Identify the head of the fibula and lateral malleolus in order to determine the location of the fibular shaft b Make a 15cm incision 2cm anterior to the fibular shaft This places the incision approxi...

Page 16: ...and nerve d The fascia of the deep posterior compartment is superficial here and readily accessible it should be opened distally and proximally under the belly of the soleus muscle e Through the same...

Page 17: ...nd needs little maintenance If the skin or muscle layers are dirty and have particles on them apply 70 isopropyl alcohol to a cloth or paper tissue and wipe away from the surface Using soap and water...

Reviews: