FLIP
®
01.12.2012
English / Englisch
Following restoration tasks, residual material consisting of adhesive,
wax or sealing lacquer may have accumulated in the pulleys or in
the attachment.
This can impair the running characteristics of the machine and
reduce the suction performance. This kind of soiling is indicated in
most cases by unsteady running, difficult starting, reduced working
speed and increased development of noise. The suction perfor-
mance also decreases. In this case, the V-belt must be removed
(
Section 7.3.1, Removing the V-belt
) and the attachment and
flanks of the pulley must be cleaned. Check whether there are any
deposits in the fan housing or on the fan blades and remove these
if necessary. Wear a respiratory protective mask.
7.2 TIGHTENING THE V-BELT
ATTENTION!
Do not overtighten the V-belt! This will allow you to avoid
excessive wearing of the V-belt and pulleys!
The V-belt must be retightened from time to time. To do so, proceed
as follows:
1
Switch off the machine.
2
Pull the power plug out of the socket!
3
Lay the machine on its side or with the motor housing on a
table. Avoid damages to the floor and/or table and the ma-
chine.
4
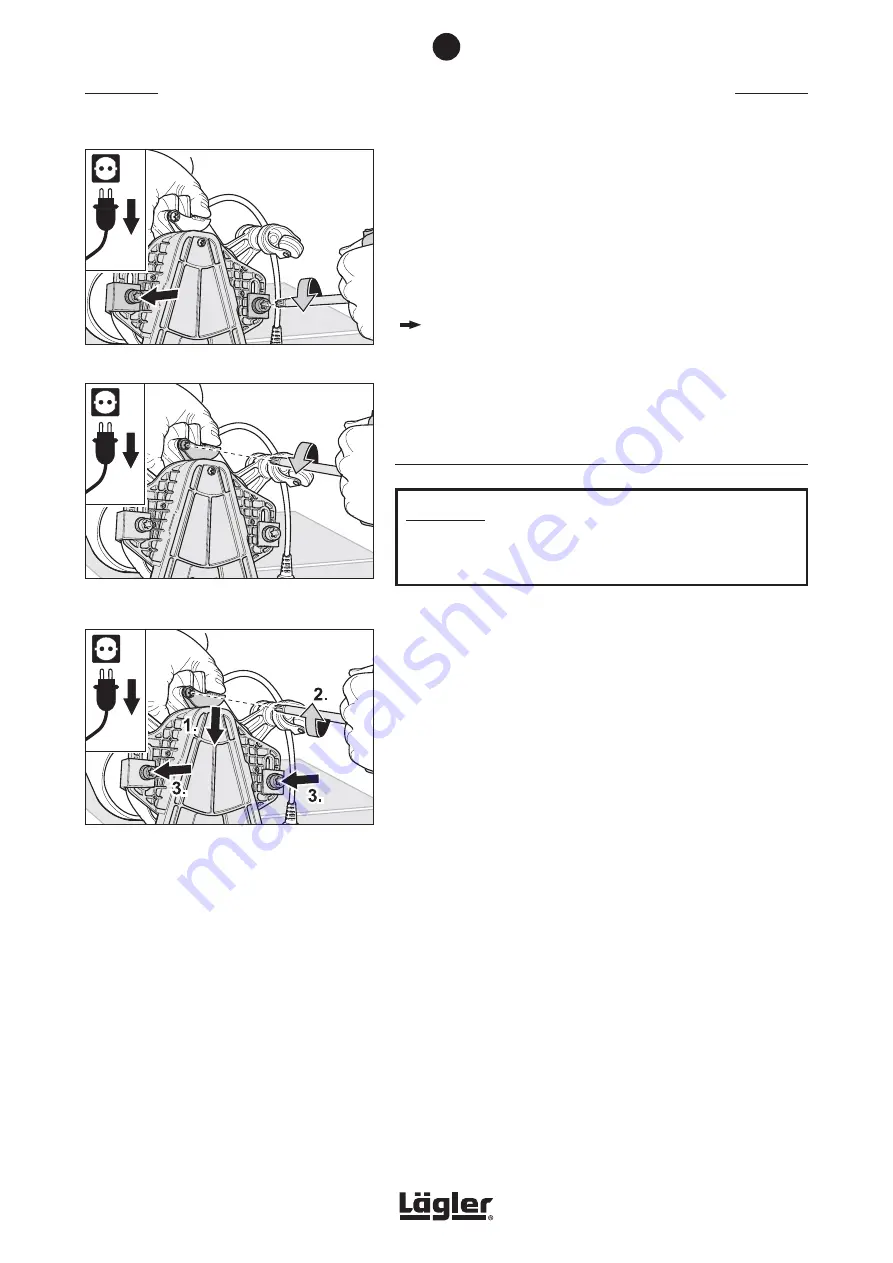
Use the universal spanner to undo the two screws which
connect the attachment to the fan housing (Fig. 30).
5
Use the universal spanner to undo the screw which attaches
the belt tightening plate (Fig. 31).
6
Hold the FLIP
®
by the fan housing and press the belt tightening
plate forward towards the attachment at the same time with
your thumb (Fig. 32, 1.).
Use your other hand and the universal spanner to retighten
the three screws (Fig. 32, 2. and 3.).
MAINTENANCE WORK AND REPLACEMENT OF WEARING PARTS
7
Fig. 32
Hold the FLIP
®
by the fan housing, press on the
belt tightening plate (1.) and retighten the three
screws (2. and 3.).
Fig. 30
Undo the two screws that connect the attachment.
Fig. 31
Undo the screw which attaches the belt tightening
plate.
26
Summary of Contents for Flip
Page 48: ...FLIP 01 12 2012 English Englisch SPARE PARTS 48 11...
Page 50: ...FLIP 01 12 2012 English Englisch SPARE PARTS 50 11...
Page 52: ...FLIP 01 12 2012 English Englisch SPARE PARTS 52 11...
Page 54: ...FLIP 01 12 2012 English Englisch SPARE PARTS 54 11...
Page 56: ...FLIP 01 12 2012 English Englisch SPARE PARTS 56 11...


