background image

31

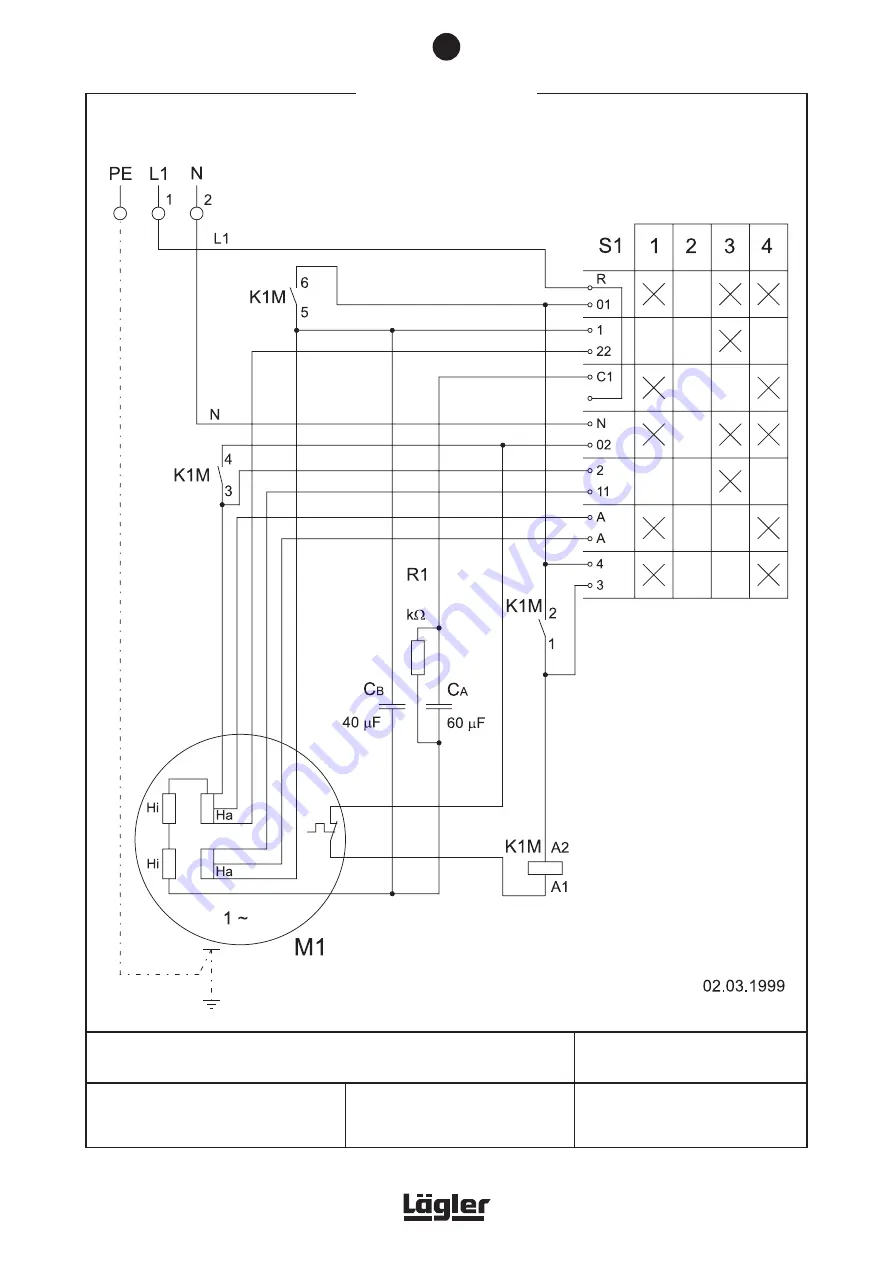
max. back-up fuse: 16 A
power supply: 230 V / 50 CPS

selector switch

test

stop

operation

start

C

A

  = starting capacitor

C

B

  = running capacitor

Ha = main winding

Hi  = auxiliary winding

temperature

switch

operation

motor 2.2 kW

230 V / 50 CPS

The circuit diagram valid for your machine is located in the motor switch box.

8.6

ELF:

2.2 kW / 230 V / 50 CPS

single-phase AC motor

CIRCUIT DIAGRAM

9

EUGEN LÄGLER GMBH
Industriegebiet Kappelrain
D-74363 Güglingen-Frauenzimmern

Telefon:  +49 - 7135 - 98 90 - 0
Fax: 

+49 - 7135 - 98 90 - 98

E-Mail: info@laegler.com
Internet: http://www.laegler.com

Summary of Contents for HUMMEL

Page 1: ...Operation Maintenance Safety Operating instructions for the belt sanding machine BELT SANDING MACHINE HUMMEL HUMMEL CAN GB NZ USA AUS IRL...

Page 2: ...support On Off switch Switch box Fig 1 Assemblies of the HUMMEL belt sanding machine Lowering lever Handle Dust bag Safety guard Side cover Lateral wheel Drive motor Bracket Belt guard Bumper felt Op...

Page 3: ...um pressure 13 4 4 Emptying the dust bag 13 5 Transport and storage 14 5 1 Dismantling the machine 14 5 2 Assembly after transportation 15 5 3 Storage 15 6 Maintenance 16 6 1 Cleaning and care instruc...

Page 4: ...ine is intended for dry use only Never attempt to use the HUMMEL for any wet process risk of fatal accidents 1 3 INTENDED USE OF THE MACHINE The HUMMEL belt sanding machine is suitable for sanding woo...

Page 5: ...ipment To avoid fire or explosive damage always remove the dust bag from the machine following sanding and empty the contents into a non combustible container Seal this container with a non combustibl...

Page 6: ...A Manufacturer Eugen L GLER GmbH Machine type Belt sanding machine Serial number see rating plate Year of construction see rating plate Motor type single phase AC motor Voltage 230 V Frequency 50 Hz O...

Page 7: ...and respiratory protection mask P3 Optional equipment Carrying handle TransCart pocket for ear plugs DI safety plug safety belt Wearing parts To ensure that the machine works safely and to maximum eff...

Page 8: ...rt of the lowering rod linkage into the bottom part of the rod linkage in the machine housing Fig 2 3 Tighten the wing screw and the wing nut Figs 3 and 4 4 Lift the sanding drum off the floor by turn...

Page 9: ...3 Checking sanding belt regulation 15 Close the housing opening with the side cover The machine is now ready for operation Before working with the machine for the first time operating staff must be a...

Page 10: ...hould be relaxed by loosening the eye bolt Lower belt tension will allow the motor to start up more easily Once the motor is up to temperature remember to retension the belts using the eye bolt 3 3 SW...

Page 11: ...anding operation In order to avoid chatter marks use sanding belts with bud joints and tape When changing to a new sanding belt always start work in a less well lit area of the room until the sanding...

Page 12: ...losing the housing opening check the precise track ing of the sanding belt To do this switch on the machine for around 2 seconds in the TEST switch position and check the tracking of the sanding belt...

Page 13: ...with grit size 40 in the MITT MEDIUM setting In order to avoid dish outs when sanding soft wood floors the sanding pressure should be reduced and the sanding speed in creased 4 4 EMPTYING THE DUST BAG...

Page 14: ...by allowing it to run off the lower pulley by turning the motor pulley Fig 20 Take care of your fingers danger of crushing 5 Apply the box wrench tool kit to the lower pulley and turn the roller in th...

Page 15: ...ASSEMBLY AFTER TRANSPORTATION Fig 20 Remove the suction V belt Fig 21 Allow the drive belt to run off the lower pulley If necessary use the box wrench to help you but turn exclusively in the clockwise...

Page 16: ...he following care pro cedure in order to ensure that the machine is in full working order and produces the customary high quality sanding finish Check the tensioning roller and the sanding drum for da...

Page 17: ...ress the operating lever for the drive unit downwards Fig 14 7 Remove the operating lever by unscrewing Fig 28 8 Release and remove the three hexagonal socket head screws Fig 29 9 Carefully remove the...

Page 18: ...ng oil for these lubrication points never use grease or sprays such as WD 40 or similar 6 3 CHECKING SANDING BELT REGULATION The sanding belt tracking must be checked every time the sanding belt is ex...

Page 19: ...n to the left belt runs to the back 6 If the belt tracking is seen to be correct after adjusting once tighten the lock again If not repeat the process 7 Replace the side cover 6 4 CHECKING THE MACHINE...

Page 20: ...ng screw at the wheel clamp of the adjust able wheel and place the setting fixture against the machine housing again Fig 37 7 Set the wheel in the required position by means of the setting device so t...

Page 21: ...ff the machine and pull the plug out of the socket 2 Remove the side cover Fig 32 3 Tilt the machine backwards over the safety guards so that you can see the wheel bearings Fig 34 Ensure that the mach...

Page 22: ...ensioning roller and check the compression spring Should this be deformed the compression spring Art no in Section 10 must be renewed 3 Clean the drive unit 4 Insert the compression spring in the tens...

Page 23: ...ete rear wheel assembly 7 If you wish to exchange the complete back wheel with tail housing release the screw which fastens the tail axle of the rear wheel in the machine housing Fig 47 8 Pull the tai...

Page 24: ...heel lever 5 Push the new wheel onto the wheel lever 6 Mount the washers and the screw 7 Tighten the screw again The lateral wheels must always be exchanged in pairs Fig 49 Pull out the mains plug and...

Page 25: ...on the drive belt using the eye bolt The slack on the belt should be just under one belt width Fig 53 6 By turning the tensioner tighten the smaller suction belt and carefully tighten the clamping scr...

Page 26: ...hine The elements required for dust pick up must be checked at least once a year by a specialist and also repaired if necessary They must also be certified as being in good working order Ensure that e...

Page 27: ...ient voltage Check the conductor quality and length Insufficiently dimensioned cable cross sections strand dia smaller than 2 5 sq mm and excessively long supply lines should be avoided if necessary u...

Page 28: ...emarks Never leave the filled dust bag unattended To avoid fire or explosive damage always remove the dust bag from the machine following sanding and empty the contents into a non combustible containe...

Page 29: ...ht machine Do not subject underpowered machines or attachments to excessive work loads Refrain from using machines for purposes and work for which they are not intended Wear suitable work clothing Do...

Page 30: ...afety devices or damaged parts with care and test that all machine functions are in correct working order Check whether moving parts are working correctly whether they are jamming whether any parts ar...

Page 31: ...rature switch operation motor 2 2 kW 230 V 50 CPS The circuit diagram valid for your machine is located in the motor switch box 8 6 HUMMEL ELF 2 2 kW 230 V 50 CPS single phase AC motor CIRCUIT DIAGRAM...

Page 32: ...liary winding temperature switch operation motor 2 2 kW 220 230 V 60 CPS The circuit diagram valid for your machine is located in the motor switch box 8 6 HUMMEL ELF single phase AC motor CIRCUIT DIAG...

Page 33: ...mperature switch operation motor 2 9 kW 220 V 60 CPS USA version The circuit diagram valid for your machine is located in the motor switch box 8 6 HUMMEL ELF single phase AC motor fuse 6 2 A fuse 6 2...

Page 34: ...34 SPARE PARTS 10...

Page 35: ...w 36 100 33 01 100 Bracket 37 0933 1008 022 Hexagonal head screw 38 100 33 02 100 Grip 39 7337 1005 033 Rivet 40 100 01 01 100 Bumper felt 41 100 01 02 100 Sealing felt 42 9021 1005 000 Washer 43 0933...

Page 36: ...36 SPARE PARTS 10...

Page 37: ...0 011 Strain relief ring 13 100 20 26 100 Cable support complete 15 100 20 01 200 Guide tube 102 20 01 200 Guide tube USA 100 20 00 200 Guide tube complete 102 20 00 200 Guide tube USA complete 100 21...

Page 38: ...38 SPARE PARTS 10...

Page 39: ...19 100 04 25 100 Tension spring complete with screw 20 100 04 06 200 Notch plate 21 7500 1005 012 Lens head screw 22 100 04 02 100 Spring tensioner complete 23 100 05 00 200 Lateral wheel complete 24...

Page 40: ...40 up to May 2000 from May 2000 Please state the machine number with each order SPARE PARTS 10...

Page 41: ...0 0980 1008 000 Nut 21 100 45 61 105 Roundhead screw 22 100 45 37 100 Double arm complete 23 100 02 05 100 Hexagonal nut right hand thread 24 100 36 00 100 V belt pulley 25 0472 0047 000 Circlip 26 60...

Page 42: ...42 SPARE PARTS 10...

Page 43: ...025 Key 18 100 65 06 100 Motor pulley 19 000 10 10 061 Lock washer 20 0912 1006 014 Hexagonal socket head screw 21 100 65 80 105 Eye bolt 22 100 65 35 100 Motor tensioner 23 0933 1008 022 Hexagonal h...

Page 44: ...44 SPARE PARTS 10...

Page 45: ...wrench 13 000 01 30 011 Tool bag empty 100 98 00 100 Tool bag complete 20 720 00 00 200 Trolley TRANSCART complete 21 000 01 10 011 Foldable earmuff type MUSIMUFF 22 000 01 10 021 Foldable earmuff typ...

Page 46: ...46 NOTES...

Page 47: ..._ Signature and stamp Date of test and service ____________________ Signature and stamp Date of test and service ____________________ Signature and stamp Date of test and service ____________________...

Page 48: ...systems for equipment with rated current up to and including 16 A The following documents are provided Overall plan of the machine with control circuit diagrams Detailed complete plans to permit revie...

Reviews: