9
PREPARING THE MACHINE
9
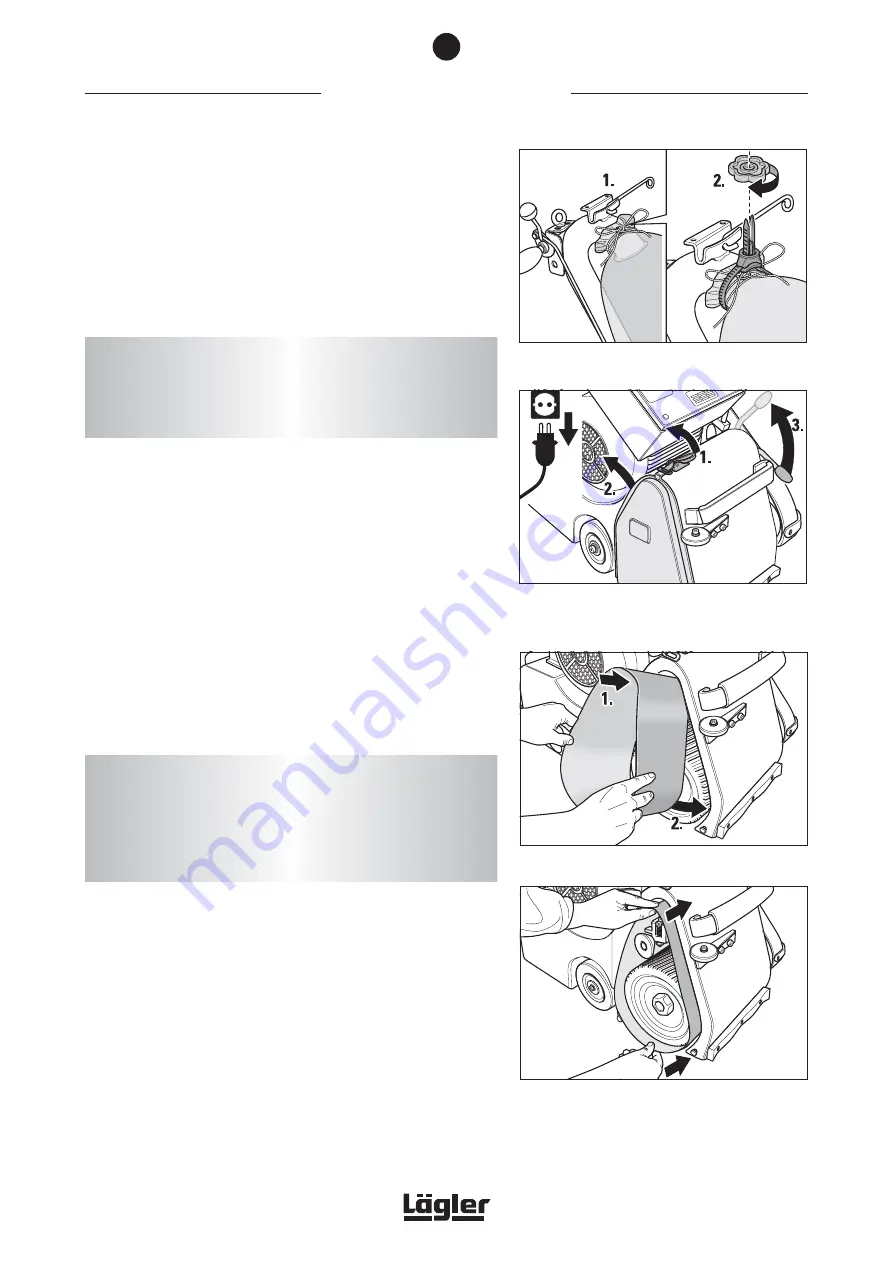
Position the sanding belt on the tensioning roller and push it
over the sanding drum (Fig. 8).
10
Position the sanding belt so that it evenly covers the sanding
drum (Fig. 9).
11
To tension the sanding belt, press the tensioning lever down-
wards (Fig. 10).
12
Connect the motor cable plug to the extension cable.
13
Plug in the extension cable to a adequately fused 230 V mains
socket with PE contacts.
14
Before closing the housing opening by replacing the side
cover, check the precise tracking of the sanding belt.
While
doing so, the sanding drum must be raised off the floor!
Switch
on the machine for around 2 seconds with the switch position
-TEST- and check the sanding belt tracking.
Should the belt require readjustment, please check
Section
6.3,
Checking sanding belt regulation.
15
Close the housing opening with the side cover.
The machine is now ready for operation.
Before working with the machine for the first time, operating staff
must be adequately instructed!
Fig. 6
Mount the dust bag without creasing using the
cord and MultiClip.
Fig. 7
Release the cover lock, remove the side cover
and lower the tensioning roller by pulling up the
lever.
Fig. 8
Mount the sanding belt.
Fig. 9
Push the sanding belt far enough over the sanding
drum and tensioning roller so that the sanding
drum is fully covered by the belt.
ATTENTION!
Never switch on the motor before tensioning the sanding belt!
Never switch on the motor unless the sanding drum is raised
off the floor!
ATTENTION!
Never reach into the area of the belt while it is running. During
the test run, ensure that no objects randomly positioned in the
vicinity can be picked up by the sanding belt. This could result
in serious injury or damage to the machine!
3
Summary of Contents for HUMMEL
Page 34: ...34 SPARE PARTS 10...
Page 36: ...36 SPARE PARTS 10...
Page 38: ...38 SPARE PARTS 10...
Page 40: ...40 up to May 2000 from May 2000 Please state the machine number with each order SPARE PARTS 10...
Page 42: ...42 SPARE PARTS 10...
Page 44: ...44 SPARE PARTS 10...
Page 46: ...46 NOTES...


