background image

-9-

www.igm.cz

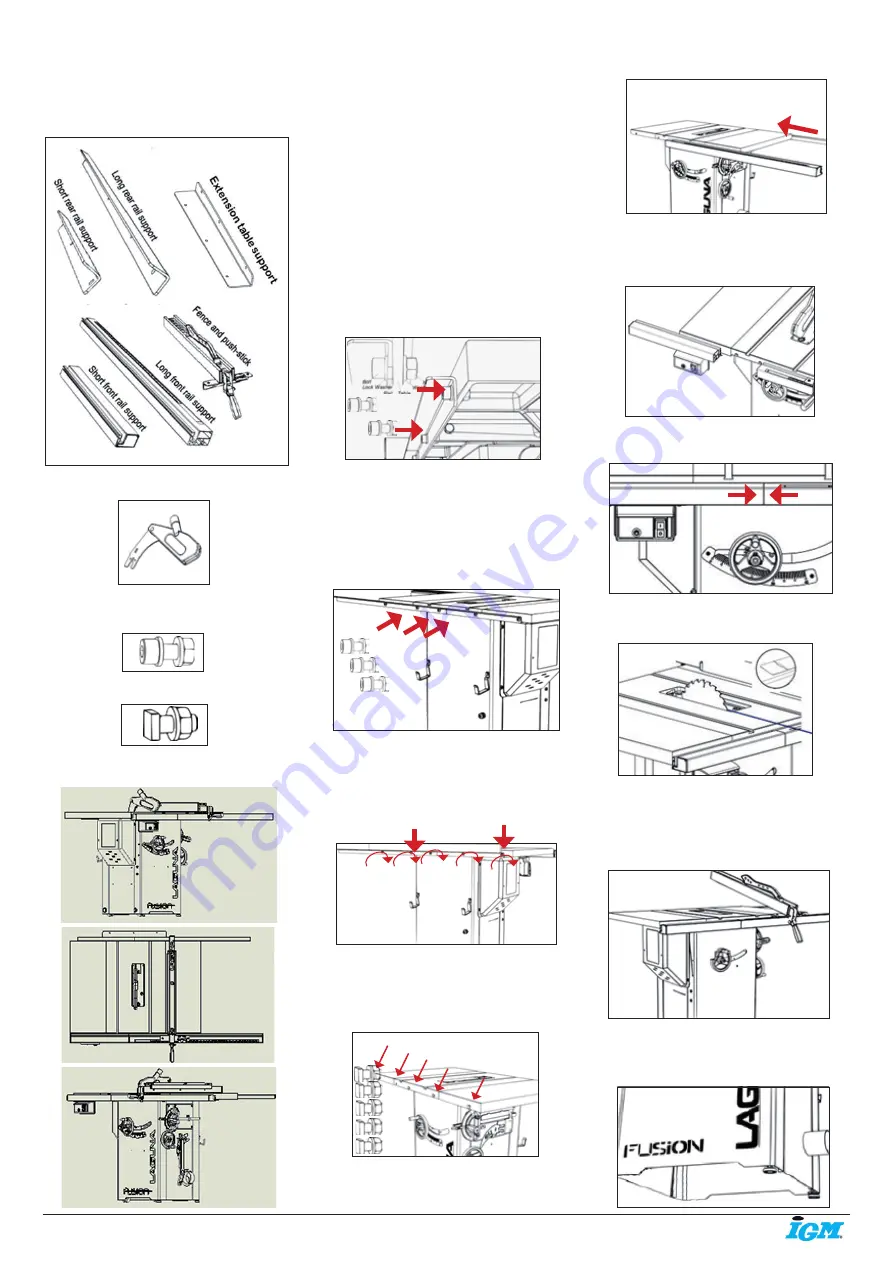
6.3 Loose Parts & Overview  

Your new machine has been mostly assembled 

at the certified ISO 91001 factory where it was 

made. Some parts must be assembled by the 

purchaser. Please read all steps first before 

proceeding with step one.

Blade Guard

(5) M8x1.5+ lock nut

(5) Square head 8x1.5 + nut

Fence hooks (step 2)

6.4 General Setup 

1. Attach the short rear fence support

2. Attach the long rear fence support

3. Level the rear rails and fasten

4. Attach T-Slot bolts to front table

5. Insert long front rail fence support

6. Insert short front rail and switch

7. Join front fence supports

8. Align the entire front rail to blade mark

9. Level and fasten the front rail

10. Insert fence

11. Level the saw by adjusting casters

1. Attach short rear fence support 

Use the supplied wrench and Alan key to 

loosely fasten (2) bolts, lock washers, washers, 

and nuts to the short rear fence guide and 

the back left of the table. STOP BEFORE 

TIGHTENING: Keep bolts loose until entire rail 

assembly is in place to properly level rail.

2. Attach short rear fence support

Repeat step 1 for the longer rear fence section 

with (3) bolts, lock washers, washers, and nuts. 

Use the same assembly diagram in Step 1.

NOTICE: If the fence hooks are not yet 

installed, now is a good time to do so.

3. Attach short rear fence support 


To level the rear fence with the table top, 

place a rigid straight edge on top of the rails. 

Apply downward force at both arrow indicators 

and simultaneously tighten the bolts with the 

supplied Allen key and wrench.

4. Attach T-slot bolts to front table 

Loosely fasten the (5) square headed bolts, (5) 

washers, and (5) nuts. A couple revolutions of 

the bolt will be tight enough. Prepare to insert 

the (2) aluminium front rail sections.

5.Insert the long front fence support

Insert the long Front Rail. STOP BEFORE 

TIGHTENING: Keep these bolts loose until the 

entire rail assembly is in place to properly level 

the rail.

6. Insert short rail and switch

Insert the short front rail into the first square 

head bolt. IMPORTANT: Insert the switch 

assembly before joining the two front rail 

pieces. STOP BEFORE TIGHTENING.

7. Join front fence supports

Align the pins and join the two front rail pieces 

and firmly push together.

8. Align the front rail with blade

Using the blade notching on the measuring tape, 

align the entire front rail section to the blade.

9. Level and fasten front rail

To level the front rail sections to the table top, 

use a ridged straight edge atop the loosely fit rail 

sections. Apply downward force to the straight 

edge while keeping the two sections firmly 

together. Simultaneously fasten down the bolts.

10. Install the fence

Install the fence by placing the front end 

first. Be sure that the handle is in the open, 

unlocked, position prior to installing.

Summary of Contents for Fusion 1

Page 1: ...ww lagunatools com Distributor IGM n stroje a stroje s r o Ke Kopanin 560 252 67 Tuchom ice Czech Republic EU Phone 420 220 950 910 E mail sales igmtools com Website www igmtools com 2022 02 21 151 Fu...

Page 2: ...2 www igmtools com...

Page 3: ...3 www igmtools com...

Page 4: ...Power Transfer Single V Ribbed 142J FJ Power Cord 2 m H07RNF Power Plug Included CEE 7 7 Breaker Recommendation 16 A tripping characteristic C 16 1 C General Footprint LxW 503 x 520 mm Overall Dimens...

Page 5: ...to become complacent and ignore tool safety principles A careless action can cause severe injury within a fraction of a second Know your machine Read and understand the owner s manual and labels affi...

Page 6: ...blade binding and kickback Feed workpiece at an even pace Do not bend or twist the workpiece If jamming occurs turn the tool off immediately unplug the tool then clear the jam Jamming the saw blade by...

Page 7: ...an increased risk of electric shock if your body is earthed or grounded Do not modify the plug Do not remove any of the prongs attached to the proper plug for the machine Use only 3 wire extension co...

Page 8: ...r tilt control The disc tilt control is on the right side of the cabinet Clockwise left counterclockwise Fence clamp lock The fence clamp securely locks the fence anywhere on the rail by a cam action...

Page 9: ...tach short rear fence support To level the rear fence with the table top place a rigid straight edge on top of the rails Apply downward force at both arrow indicators and simultaneously tighten the bo...

Page 10: ...the guard insert 5 Lock the blade guard 6 Reinstall throat plate CAUTION Make sure the blade guard is in line with the blade If it is not in line please see the Adjustment section 3 Insert the blade...

Page 11: ...ew as needed 5 Tighten the view screws Place fence in fence guide WARNING MAKE SURE SAW IS UNPLUGGED With the blade in a high position bring the fence close to but not touching the blade Use a folded...

Page 12: ...head driver There are 4 screws in total holding on the motor cover A dial indicator on a mitre gauge Best A dedicated saw dial indicator Such as this one by Iagging 1 Un plug the tablesaw 2 Take initi...

Page 13: ...de accessories 3 Remove the motor cover 4 Remove the dust shroud 5 Loosen the Belt adjustment bolt and loosen belt by raising motor 6 Remove belt NOTE you may need to lower the arbor height to access...

Page 14: ...f plywood lengthwise to reduce its width is called ripping To rip stock hold the work with both hands pushing it into the blade as well as firmly against the rip fence so that it is cut straight Never...

Page 15: ...a suitable jig 8 5 Bevel cross cutting This procedure is the same as cross cutting except that the blade is set to an angle other than 0 After changing the bevel angle verify the alignment of the guar...

Page 16: ...rinding loose shaft requires bearing replacement Machine trips the overload or feels underpowered during operation Possible Causes 1 Feed rate cutting speed too fast 2 Workpiece material unsuitable fo...

Page 17: ...17 www igm cz...

Page 18: ...5H 1 72 008316 200 Lock Nut M10 1 5P 17B 8H 1 73 006001 075 Flat Washer 10 3 22 2 0t 1 74 048701 101 Square Screw M8 1 25P 20 6 92 920703 001 Fixing Knob 1 97 250406 615 Bushing 1 115 001801 102 CAR...

Reviews: