-71-
www.igmtools.pl
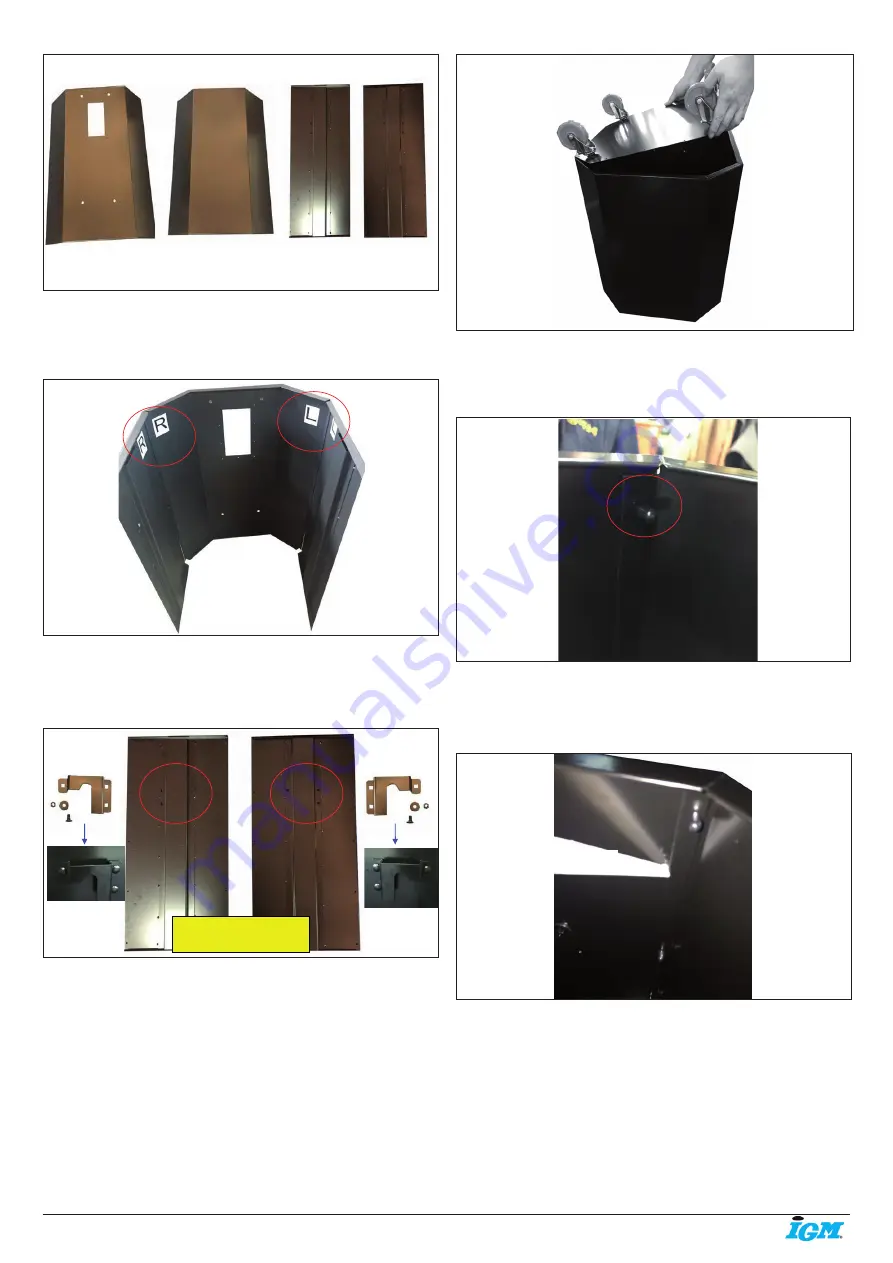
Rys. 25
Krok 21: Pojedyńcze elementy oznaczone są literą R (prawa strona) i
literą L (lewa strona), dzięki czemu wiesz, jak prawidłowo złożyć pojemnik
na odpady. Zmontuj go zgodnie ze zdjęciem znajdującym się poniżej.
Rys. 26
Krok 22: Lewa i prawa część ma 3 nawiercone wcześniej otwory.
Weź odpowiednią płytę boczną i zabezpiecz ją na zewnątrz panelu.
(Zdjęcie pokazuje wnętrze panelu) za pomocą śrub (6) 6 mm * 12,7 mm,
podkładek (6) 6 mm * OD19 * 2T (6) i nakrętek (6) 6 mm.
Rys. 27
Krok 23: Za pomocą śrub M4 * 12 mm przykręć podstawę pojemnika na
odpady wraz z kołami do dolnej strony pojemnika.
Rys. 28
Krok 24: Przykryj wystające końce śrub po wewnętrznej stronie pojemnika
odpadowego
plastikowymi zaślepkami
(40). Ten krok jest bardzo
ważny, aby zapobiec uszkodzeniu worka na odpady przez ostre gwinty
śrub.
Rys. 29
Krok 25: Aby uszczelnić pojemnik na odpady i zapobiec wyciekom
powietrza po zakończeniu montażu nałóż silikon na złącza znajdujące się
wewnątrz pojemnika, łącznie z podstawą.
Rys. 30
Krok 26: Na dolnej i górnej części pojemnika na odpady, na części z
przezroczystym okienkiem umieść uchwyty i przymocuj je za pomocą śrub
krzyżowych (4), podkładek (4) 8 mm * OD23 * 2T i nakrętek (4) 8 mm.
3HP Mobile Dust Cyclone Manual
24
Step Twenty:
Take the Octagon drum side panels and assemble together,
secure with (40) M4*12mm sheet metal thread bolts. Take note of the left and
right panels; do not assemble the incorrect sides. Refer to the next step..
Step Twenty One: The panels have labels R and L on them to show you which
panels should be bolted together to prevent any confusion. Please assemble
them together per photo below.
Pohled zevnitř.
Widok od wewnątrz
3HP Mobile Dust Cyclone Manual
25
Step Twenty Two: Both the left and right side lift panels have three bolt holes on
them. Take the matching side plate and secure to the outside of the panel.
(Photo shown is the inside of the panel) using (6) 1/4”*1/2” carriage bolts, (6)
1/4”*OD19*2t flat washers and (6) 1/4” hex nuts.
Step Twenty Three:
Take the Octagon base panel with wheels and secure on to
the bottom of the drum using M4*12mm sheet metal thread bolts.
View of side panels
from inside out.
3HP Mobile Dust Cyclone Manual
26
Step Twenty Four: Take the plastic bolt end caps to cover all the bolt ends on
the inside of the Octagon drum using (40) plastic end caps. This step is
necessary to prevent any injuries caused by the sharp end of the bolts.
Step Twenty Five:
Once completing the assembly, apply silicone to the inside of
the drum including the base to seal and prevent air leakages and air flow loss.
Silicone
Silikon


