-13-
www.igmtools.com
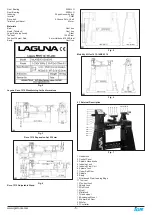
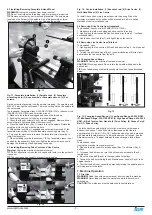
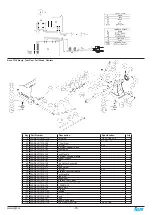
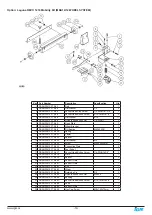
Inventory
Key
Name
Description
2.1
Stationary Wheels
Can be mounted on left or right stand
leg. Must be positioned so that the
machine is off the floor when the foot
pedal is engaged.
2.2
Foot Pedal Assembly
Must be positioned so that the
machine is off the floor when the foot
pedal is engaged.
2.3
Support Plate
Mounts to the (inside) stand leg with
foot pedal assembly (2.2).
2.4
Foot Pedal Caster
Mounts to foot pedal assembly (2.2).
2.5
Lathe Bolts and
Washers
Used to fasten the wheels to the
machine base.
2.6
Foot Pedal Spring
Installs in between the caster (2.4)
and the assembly (2.2).
3
Swivel Axle
Axle that spring (2.6) and caster (2.4)
are installed to.
Setup Procedure
Tools needed: Hex wrench, open ended wrench
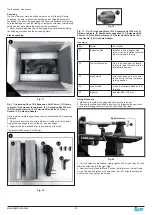
Installing the Stationary Wheels
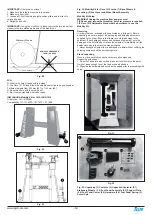
1. Make sure the lathe is unplugged and cannot be turned on.
2. Install the stationary wheels (Key 2.1) to either the left or the right stand
leg with 2 bolts and washers (Key 2.5). TIP Choose more suitable side for
mounting stationary wheels. It is often best to have the foot pedal caster
on the right side and the stationary wheels on the left side.
3. Remove the 2 rubber pads closest to the stationary wheels.
4. Make sure that the wheels are in contact with the floor and in the same
height.
Fig. 33
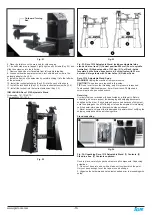
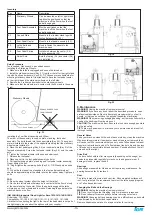
Installing the Foot Pedal Assembly and Wheel
The order of the assembly is: support plate, stand leg, foot pedal
assembly. The bolts thread into the support plate (Key 2.3). The support
plate is installed to the inside of the opposite stand leg that the stationary
wheels were installed to.
5. Place the foot pedal spring (Key 2.6) on the swivel axle (Key 3) of the
foot pedal assembly. Screw the foot pedal caster (Key 2.4) onto the swivel
axle.
6. Tighten the foot pedal caster with open ended wrench.
7. Release the foot pedal.
8. Place one bolt in the foot pedal assembly bolt slot.
9. Put together support plate, stand leg and foot pedal caster assembly.
Finger tighten the bolt.
10. Finger tighten the remaining bolts (Key 2.5). TIP We supply an extra
bolt.
11. When the foot pedal is not engaged, the foot pedal caster wheel
should be approximately at the same level as the rubber pads. Tighten all
bolts.
FAQ
Q: Does the wheel system affect the height of the lathe?
A: No, the two left wheels will always be in contact with the floor but only
at the same level as the caster. When the pedal is engaged the lathe
will prop up on the 3 wheels and is mobile. Releasing the pedal puts the
machine back on the floor.
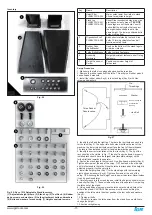
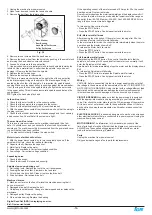
IGM LAGUNA Industrial Flood Light for Revo1836-1412-14BX-18BX
Order code: 151-1836L
Compatibility: 151-1836, 151-18BX, 151-1216, 151-1412, 151-14BX
L-bracket for connecting the light to the rear of the headstock is not part of
the light supply, inquire about the options with your supplier:
Fig. 34
Fig. 35
9. Maintenance
WARNING!
Unplug the machine from power source!
WARNING!
If you have any doubt about the described procedure, seek
professional assistance. Do not attempt any procedure that you feel is
unsafe, or that you do not have the physical capability of achieving.
WARNING!
When removing packaging banding, extreme caution must be
used as the banding will spring when cut.
CAUTION!
The machine is heavy. Ensure that you have enough people to
do the job safely.
TIP
There may be sawdust in or around your new machine as a result of
thorough testing.
General Notes
Keep your machine clean At the end of each work day, clean the machine.
Wood contains moisture. If sawdust or wood chips are not removed they
will cause rust. We recommend that you only use a Teflon based lubricant.
Regular oil attracts dust and dirt. Teflon lubricant tends to dry and has less
of a tendency to accumulate dirt and saw dust. Periodically check that all
nuts and bolts are tight.
Drive Belt
The drive belt should last for many years (depending on the usage) but
needs to be inspected regularly for cracks, cuts and general wear. If
damage is found, replace the belt.
Bearings
All bearings are sealed for life and do not require any maintenance. If a
bearing becomes faulty, replace it.
Rust
The lathe is made from steel and cast iron. All non-painted surfaces will
rust if not protected. We recommend to protect the lathe by applying wax
or a Teflon based lubricant.
Changing the Belt and the Bearings
WARNING!
Unplug the machine from power source!
TIP
Do not over torque the threading, only firm pressure is required.
TIP
Do not attempt to remove pulleys before removing set screws.
WARNING!
Changing belt and bearings can be a difficult task and should
be performed by an authorized repair station.
Remove headstock and take it to a repair station for servicing.
Stationary Wheels
Same Spacing
REMOVE RUBBER PADS
FROM THE BASE


