background image


6


2021 LAING All right 

Know Master 

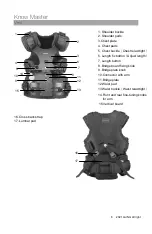
Vest


1. Shoulder buckle 

2. Shoulder pads 

3.Chest plate 

4. Chest pads 

5. Chest buckle

Chest relax/tight


6. Length fix button

Adjust length


7. Length button 

8. Bridge board fixing knob 

9. Bridge plate knob 

10.Connector with arm 

11.Bridge plate 

12.Waist pad 

13.Waist buckle

Waist relax/tight


14.Front and rear fine-tuning knobs    

for arm 

 15.Vertical board 


16. Cross back strap 
17. Lumbar pad


10 

11 

12 

13 

16 

17 

14 

15 

Summary of Contents for MASTER

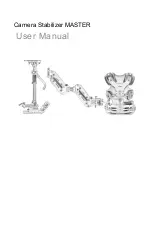
Page 1: ...Camera Stabilizer MASTER User Manual ...

Page 2: ...er Windows users can use the shortcut key Ctrl F and Mac users can use Command F to search for keywords Click the Catalog to jump Users can understand the content structure of the document through the catalog and click on the title to jump to the corresponding page Print document This document supports high quality printing ...

Page 3: ...k all the items in the Master package according to the Item List Please read the User Manual carefully and Watch the instructional video on the Master product page of the official website http www szlaing com Read the Disclaimer and Safe Operation Guidelines carefully to understand your legal rights and responsibilities If you have any questions or problems in the process of installing using or ma...

Page 4: ... function overview 9 Arm function overview 9 Preparation 13 Install the docking bracket 13 Install battery and monitor 13 Install the camera 14 Adjust Balance 15 Preparation for adjustment 15 Static balance adjustment steps 15 Dynamic balance adjustment steps 15 Wearing of the vest 16 Wearing steps 16 Install and remove of the arm 16 Installation and debugging steps 16 Precautions for use 17 Maint...

Page 5: ...ns to meet your high quality needs for film and TV production Structure Steadicam is mainly composed of three parts that is shock absorbing arm sled and metal vest The shock absorbing arm isolates the photographer from the camera so that the vibration generated by the movement is absorbed by the spring to reduce the up and down vibration of the camera The sled can effectively reduce the shaking of...

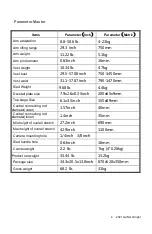
Page 6: ... Weight 9 68lb 4 4kg Dovetail plate size 7 9x2 6x0 35inch 200x65x9mm Top stage Size 6 1x3 5inch 155x89mm Central connecting rod diameter outer 1 57inch 40mm Central connecting rod diameter inner 1 4inch 35mm Min height of overall stretch 27 2inch 690mm Max height of overall stretch 42 9inch 1100mm Camera mounting hole 1 4inch 3 8inch Sled handle hole 0 63inch 16mm Counterweight 2 2 lb 1kg 4 0 25kg...

Page 7: ... set 1 Standard 4 Docking bracket set 1 Standard 5 Damping arm connector set 1 Standard 6 Accessories set 1 1 6MM hexagon wrench for adjusting the arm 1pc flat head cross screwdriver 1pcs 2 Screw 3 8x2 1 4x2 M6X60mmx2 3 Power D TAP to D TAP 2pcs BNC video cable SDI to SDI 2pcs 4 Counterweight 0 25kgx4 pcs 5 Pole ZJG05 2pcs Standard 7 Packing box pcs 1 Safety protection aluminum box Standard ...

Page 8: ...x tight 6 Length fix button Adjust length 7 Length button 8 Bridge board fixing knob 9 Bridge plate knob 10 Connector with arm 11 Bridge plate 12 Waist pad 13 Waist buckle Waist relax tight 14 Front and rear fine tuning knobs for arm 15 Vertical board 16 Cross back strap 17 Lumbar pad 1 2 4 3 5 8 10 9 6 7 11 12 13 16 17 14 15 ...

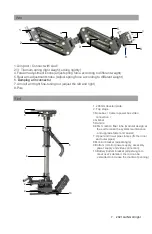
Page 9: ...ht 8 Pole Sled 1 200mm dovetail plate 2 Top stage 3 Nosebox Camera power box video connection 4 Gimbal 5 Handle 6 40mm carbon fiber tube modular design at the end to make the system maintenance and upgrade faster and easier 7 Upper and lower pipe clamps fix the inner and outer pipes 8 Monitor bracket adjust angle 9 Bottom monitor power supply accessory power supply and video connection 10 Battery ...

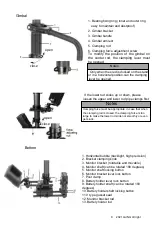
Page 10: ...nsion without gasket Front and back left and right adjustment Turn the knurled knob marked Fore Aft clockwise to move the camera dovetail back Turn it counterclockwise to move forward Before insert the dovetail board set the clamping lever to the unlock position after the adjustment is completed set the clamping lever to the lock position Turn the knurled knob marked R L clockwise to move the came...

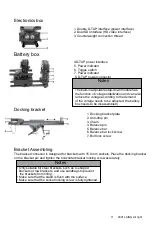
Page 11: ...r rod pipe clamps first The clamping force must be appropriate in case that when the clamping rod is closed the clamping force is too large to make the lower rod slide not smoothly or even get stuck Bottom 1 Horizontal bubble backlight high precision 2 Bracket clamping knob 3 Monitor bracket rotatable and movable 4 Monitor shaft can be rotated 180 degrees 5 Monitor shaft locking button 6 Monitor b...

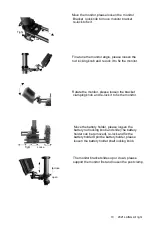
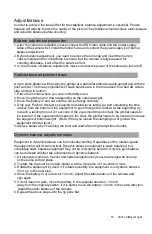
Page 12: ...onitor Rotate the monitor please loosen the bracket clamping knob and re lock it to fix the monitor Move the battery holder please loosen the battery rod locking knob and slide The battery holder can be removed re lock and fix the battery holder Spin the battery holder please loosen the battery holder shaft locking knob The monitor bracket slides up or down please support the monitor first and loo...

Page 13: ...eds to be adjusted the battery box needs to be disassembled Docking bracket 1 Docking bracket plate 2 Anti drop pin 3 Chain 4 Balance pin 5 Balance bar 6 Balance bar lock screw 7 Bolt lock screw Bracket Assembling The bracket connector is designed for brackets with 15 9 mm sockets Place the docking bracket on the bracket pin and tighten the horizontal bracket locking screw accurately Only suitable...

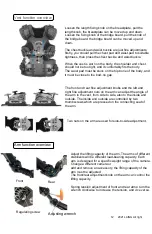
Page 14: ...he front and rear fine adjustment knobs and the left and right fine adjustment nuts on the arm can adjust the angle of the arm to the vest from side to side also to the inside and outside The inside and outside are controlled by two thumbscrews which are pressed on the connecting seat of the arm Two nuts on the arm are used for side to side adjustment Arm function overview Adjust the lifting capac...

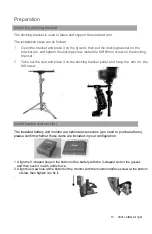
Page 15: ...2 Take out the sled and place it on the docking bracket pallet and hang the arm on the M6 screw Install battery and monitor The installed battery and monitor are optional accessories you need to purchase them please confirm whether these items are included in your configuration 1 Align the V shaped plug on the bottom of the battery with the V shaped slot on the gusset and then push it in with a li...

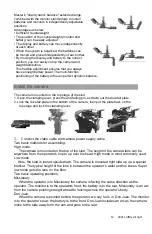
Page 16: ...bottom of the camera then put the plate back on the top stage and lock the clamping lever 3 Connect the video cable and camera power supply cable Two basic methods for assembling High mode The camera is mounted on the top of the sled The height of the camera lens can be anywhere from the operator s hop to up over his head High mode is most commonly used Low mode Here the sled is turned upside down...

Page 17: ...alculating the time it takes from the bottom of the equipment to pass through the vertical At the beginning try to reach a landing time of 2 3 seconds If the equipment drops too fast the gimbal needs to be lowered If the equipment fall speed is too slow the gimbal needs to be risen and increase the equipment bottom weight Note When you loosen the clamping rod of gimbal the equipment must be level ...

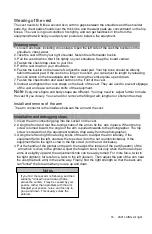
Page 18: ...t fit you closely You can add or remove the filling at will lengthen or shorten the strap Install and remove of the arm The arm connector is the interface between the arm and the vest Installation and debugging steps 1 Insert the arm connecting plug into the socket on the vest 2 Using the front and rear fine tuning knobs of the arm to fix the arm in place When the top screw is turned inward the an...

Page 19: ...tage and component installation place should be kept clean If there is debris or oil residue on the connection of the equipment after disconnecting the power wipe it with a damp cloth dampened with a neutral detergent Do not wipe with a rough surface or corrosive detergent or scrape with a knife to avoid damage the protective layer of the surface 4 Grease to the rotating part of the gimbal and arm...

Page 20: ...2021 LAING All right This manual is subject to update without notice You can check the latest version of User Manual on the official website of Luanyi http www szlaing com ...

Reviews: