background image

15

ELECTRICAL CONNECTIONS

This appliance is fitted with a fused three-pin plug to BS1363 which is suitable for use 
in all homes fitted with sockets to current specifications. If the fitted plug is not suitable 
for your socket outlets, it should be cut off and carefully disposed of. To avoid an electric 
shock, do not insert the discarded plug into a socket.

This product is a Class 2 electrical appliance and does not include an earth wire.
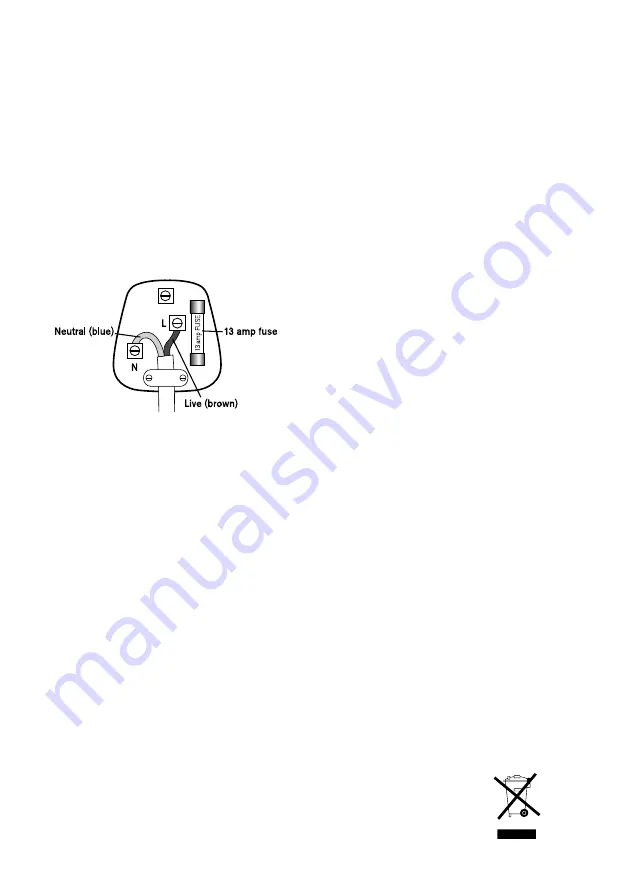
FITTING A NEW PLUG

If for any reason you need to fit a new plug, the flexible mains lead must be connected 
as shown here. The wires in the mains lead fitted to this appliance are coloured in 
accordance with the following code:

Connect 

BLUE

 to Neutral (N)

Connect 

BROWN

 to Live (L)

13 amp fuse to be used

If the colours of the wires in the mains lead of this appliance do not correspond with the 
coloured markings identifying the terminals in your plug, proceed as follows. The wire 
which is coloured blue 

MUST

 be connected to the terminal which is marked with the 

letter N (Neutral). The wire which is coloured brown 

MUST

 be connected to the terminal 

which is marked with the letter L (Live).

Before refitting the plug cover, check that there are no cut or stray strands of wire inside 
the plug. Use a 13 amp BS1362 fuse. Only BSI or ASTA approved fuses should be used. If 
you are at all unsure which plug or fuse to use, always refer to a qualified electrician.

Note:

 after replacing or changing a fuse on a moulded plug which has a fuse cover, the 

cover must be refitted to the plug; the appliance must not be used without a fuse cover. 
If lost, replacement fuse covers can be obtained from an electrical shop. This appliance 
complies with the following EU Directives: 2014/35/EU (Low Voltage Directive) and 
2014/30/EU (EMC Directive).

RECYCLING YOUR ELECTRICALS

Along with many other high street retailers, Lakeland has joined a 
scheme whereby customers can take their unwanted electricals to 
recycling points set up around the country.

Visit

 www.recycle-more.co.uk 

to find your nearest recycling point.

Summary of Contents for 31789

Page 1: ...INSTRUCTION BOOKLET MODEL 31789 2 IN 1 HAND AND STAND MIXER...

Page 2: ...nto the bowl and the machine does the hard work for you Versatile attachments for a varied range of baking tasks A mixing plate to help get an even mix add to the bowl when using as a stand mixer to s...

Page 3: ...sembling your 2 in 1 Hand and Stand Mixer and using for the first time 8 10 Instructions for use 11 A guide to speed settings 12 Hints and tips 13 Frequently asked questions 14 Care and cleaning 14 El...

Page 4: ...4 PRODUCT FEATURES 1 Hand mixer 2 Beater hook holes 3 Mixer cradle 4 Mixer release button 5 Cradle release button 6 Stand 6 5 3 4 2 1...

Page 5: ...5 7 Beater eject button 8 Speed switch 9 Turbo button 10 Cord and plug Accessories 11 Mixing bowl 12 Mixing plate 13 Beaters 14 Dough hooks 15 Spatula 13 12 11 14 15 7 8 9 10 11...

Page 6: ...for noticeable signs of damage Do not use if damaged or has been dropped In the event of damage or if the appliance develops a fault contact the Lakeland customer care team on 015394 88100 Do not use...

Page 7: ...isk of suffocation keep these bags out of reach of babies and children These bags are not toys Avoid contact with moving parts To avoid the risk of injury and damage to the appliance do not put your h...

Page 8: ...in warm soapy water rinse and dry thoroughly These are all dishwasher safe Make sure that all parts are clean and dry before assembling the product WARNING Do not insert the plug into an electrical ou...

Page 9: ...nd raise the cradle Place the mixing bowl onto the base of the stand twisting it clockwise until it locks into the base of the stand Insert the mixing plate over the edge of the mixing bowl locating t...

Page 10: ...l is click into position Attach the hand mixer to the stand by placing it onto the cradle ensuring it locks into place Ensure the beater hook with the plastic gear sits into the cradle with the corres...

Page 11: ...the release button on the stand and lower the mixer until it clicks into place Plug in the 2 in 1 Hand and Stand Mixer and switch on at the socket Use the speed switch sliding sideways to select your...

Page 12: ...speeds for combining dry ingredients with liquid and rubbing fat into flour for pastry Beaters 3 5 minutes Use medium to higher speeds for mixing cakes whipping cream meringues batters eggs and cream...

Page 13: ...ove the mixer from the stand and use as a hand mixer To prevent splattering and flour dusting lower the beaters hooks fully into the mixture before switching the mixer on When switching it off allow t...

Page 14: ...ct a lower speed and fully lower the beaters into the mixture before starting to mix CARE AND CLEANING Switch off and unplug the 2 in 1 Hand and Stand Mixer at the socket before cleaning and when not...

Page 15: ...wire which is coloured blue MUST be connected to the terminal which is marked with the letter N Neutral The wire which is coloured brown MUST be connected to the terminal which is marked with the let...

Page 16: ...Lakeland Alexandra Buildings Windermere Cumbria UK LA23 1BQ Tel 44 0 15394 88100 www lakeland co uk...

Reviews: