background image


Rev 05.12 

COASTLINE ONE DOOR QUADRANT ENCLOSURE  


Installation / Maintenance Instructions


Rev 01.19 

Summary of Contents for COASTLINE ONE DOOR QUADRANT ENCLOSURE

Page 1: ...Rev 05 12 COASTLINE ONE DOOR QUADRANT ENCLOSURE Installation Maintenance Instructions Rev 01 19...

Page 2: ...th Under no circumstances should abrasive caustic or scouring products be used Cleaning products should have pH value 4 8 DO NOT use spray leave type cleaning products Non compliance with these cleani...

Page 3: ...ocks pair each Cover Caps Stiffener frame corners 2x 3 5 x 10 pan head self tapping screw 8x Wall Profile 2x wall side see fig D Fixed Panel Sub Assy 1x flat 1x curve glass vertical frame 3 5 x 40mm p...

Page 4: ...sides See Fig A prior to fitting enclosure DO NOT SEAL BASE WALL EDGES UPTO A FITTED ENCLOSURE SIZE Adjustment A X Wall Profile Position outside 800 080 765 795mm 780mm 900 090 865 895mm 880mm 100 10...

Page 5: ...orstops If necessary remove refit as shown pilot hole glazing block glass Glazing Block If necessary remove refit as shown Glazed Corners Assemble glazing seals onto glass end as shown Check glazing b...

Page 6: ...ith frame in desired position from inside enclosure using wall profile holes as a guide drill dia 3mm pilot holes affix frame to wall mounts with 8off 3 5 x 10 self tapping screws Carefully orientate...

Page 7: ...ot fit cover at this stage Bottom Wheel Assemble with push button uppermost Fully tighten clamp screw fit cover Right hand shown reverse for Left hand Assemble handle to glass as shown grubscrews to i...

Page 8: ...doors into enclosure engage top wheels into wheel groove If necessary loosen but do not remove centre screw to permit engagement Immediately after all wheels are correctly engaged fully tighten centre...

Page 9: ...FIT EDGE MAGNETIC SEALS F Fit edge seals to leading edges of fixed panels trailing edges of doors Fit magnetic seals to leading edges of doors as shown SEALS MAY BE WETTED TO EASE ASSEMBLY...

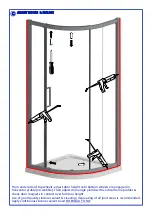
Page 10: ...profile no wobble Then adjust door angle plumb with vertical frame profiles check door magnets in contact over full door height Use of good quality silicone sealant cleaning degreasing of all joint a...

Page 11: ...scribed in these instructions relies on a continuous seal being applied between shower walls tray before installing the enclosure see fig A it ensures a watertight seal around the perimeter of the enc...

Reviews: