background image

- 4 -

Buttons and camera functions

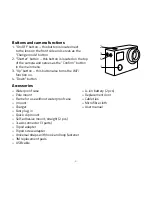
1.  “On/Off” button – this button is located next  

to the lens on the front side and serves as the 

“Change mode” button.

2.  “Shutter” button – this button is located on the top 

of the camera and serves as the “Confirm” button  

in the main menu.

3.  “Up” button – this button also turns the WiFi 

function on.

4. “Down” button

4

1

3

2

Accessories


Waterproof case


Pole mount


Frame for use without waterproof case


J mount


Charger


Fast plug-in


Quick-clip mount


Self-adhesive mount, straight (2 pcs)


3-axis connector (3 parts)


Tripod adapter


Tripod screw adapter


Universal straps with hook and loop fastener


3M replacement pads


USB cable


Li-ion battery (2 pcs)


Replacement door


Cable ties


Microfibre cloth


User manual

Summary of Contents for X8.1 Sirius

Page 1: ... 1 LAMAX X8 1 Sirius Waterproof up to 30 m Native 2 7K video at 30 fps Photos at a resolution of 16 MP WiFi ...

Page 2: ... limit the functionality of the camera and it may not be able to record in all modes and at all resolutions 5 Do not place the microSD card near magnetic fields or in places where static electricity may occur This will prevent any accidental loss of data 6 If the device overheats produces smoke or a suspicious odour whilst charging imme diately unplug the device and stop charging 7 When charging k...

Page 3: ...t a resolution of 2 7K at 30 fps Full HD at 60 fps amd HD at 120 fps Wide angle 170 lens 16 MP photos Wide selection of resolutions for video and photo Time lapse photo and time lapse video modes Wide range of accessories included making it easy to shoot anytime and anywhere Support for microSDHC and microSDXC cards up to 64 GB U3 cards recommended USB and HDMI connectivity Integrated WiFi for con...

Page 4: ...menu 3 Up button this button also turns the WiFi function on 4 Down button 4 1 3 2 Accessories Waterproof case Pole mount Frame for use without waterproof case J mount Charger Fast plug in Quick clip mount Self adhesive mount straight 2 pcs 3 axis connector 3 parts Tripod adapter Tripod screw adapter Universal straps with hook and loop fastener 3M replacement pads USB cable Li ion battery 2 pcs Re...

Page 5: ...ing to a PC or using the AC adapter b In a vehicle the camera can be charged sing the cigarette lighter adapter c Whilst charging you can still shoot video or take photos except when charging via PC d Camera may also be charged when turned off Note Never charge unattended If device overheats produces smoke or suspicious odour when charging immediately unplug and stop charging 4 Turning the camera ...

Page 6: ...e recording time To stop recording press the Shutter button again 7 Photo mode Switch the camera to photo mode by pressing the On Off button A camera icon will appear on the upper left corner of the display To take a photo press the Shutter button There will be a shutter sound and the screen will flash ...

Page 7: ...es at preset intervals allowing you to create attractive time lapse shots 4 Loop recording when activated the camera records videos of a predetermined length When the memory card is full the most recent recordings are recorded over the oldest ones 5 Gyro stabilization enables video stabilization when shooting 6 Record audio allows you to shoot video with or without sound 7 Photo resolution changes...

Page 8: ...vated camera automatically turns off after a selected period of inactivity 21 Time stamp this option enables the date and time to be displayed on the final video or photo 22 Date Time sets the date and time of the camera 23 Delete file deletes the last recorded file or all files 24 Lock file locks the last recorded file or all files Locked files are protected against deletion 25 Exposure adjusts t...

Page 9: ... displayed in the upper corner 32 WiFi name changes the name of the camera WiFi network 33 WiFi password changes the password to access the cameras WiFi network 34 Format formats the inserted card Note Formatting will erase all data on the inserted card 35 Factory settings restores the camera to factory settings 36 Firmware displays actual version of the firmware installed on the camera ...

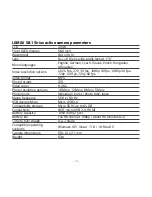
Page 10: ...ideo format MP4 Photo format JPG Video codec H 264 Photo resolution options 16 Mpix 12 Mpix 8 Mpix 5 Mpix Photo mode Individual burst photo time lapse Mains frequency 50 Hz 60 Hz USB devices Micro Micro USB 2 0 Compatibility storage Micro SDHC up to 64 GB Connectivity WiFi micro USB 2 0 HDMI Battery capacity 1050 mAh 2 pcs Battery life Full HD video at 1080p about 90 minutes x 2 Time to fully char...

Page 11: ... time of launch We apologise for any inconve snience How to connect 1 Turn on the camera s WiFi in the menu or by pressing Up button when the camera is in the video or photo mode This is indicated by an icon on the display 2 Turn on the WiFi on your smartphone or tablet and you should see the network X8 1Sirius unless you have changed the network name in the camera WiFi settings To connect to the ...

Page 12: ...edienungsanleitung in Deutsch können Sie von hier runterladen Český manuál ke stažení zde Slovenský manuál na stiahnutie tu Instrukcja obsługi w języku polskim do pobrania tutaj Használati útmutató Naudojimo instrukcija http lamax electronics com x8 1 manuals ...

Reviews: