background image

Lambda Labs - Professional Acoustics                                                                                                                                                                   DH-18 Manual

2.2.


General


Components


2.2


Figure


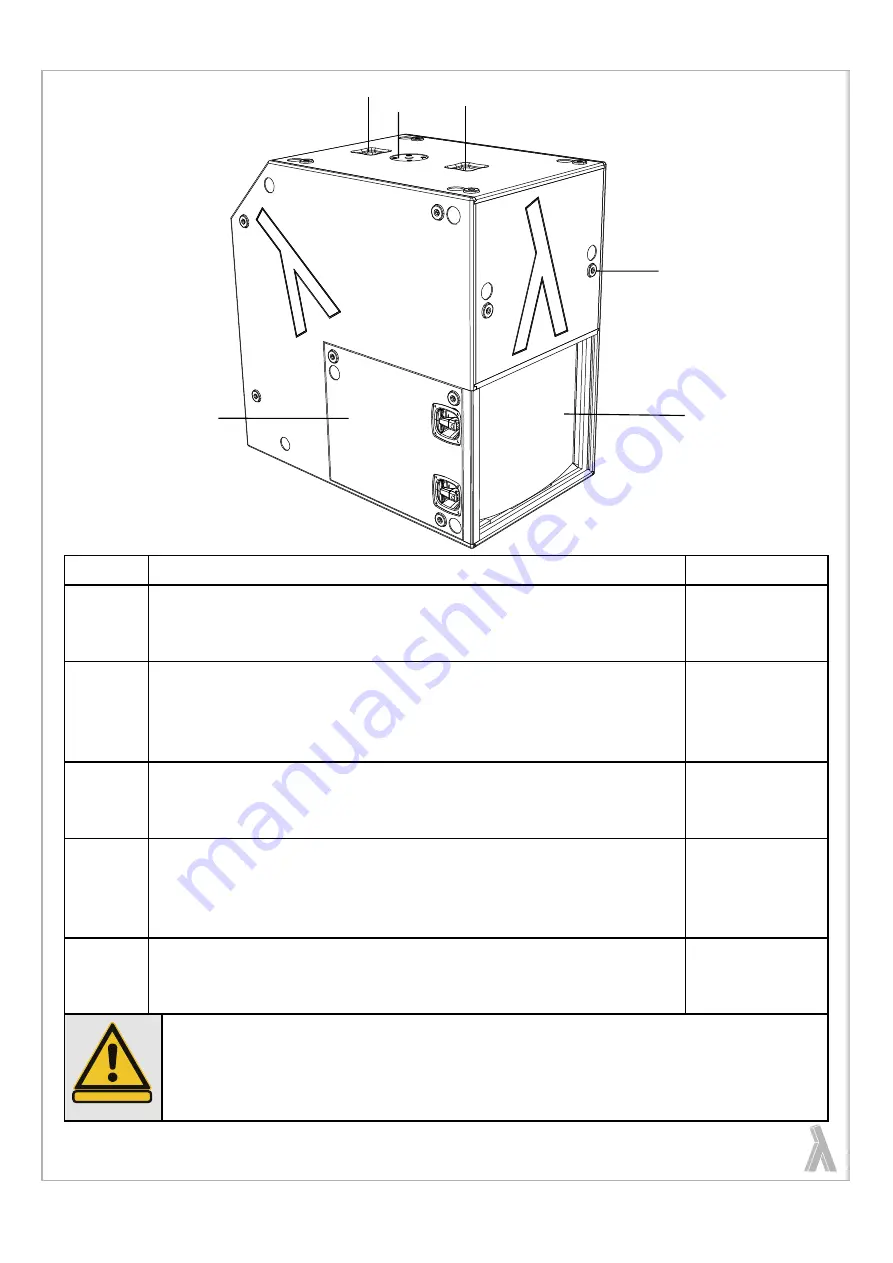
1:


DH-18


Front


Side


www.lambda-labs.com 

 9

a)

b)

d)

PART

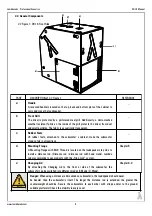
DESCRIPTION of 2.2 Figure 1

REFERENCE

a)

Handle


A


recessed


handle


is


located


on


the


top,


back


and


bottom


plate


of


the


cabinet


to


carry


and


move


the


loudspeaker.

_

b)

Front


Grill


The


driver


is


protected


by


a


perforated


steel


grill.


Additionally,


a


micro-meshed


weather


resistant


fabric


on


the


inside


of


the


grill


protects


the


driver


from


dust


and


small


particles.


The


fabric


is


acoustically


transparent.


_

c)

Rubber


Feets


24


rubber


feets,


attached


to


the


subwoofer`s


cabinet,


make


the


subwoofer


stand


safely


in


all


positions.

_

d)

Mounting


Flange


A


Mounting


Flange


with


M20


Thread


is


located


on


the


loudspeakers


top


side


to


install


a


distance


rod.


(Distance


rod


/


distance


rod


with


hand


crank).


Lambda


Labs


recommends


to


use


products


with


the


„Ring


Lock“


system.


Chapter


5

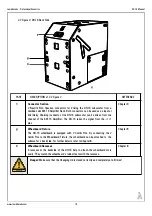
e)

Changing


Lid


By  attaching  the  Changing  Lid  to  the  front  or  side  of  the  subwoofer,  the 
subwoofer can be switched into different modes (S-Mode / D-Mode). 

Chapter


4.3

c )

Danger:


When using a distance rod mounted on subwoofer/s, the loudspeaker should never 

be  heavier  than  the  subwoofer/s  itself.  The  longer  the  distance  rod  is  extended,  the  greater  the 
counterweight  should  be.  Secure  the  subwoofers  to  each  other  with  straps  and/or  to  the  ground/
suitable platforms! Check the stability in every case! 


DANGER!

a)

e)

Summary of Contents for DH-18

Page 1: ...DH 18 Manual Version 1 1 DH 18 Manual Version 1 1 02 2022 2022 Lambda Labs All rights reserved This manual is optimized to save paper and to print 2 pages per DIN A4 sheet...

Page 2: ...ENERAL SAFETY REGULATIONS 4 1 4 EC declaration and conformity 7 2 The DH 18 8 2 1 Technical data overview 8 2 2 General Components 9 3 Cabling 11 4 Changing the DH 18 s mode of operation 11 4 1 Preset...

Page 3: ...Lambda Labs Professional Acoustics DH 18 Manual NOTES www lambda labs com 2...

Page 4: ...l information in this manual has been prepared to the best knowledge and with the utmost care Lambda Labs can not guarantee the accuracy of the documentation in all cases Lambda Labs disclaims any lia...

Page 5: ...ring loss Always pay close attention to the SPL levels when using a sound reinforcement product or system Always adhere to the corresponding statutory provisions and safety regulations Qualified opera...

Page 6: ...rovided when operating the loudspeakers Setup area protection When setting up a system with stacked loudspeaker arrays secure the entire work area with crowd control barriers Make sure that the secure...

Page 7: ...or download a current copy If you resell the loudspeaker hand over the manual to the next operator and provide written records about any changes of the device which may have been applied Check our web...

Page 8: ...afety DIN 18800 Mechanical Structure BGV C1 DGUV Regulation 17 18 Mechanical Standard applied in Germany WEEE Declaration Disposal Electrical and electronic devices must be disposed of separately from...

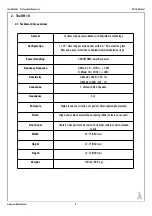
Page 9: ...ngs Power Handling 3600W RMS amplifier power Frequency Response S Mode 28 110Hz 3dB D Mode 30 120Hz 3dB Sensitivity S Mode 102dB 1W 1m D Mode 104dB 1W 1m Connection 2 x Neutrik NL4 Speakon Impedance 4...

Page 10: ...abinet make the subwoofer stand safely in all positions _ d Mounting Flange A Mounting Flange with M20 Thread is located on the loudspeakers top side to install a distance rod Distance rod distance ro...

Page 11: ...nnel of the KW 18 Amplifier The DH 18 takes the signal from the 1 1 pins Chapter 3 g Wheelboard Fixture The DH 18 wheelboard is equipped with 2 Combi Pins By connecting the 2 Combi Pins to the Wheelbo...

Page 12: ...w frequency extension down to 28Hz At the same time the subwoofer in this mode has 2dB less sensitivity and less rear attenuation www lambda labs com 11 Cable Type DESCRIPTION 8 Pole Speakon Cable 20m...

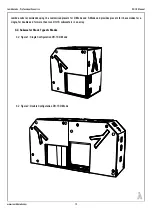
Page 13: ...presets for D Mode and S Mode and provides presets for these modes for a single for double and for more than two DH 18 subwoofers in an array 4 2 Subwoofer Stack Types Modes www lambda labs com 12 4...

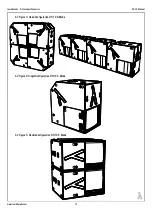
Page 14: ...a Labs Professional Acoustics DH 18 Manual www lambda labs com 13 4 2 Figure 3 Quad Configuration DH 18 D Mode 4 2 Figure 4 Single Configuration DH 18 S Mode 4 2 Figure 5 Double Configuration DH 18 S...

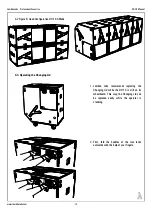
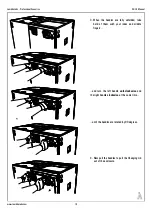
Page 15: ...ds replacing the Changing Lid while the DH 18 is still on its wheelboard This way the Changing Lid can be replaced easily while the operator is standing 2 First fold the handles of the two locks outwa...

Page 16: ...lded take hold of them with your index and middle fingers and turn the left handle anti clockwise and the right handle clockwise at the same time until the handles are rotated by 90 degrees 4 Now pull...

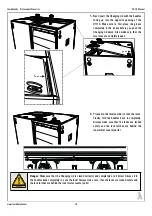
Page 17: ...6 Proceed in the reverse order to lock the locks Finally fold the handles back in completely Always make sure that the locks are locked safely and the lock latches are behind the inner metal counter...

Page 18: ...k Distance Rod V2 Distance Rod with hand crank and splints Ring Lock Distance Rod V2 Danger When using a distance rod mounted on a subwoofer s the loudspeaker should never be heavier than the subwoofe...

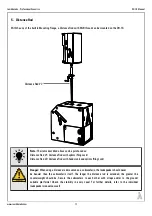
Page 19: ...r storage position To do this push the release button of the Combi Pin and pull out the pin Just let the Combi Pin connected to the wire rope hanging at the outside www lambda labs com 18 6 Figure 1 D...

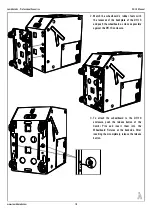
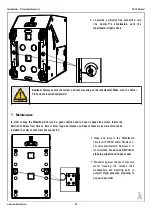
Page 20: ...of the DH 18 and push the wheelboard as close as possible against the DH 18 enclosure 3 To attach the wheelboard to the DH 18 enclosure push the release button of the Combi Pins and insert them into t...

Page 21: ...steps more often when installed in a salty environment like sea shores Clean and protect the Wheelboard Fixture with WD 40 and or Rolimeco 1 For salty environments Rolimeco 5 is recommended Do not us...

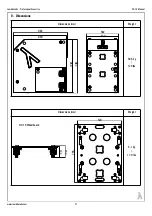
Page 22: ...Labs Professional Acoustics DH 18 Manual 8 Dimensions www lambda labs com 21 Dimensions mm Weight 58 5 kg 129 lbs 962 950 962 950 582 570 Dimensions mm Weight 8 1 kg 17 9 lbs DH 18 Wheelboard 570 755...

Page 23: ...Lambda Labs Professional Acoustics DH 18 Manual www lambda labs com 22...

Reviews: