background image

11 

DAY MAINTENANCE 


-    Disconnect the machine with 

pushbutton "A"; 

Lift   the   overflow  pipe and let 
the water  

drain out of the 

tank; 

Wash thoroughly the   tank and  
the filters  

housing to remove 

all impurities; 

Take the filters and clean it under 
running  

water; 

-  

Re-assemble the overflow   pipe   
and the  

filters in their 

housings; 

Check and clean the washing and 
the rinsing jets; 

Clean the outer surface of the 
machine by using a wet sponge; 

don't use water jets because, 
beside being dangerous they 
could damage the electrical parts; 
don't use abrasive detergents; 

When the machine is to remain 
idle  for a  

long time, drain all  

the water   from    the  

boiler 

(the   drain  plug    is located on 
the  

lower side of the boiler)    

and    from   the  

electropump. 

Also leave the    wash  tank 
  open. 


NEVER WASH THE EXTERNAL PART  OF 
THE MACHINE WITH A WATER JET 


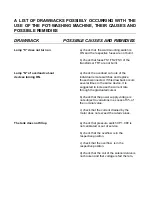
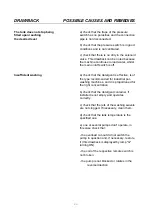
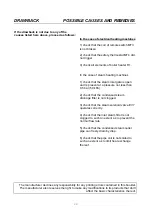
POSSIBLE TROUBLES - CAUSES - SOLUTIONS 


PROBLEMS 

CAUSES 

SOLUTIONS 

 
The machine doesn't catch 

Main switch is switched off; 

Turn ON the main switch; 

 
The water doesn't go in 

Water cock closed; 

Open water cock; 


The Overflow is not in its place; 

Reassemble the Overflow in its 


place; 

 
Insufficient Washing 

Wrong detergent or dosage  

Use anti-foam detergent in the 


insufficient; 

right dosage and never with  


cold water; 


Low temperature in the tank; 

Wait untill the water gets hot; 


Dirt wash filter; 

Clean filter; 

 
Insufficient Rinsing 

Rinsing nozzles blocked; 

Unscrew and clean nozzles  


under running water; 


Hydraulic pressure lower than 

Wait till the pressure is on or buy 


1 bar - 100 kPa; 

a booster pump; 


CAUTION! FOR ANY OTHER TROUBLE, CALL SERVICE 


Summary of Contents for PT1500M-ek

Page 1: ...POT WASHING MACHINES INSTRUCTIONS MANUAL PT850M ek PT1500M ek...

Page 2: ...EN 292 2 1992 Part 1 PART 2 Sicurezza del macchinario Concetti fondamentali Principi generali progettazione Specifiche e principi tecnici Safety of machinery Basic concepts General principles for desi...

Page 3: ...ti per le emissioni di corrente armonica apparecchiature con corrente di ingresso 16 A per fase EN 61000 3 2 2000 Electromagnetic compatibility EMC Part 3 3 Limits Limitation of voltage fluctuations a...

Page 4: ...23 Wiring diagram pag 27 Wiring diagram legend pag 29 Specifications pag 32 GENERAL NORMS ENGLISH Tank You for purchasing our POT WASHING MACHINE Perfect washing up results as far as hygiene concerns...

Page 5: ...DO NOT attempt to move install set up or operate this machine until you have read and fully understood this Manual If doubt persists ask your supervisor never leave tools parts or other loose materia...

Page 6: ...INSTRUCTIONS FOR THE USER...

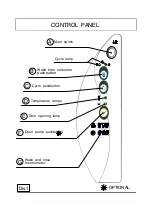
Page 7: ...OPTIONAL C D E F G B Dis 1 A CONTROL PANEL Cycle pushbutton Door opening lamp Cycle lamp Temp rature lampe Drain pump pushbutton Wash time selection pushbutton Wash and rinse thermometer Main switch...

Page 8: ...ed and the machine loads automatically B Lift the inspection doors Put the detergent directly into the tank by paying attention to distribute it uniformly on the filters the quantity being according t...

Page 9: ...der to make washing keep on load another basket and press pushbutton C The cycle will automatically start again Endless cycle maximum 15 minutes the door being closed and the cycle put on any cycle ke...

Page 10: ...cid In order to avoid damage to the machine do not increase the quantities and once operations end rinse abundantly SANIFICATION At last each 30 days it would be useful to do this operation which guar...

Page 11: ...he lower side of the boiler and from the electropump Also leave the wash tank open NEVER WASH THE EXTERNAL PART OF THE MACHINE WITH A WATER JET POSSIBLE TROUBLES CAUSES SOLUTIONS PROBLEMS CAUSES SOLUT...

Page 12: ...rior panelling upper tops tanks etc Comply with the following instructions when cleaning and servicing parts in stainless steel Ordinary daily maintenance Carefully and frequently clean the surfaces u...

Page 13: ...he following instructions are addressed to a qualified personnel the only one authorised to carry out checks and repair if any The Manufacturer declines any responsibility in the case of interventions...

Page 14: ......

Page 15: ......

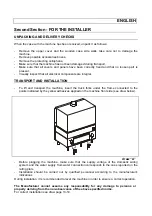
Page 16: ...d transport the machine insert the truck forks under the frame connected to the points indicated by the yellow adhesives applied on the machine front side see draw below draw A Before plugging the mac...

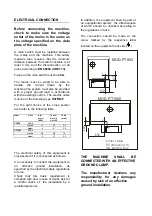
Page 17: ...ty max A Cable mm PT850 400 3 electric 13 20 2 5 steam 4 8 2 5 PT1500 400 3 electric 26 38 10 steam 6 12 2 5 The electrical safety of this equipment is only assured if it is connected as follows It is...

Page 18: ...fter opening the front panel to do this turn the two front screws out Arrange a discharge at floor level provided with siphon and connect to the floor drain by means of a hose provided with an adequat...

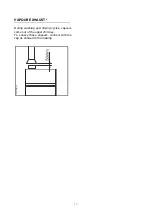
Page 19: ...19 VAPOUR EXHAUST During washing and rinsing cycles vapours come out of the upper chimney To convey these vapours connect with the cap as showed in the drawing...

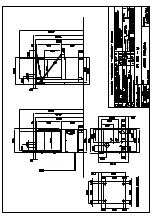
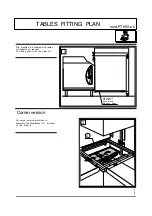
Page 20: ...M6x15 MENSP85 ek Corner version 1 2 mod PT850 ek TABLES FITTING PLAN The machine is endowed with tables for baskets on request The fitting plan in on the draw N 1 For corner version machines to assem...

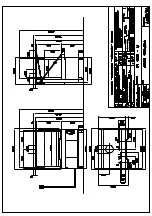
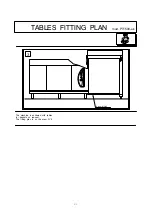
Page 21: ...21 Screw M6x15 3 mod PT1500 ek TABLES FITTING PLAN The machine is endowed with tables for baskets on request The fitting plan in on the draw N 3...

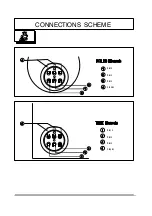
Page 22: ...CONNECTIONS SCHEME Black Black Black Black Staples Black Black Staples...

Page 23: ...replace those disconnected If this drawback occurs several times in the same device it is suggested to increase the current rate through the graduated cursor b check that the power supply voltage is n...

Page 24: ...k that the detergent is effective is of the type recommended for industrial pot washing machines and it is proportioned for the right concentration b check that the detergent container if installed is...

Page 25: ...insing system make sure that the washing system operates correctly as a matter of fact an effective rinsing also depends on a correct washing Having ascertained that washing takes place correctly chec...

Page 26: ...han 0 5 bar 50 kPa 2 check that the condensed steam drainage filter is not clogged 3 check that the steam solenoid valve EV7 operates correctly 4 check that the inlet steam filter is not clogged to su...

Page 27: ......
Page 28: ...EMPS DE RIN AGE RINSE TIME SELECTION TABLE AUSWAHLSTAFEL F R SP LUNGSZEIT 25 20 DIP 1 2 3 4 1 2 3 4 4 TABELLA SELEZIONE TEMPI DI PRE RISCIACQUO TABLEAU SELECTION TEMPS DE PRE RIN AGE PRE RINSE TIME SE...

Page 29: ...lamp Kontrollampe Motorschutz ausgel st CT1 Termostato di sicurezza Thermostat de suret Security thermostat Sch tzthermostat CT2 Termostato boiler Thermostat surchauffeur Boiler thermostat Boilertherm...

Page 30: ...de course Stop micro switch Endschalter EV3 Elettrovalvola carico Electrovanne chargement Loading solenoid valve ElektrischesWassereinlaufventil EV4 Elettrovalvola risciacquo Electrovanne rin age Rin...

Page 31: ...Contacteur pompe lavage sup Upper washing pump contactor Sch tz Waschpumpenmotor MT8 Contattore pompa lavaggio inferiore Contacteur pompe lavage inf Lower washing pump contactor Sch tz Waschpumpenmot...

Page 32: ...10 kg V RINSE TANK ELEMENTS electric 9000 2x9000 W steam 16 30 kg V TOTAL RATING electric 13400 26800 W steam 26 4550 40 8950 kg W MAX CURRENT INTENSITY 20 38 A TANK CAPACITY 110 177 Lt BOILER CAPACI...

Reviews: