background image

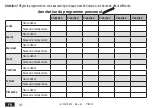
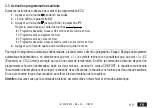
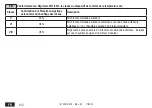
3.14 Durée d’illumination (pour les versions avec rétro-éclairage)

Pour modifier la durée de l’illumination du rétro-éclairage, suivre les instructions ci-dessous.

1. 

Appuyer sur la touche   pendant 3 secondes.

2. 

L'écran affiche le paramètre 

CU

.

3. 

Appuyer plusieurs fois sur la touche   jusqu’à afficher le paramètre 

D2

.

4.

  Utiliser les touches 

/

 pour en modifier la durée en secondes.

réf. 3541Z230  -  Rév.  04  -  11/2021

FR

126  

Summary of Contents for REMOTO CRM N

Page 1: ...IT MANUALE UTENTE ES MANUAL DE USUARIO PL INSTRUKCJA OBS UGI RU FR MANUEL DE L UTILISATEUR EN USER MANUAL NL GEBRUIKERSHANDLEIDING EL REMOTOCRMN cod 3541Z230 Rev 04 11 2021...

Page 2: ......

Page 3: ...di fasce orarie giornaliere 17 3 6 Temperatura minima riscaldamento 17 3 7 Riempimento impianto 18 3 8 Selezione unit di misura temperatura 19 3 9 Correzione lettura temperatura ambiente 19 3 10 Ingre...

Page 4: ...1 PANORAMICA DEL COMANDO REMOTO fig 1 cod 3541Z230 Rev 04 11 2021 IT 4...

Page 5: ...settimana 13 Indicazione ore e minuti 14 Indicazione modalit OFF 15 Indicazione funzionamento manuale riscaldamento 16 Indicazione funzionamento automatico riscaldamento 17 Indicazione funzione vacanz...

Page 6: ...2 Fase 2 Impostazione del programma automatico settimanale Terminatal impostazionedell oraedelgiorno ilComandoRemotoseguir ilprogrammaautomaticopre impostato Ilprogramma di riscaldamento prevede 6 fas...

Page 7: ...a a lampeggiare premere i tasti per modificare il livello di temperatura ad incrementi di 0 1 C Tenendo premuto il tasto la tempe ratura cambier rapidamente 4 Premere il tasto Le 6 fasce orarie giorna...

Page 8: ...4 Fascia 5 Fascia 6 Luned Ora d inizio Livello di temperatura Marted Ora d inizio Livello di temperatura Mercoled Ora d inizio Livello di temperatura Gioved Ora d inizio Livello di temperatura Venerd...

Page 9: ...lo Il riscaldamento viene spento ed attivato solo se la temperatura ambiente diventa minore di 5 C funzione di misura protettiva contro il gelo in casa La caldaia di qualsiasi tipo erogher acqua calda...

Page 10: ...lizzate Successivamente impostare il valore di temperatura ambiente premendo i tasti ad incrementi di 0 1 C Tenendo premuto il tasto la temperatura cambier rapidamente Il funzionamento manuale sar man...

Page 11: ...elo in casa Seguire le successive istruzioni per attivare ed impostare la funzione Vacanze 1 Premere il tasto Il simbolo inizia a lampeggiare il simbolo appare fisso e l indicazione dell ora e dei min...

Page 12: ...di una determinata curva di compensazione Con regolazione a Temperatura Scorrevole la temperatura impostata attraverso l impostazione Regolazione temperatura riscaldamento diviene la massima temperat...

Page 13: ...ato Eventuali adattamenti possono essere comun que apportati dall utente per il miglioramento del comfort Se la temperatura ambiente risulta inferiore al valore desiderato si consiglia di impostare un...

Page 14: ...no i seguenti grafici 1 Premere il tasto per 3 secondi 2 Il display visualizza il parametro CU 3 Premere il tasto fino a visualizzare il parametro OF Premere i tasti per modificare lo spostamento para...

Page 15: ...____________________________________________________________ Perimpostareilprogrammaautomaticosettimanaleprocederecomedescrittoalparagrafo Fase2 Impostazionedelprogramma automatico settimanale selezio...

Page 16: ...ambiente verr innalzata di 3 C all ora E importante che il programma automatico riscaldamento venga quindi programmato in funzione dell orario in cui si desidera il calore e non su quello in cui si d...

Page 17: ...i fasce orarie giornaliere da 2 a 6 4 Premere un qualsiasi altro tasto per uscire dal men 3 6 Temperatura minima riscaldamento Seguire le successive istruzioni per impostare il valore minimo dell acqu...

Page 18: ...iempimento impianto manuale Impostare a 2 utilizzando i tasti per attivare il Riempimento impianto automatico 4 Premere un qualsiasi altro tasto per uscire dal men Attenzione Impostare sulla scheda di...

Page 19: ...o i tasti per selezionare i F 4 Premere un qualsiasi altro tasto per uscire dal men 3 9 Correzione lettura temperatura ambiente Seguire le successive istruzioni per correggere la lettura della tempera...

Page 20: ...per spegnere il riscaldamento alla chiusura del contatto Impostare a 1 utilizzando i tasti per regolare la temperatura ambiente ad un valore fisso pre impostato attraverso il successivo parametro P9...

Page 21: ...o possono essere sia lette che scritte in caldaia 0 default oppure solo scritte 1 1 Premere il tasto per 3 secondi 2 Il display visualizza il parametro CU 3 Premere ripetutamente il tasto fino a visua...

Page 22: ...inazione del backlight seguire le seguenti istruzioni 1 Premere il tasto per 3 secondi 2 Il display visualizza il parametro CU 3 Premere ripetutamente il tasto fino a visualizzare il parametro D2 4 Ag...

Page 23: ...rcuito riscaldamento Solo per caldaie dotate del sensore T4 Setpoint temperatura acqua mandata calcolato dal comando remoto P5 Potenza attuale bruciatore F6 Velocit attuale del ventilatore Solo per ca...

Page 24: ...ldaia Vi sono anomalie che causano blocchi permanenti contraddistinte con la lettera A e da simbolo per il ripristino del funzionamento sufficiente premere il tasto Altre anomalie causano blocchi temp...

Page 25: ...va al programma automatico settimanale e re impostare i parametri dell utente Premereitasti contemporaneamenteper10secondi vienevisualizzataesclusivamenteladicituraRElampeggiante In qualsiasi momento...

Page 26: ...set di viti di fissaggio in dotazione la parte posteriore del Comando Remoto avendo cura di far passare i 2 conduttori all interno dei fori posizionati sopra i morsetti Utilizzare i morsetti COM per l...

Page 27: ...mero di fasce orarie giornaliere 6 P4 Temperatura minima riscaldamento P5 Riempimento impianto 0 Disattivato P6 Sezione unit di misura temperatura 0 C P7 Correzione lettura temperatura ambiente 0 P8 S...

Page 28: ...agionale di riscaldamento d ambiente Descrizione V 3 Kit cronocomando remoto VI 4 Kit cronocomando remoto abbinato a sonda esterna installati su caldaia equipaggiata di bruciatore modulante VIII 5 Kit...

Page 29: ...43 3 6 Temperatura m nima de calefacci n 43 3 7 Llenado de la instalaci n 44 3 8 Selecci n de la unidad de temperatura 45 3 9 Correcci n de la lectura de la temperatura ambiente 45 3 10 Entrada de co...

Page 30: ...1 PANOR MICA DEL MANDO A DISTANCIA fig 1 c d 3541Z230 Rev 04 11 2021 ES 30...

Page 31: ...alefacci n 12 Indicaci n de d a de la semana 13 Indicaci n de horas y minutos 14 Indicaci n de modalidad OFF 15 Indicaci n de funcionamiento manual de la calefacci n 16 Indicaci n de funcionamiento au...

Page 32: ...ama autom tico semanal Al terminar de ajustar la hora y el d a el mando a distancia iniciar el programa autom tico preprogramado El programa de calefacci n prev 6 franjas horarias diarias de nivel de...

Page 33: ...mbiente dentro de la casa parpadea pulse las teclas para modificar el nivel de temperatura con pasos de 0 1 C Manteniendo pulsada la tecla la temperatura cambia r pidamente 4 Pulsar la tecla Las 6 fra...

Page 34: ...5 Franja 6 Lunes Hora de inicio Nivel de temperatura Martes Hora de inicio Nivel de temperatura Mi rcoles Hora de inicio Nivel de temperatura Jueves Hora de inicio Nivel de temperatura Viernes Hora d...

Page 35: ...olo La calefacci n se apaga y solo se activa si la temperatura ambiente es inferior a 5 C funci n de protecci n contra el hielo en casa La caldera todos los tipos suministra agua caliente Selecci n de...

Page 36: ...las para ajustar el valor de temperatura ambiente con incrementos de 0 1 C Manteniendo pulsada la tecla la temperatura cambia r pidamente El funcionamiento manual permanecer activado hasta que se sele...

Page 37: ...ecci n contra el hielo en casa Para activar la funci n Vacaciones 1 Pulse la tecla El s mbolo inicia a parpadear el s mbolo aparece fijo y la indicaci n de la hora y de los minutos muestra 00 01 es de...

Page 38: ...e acuerdo con una curva de compensaci n determinada Durante el funcionamiento con temperatura adaptable la temperatura programada en Regulaci n de la temperatura de calefacci n se convierte en la temp...

Page 39: ...la instalaci n M s tarde el usuario puede realizar modificaciones de acuerdo con sus preferencias Si la temperatura ambiente es inferior al valor deseado se aconseja seleccionar una curva de orden su...

Page 40: ...eratura de ida a calefacci n Temperatura exterior Temperatura de ida a calefacci n 1 Pulse la tecla durante 3 segundos 2 La pantalla muestra el par metro CU 3 Pulse la tecla hasta que aparezca el par...

Page 41: ...________________________________________________________________________________________ Para seleccionar el programa autom tico semanal siga las instrucciones del apartado Fase2 Configuraci n del pro...

Page 42: ...peratura ambiente aumenta 3 C por hora Esimportanteconfigurarelprogramaautom ticodecalefacci nenfunci ndelhorarioenelquesedeseaalcanzarunadeterminada temperatura y no en funci n del momento en que se...

Page 43: ...ficar el n mero de franjas horarias diarias de 2 a 6 4 Pulse una tecla para salir del men 3 6 Temperatura m nima de calefacci n Para programar el valor m nimo del agua del circuito de calefacci n con...

Page 44: ...de la instalaci n Seleccione 2 utilizando las teclas para activar el llenado autom tico de la instalaci n 4 Pulse una tecla para salir del men Atenci n Programe en la tarjeta de control de la caldera...

Page 45: ...zando las teclas para seleccionar F 4 Pulse una tecla para salir del men 3 9 Correcci n de la lectura de la temperatura ambiente Para corregir la lectura de la temperatura ambiente entre 2 y 2 C con i...

Page 46: ...ando las teclas para apagar la calefacci n al cerrar el contacto Seleccione 1 utilizando las teclas para regular la temperatura ambiente al cerrar el contacto en funci n del valor fijo preprogramado e...

Page 47: ...leer y escribir en la caldera 0 predefinido o solo leer 1 1 Pulse la tecla durante 3 segundos 2 La pantalla muestra el par metro CU 3 Pulse varias veces la tecla hasta que aparezca el par metro FS 4...

Page 48: ...de iluminaci n de la retroiluminaci n siga las instrucciones 1 Pulse la tecla durante 3 segundos 2 La pantalla muestra el par metro CU 3 Pulse varias veces la tecla hasta que aparezca el par metro D2...

Page 49: ...a calderas equipadas con sensor T4 Punto de intervenci n temperatura del agua enviada calculada por el mando a distancia P5 Potencia actual del quemador F6 Velocidad actual del ventilador solo para ca...

Page 50: ...Algunas anomal as indicadas con la letra A y el s mbolo provocan bloqueos permanentes para restablecer el funcionamiento es suficiente pulsar la tecla Las anomal as que se indican con la letra F caus...

Page 51: ...al programa autom tico semanal y reprogramar los par metros de usuario Pulse las teclas al mismo tiempo durante 10 segundos Solo se visualiza el mensaje RE parpadeante En cualquier momento al soltar l...

Page 52: ...Ahora utilice el juego de tornillosdefijaci nincluidoenladotaci nparafijaralaparedlaparteposteriordelmandoadistancia pasandolos2conductores por los orificios situados sobre los bornes Utilice los bor...

Page 53: ...P4 Temperatura m nima de calefacci n P5 Llenado de la instalaci n 0 desactivada P6 Selecci n de la unidad de temperatura 0 C P7 Correcci n de la lectura de la temperatura ambiente 0 P8 Selecci n del...

Page 54: ...alefacci n del ambiente Descripci n V 3 Kit del cronomando a distancia VI 4 Kit del cronomando a distancia combinado con sonda exterior instalados en caldera equipada con quemador modulante VIII 5 Kit...

Page 55: ...dzia w godzinowych 69 3 6 Temperatura minimalna c o 69 3 7 Nape nianie uk adu 70 3 8 Wyb r jednostki miary temperatury 71 3 9 Korekta odczytu temperatury otoczenia 71 3 10 Wej cie styku telefonicznego...

Page 56: ...1 PRZEGL D PANELU ZDALNEGO STEROWANIA rys 1 nr art 3541Z230 Zm 04 11 2021 PL 56...

Page 57: ...o 12 Wska nik dnia tygodnia 13 Wska nik godzin i minut 14 Wska nik trybu OFF 15 Wska nik dzia ania r cznego c o 16 Wska nik dzia ania automatycznego c o 17 Wska nik funkcji Wakacje 18 Wska nik w czon...

Page 58: ...awienie automatycznego programu tygodniowego Poustawieniugodzinyidniapanelzdalnegosterowaniab dziewykonywa fabrycznieustawionyprogramautomatyczny Program c o przewiduje 6 przedzia w godzinowych i dzie...

Page 59: ...ciska przyciski aby zmieni poziom temperatury w skokach po 0 1 C Po przytrzymaniu przycisku temperatura b dzie si przewija szybciej 4 Nacisn przycisk 6 przedzia w godzinowych dziennych miga 5 Nast pni...

Page 60: ...Przedzia 6 Poniedzia ek Godzina rozpocz cia Poziom temperatury Wtorek Godzina rozpocz cia Poziom temperatury roda Godzina rozpocz cia Poziom temperatury Czwartek Godzina rozpocz cia Poziom temperatur...

Page 61: ...ewanie jest wy czone i w cza si tylko wtedy kiedy temperatura otoczenia spadnie poni ej 5 C jest to dzia anie ochronne zabezpieczaj ce przed zamarzaniem w domu Kocio niezale nie od rodzaju b dzie prod...

Page 62: ...przedzia w godzinowych Nast pnie ustawi warto temperatury otoczeniazapomoc przycisk w wskokachpo0 1 C Poprzytrzymaniuprzyciskutemperaturab dziesi przewija a szybciej Dzia anie w trybie r cznym b dzie...

Page 63: ...d zamarzaniem w domu Aby w czy i ustawi funkcj Wakacje post powa wed ug poni szych instrukcji 1 Nacisn przycisk Symbol zaczyna miga symbol wieci wiat em ci g ym a wska nik godziny i minut wy wietla 00...

Page 64: ...e z okre lon krzyw kompensacji W przypadku regulacji z przesuni ciem temperaturowym temperaturaustawionazapomoc ustawienia Regulacjatemperaturyogrzewania stajesi maksymaln temperatur dostarczan przez...

Page 65: ...nel Jednak u ytkownik mo e dokona dalszych regulacji niezb dnych do optymalizacji poziom w komfortu Je li temperatura w pomieszczeniu jest ni sza od wymaganej warto ci zaleca si ustawienie krzywej wy...

Page 66: ...a zasilania uk adu Temperatura zewn trzna Temperatura zasilania uk adu 1 Nacisn przycisk i przytrzyma przez 3 sekundy 2 Wy wietlacz pokazuje parametr CU 3 Naciska przycisk a do momentu kiedy wy wietli...

Page 67: ..._______________________________________________________________________ Abyustawi automatycznyprogramtygodniowy post powa zgodniezinstrukcjamiwpunkcie Faza2 Ustawienieautomatycznego programutygodniowe...

Page 68: ...a w takim przypadku temperatura otoczenia b dzie podnosi a si o 3 C na godzin Wa ne jest aby program automatycznego grzania by zaprogramowany odpowiednio do harmonogramu godzinowego zapotrzebowania na...

Page 69: ...zmieni liczb dziennych przedzia w godzinowych w zakresie od 2 do 6 4 Nacisn dowolny przycisk aby wyj z menu 3 6 Temperatura minimalna c o Aby ustawi minimaln warto wody w uk adzie grzania w skokach p...

Page 70: ...a pomoc przycisk w ustawi na 2 aby w czy automatyczne nape nianie uk adu 4 Nacisn dowolny przycisk aby wyj z menu Uwaga Ustawi nape nianie r czne na p ycie sterowania kot a Podczas dzia ania r cznego...

Page 71: ...pomoc przycisk w ustawi na 1 aby wybra F 4 Nacisn dowolny przycisk aby wyj z menu 3 9 Korekta odczytu temperatury otoczenia Abyskorygowa odczyttemperaturyotoczeniawzakresieod 2 Cdo 2 Cwskokachpo0 1 C...

Page 72: ...etr P8 Za pomoc przycisk w ustawi na 0 aby wy czy grzanie w momencie zamkni cia styku Ustawi na 1 przyciskami aby ustawi temperatur otoczenia na stal warto fabryczn za pomoc kolejnego parametru P9 w m...

Page 73: ...u mog by zar wno odczytane jak i zapisane w kotle 0 domy lnie lub tylko zapisane 1 1 Nacisn przycisk i przytrzyma przez 3 sekundy 2 Wy wietlacz pokazuje parametr CU 3 Naciska przycisk a do momentu ki...

Page 74: ...ania pod wietlenia nale y post powa zgodnie z poni szymi 1 Nacisn przycisk i przytrzyma przez 3 sekundy 2 Wy wietlacz pokazuje parametr CU 3 Naciska przycisk a do momentu kiedy wy wietli si parametr D...

Page 75: ...w wyposa onych w taki czujnik T4 Nastawa temperatury doprowadzanej wody obliczona przez panel zdalnego sterowania P5 Bie ca moc palnika F6 Bie ca pr dko wentylatora tylko w przypadku kot w kondensacy...

Page 76: ...powoduj trwa e zablokowanie oznaczone liter A oraz symbolem w celu przywr cenia pracy kot a wystarczy nacisn przycisk Inne usterki powoduj zablokowanie czasowe s one oznaczone liter F kt re jest wy c...

Page 77: ...utomatycznego programowania tygodniowego oraz ponowne ustawienie parametr w u ytkownika Nacisn jednocze nie przyciski i przytrzyma przez 10 sekund wy wietli si jedynie migaj cy kod RE Je li przyciskiz...

Page 78: ...udo czonychwkomplecie rubmonta owychzamontowa tyln cz paneluzdalnegosterowania Uwa a podczas przeprowadzania 2 przewod w przez otwory znajduj ce si powy ej zacisk w U y zacisk w COM do po czenia elekt...

Page 79: ...alna liczba dziennych przedzia w godzinowych 6 P4 Temperatura minimalna c o P5 Nape nianie uk adu 0 Wy P6 Cz jednostki miary temperatury 0 C P7 Korekta odczytu temperatury otoczenia 0 P8 Cze dzia ania...

Page 80: ...etycznej ogrzewania rodowiska Opis V 3 Zdalnego panelu pokojowego VI 4 Zestaw panelu pokojowego po czony z sond zewn trzn zainstalowany na kotle z palnikiem moduluj cym VIII 5 Zestaw zarz dzania stref...

Page 81: ...3 3 87 2 4 4 88 3 89 3 1 89 3 2 90 3 3 93 3 4 94 3 5 95 3 6 95 3 7 96 3 8 97 3 9 97 3 10 98 3 11 99 3 12 Max CH DHW 99 3 13 99 3 14 100 4 101 4 1 101 4 2 102 4 3 102 4 4 102 4 5 102 4 6 103 4 7 104 5...

Page 82: ...1 1 3541Z230 04 11 2021 RU 82...

Page 83: ...1 2 3 4 5 6 7 8 9 10 11 12 13 14 15 16 17 18 19 20 21 22 23 24 25 26 27 28 29 OpenTherm 30 ECO 3541Z230 04 11 2021 RU 83...

Page 84: ...________________________________________________________________________________________________________________________________________________________________________________________________ 2 2 2 6...

Page 85: ...1 6 1 1 1 2 10 3 0 1 C 4 6 5 2 2 4 6 3 4 5 6 5 7 a 2 2 6 3541Z230 04 11 2021 RU 85...

Page 86: ...1 2 3 4 5 6 3541Z230 04 11 2021 RU 86...

Page 87: ...2 3 3 5 C 5 C 6 00 00 1 3541Z230 04 11 2021 RU 87...

Page 88: ...0 1 C 6 0 1 C 2 4 4 1 C 1 C 3541Z230 04 11 2021 RU 88...

Page 89: ...3 3 1 1 45 1 5 C 1 00 01 2 1 00 01 1 45 00 45 3 3541Z230 04 11 2021 RU 89...

Page 90: ...3 2 1 10 1 3 2 CU 1 3 3541Z230 04 11 2021 RU 90...

Page 91: ...0 3541Z230 04 11 2021 RU 91...

Page 92: ...20 40 1 3 2 CU 3 OF 4 1 C 5 3541Z230 04 11 2021 RU 92...

Page 93: ...________________________________________________________________________________________________________________________________________________________________________________ 2 1 3 EC Economy CO Com...

Page 94: ...3 4 00 00 3 C 1 3 2 CU 3 P2 0 1 2 3 C 4 C 0 5 C 3541Z230 04 11 2021 RU 94...

Page 95: ...3 5 6 1 6 2 1 3 2 CU 3 P3 2 6 4 3 6 1 C 1 3 2 CU 3 P4 1 C 4 3541Z230 04 11 2021 RU 95...

Page 96: ...3 7 1 3 2 CU 3 P5 0 1 2 4 3541Z230 04 11 2021 RU 96...

Page 97: ...3 8 C F 1 3 2 CU 3 P6 0 C 1 F 4 3 9 2 C 2 C 0 1 C 1 3 2 CU 3 P7 0 1 C 4 3541Z230 04 11 2021 RU 97...

Page 98: ...3 10 1 3 2 CU 3 P8 0 1 P9 4 5 P9 P8 1 0 1 C 6 60 3541Z230 04 11 2021 RU 98...

Page 99: ...3 11 1 3 2 CU 3 OT 4 1 3 12 Max CH DHW 0 1 1 3 2 CU 3 FS 4 1 3 13 1 3 2 CU 3 D1 4 3541Z230 04 11 2021 RU 99...

Page 100: ...3 14 1 3 2 CU 3 D2 4 3541Z230 04 11 2021 RU 100...

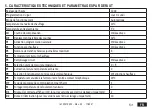
Page 101: ...4 4 1 T1 T2 T3 T4 P5 F6 F7 P8 M V 3541Z230 04 11 2021 RU 101...

Page 102: ...4 2 5 1 4 3 A F 4 4 E92 4 5 E93 3541Z230 04 11 2021 RU 102...

Page 103: ...4 6 10 RE 10 3541Z230 04 11 2021 RU 103...

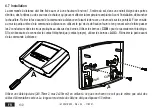
Page 104: ...4 7 1 5 A 2 COM AUX A 2x0 75 2 2x2 5 2 50 3541Z230 04 11 2021 RU 104...

Page 105: ...5 12 00 1 20 C 5 C CU 0 OF 30 C P1 0 P2 0 P3 6 P4 P5 0 P6 0 C P7 0 P8 0 P9 20 C OT OpenTherm 1 FS 0 D1 2 D2 10 3541Z230 04 11 2021 RU 105...

Page 106: ...RU 811 2013 V 3 VI 4 VIII 5 3 3541Z230 04 11 2021 RU 106...

Page 107: ...urnali res maximum 121 3 6 Temp rature minimum chauffage 121 3 7 Remplissage circuit 122 3 8 S lection unit de mesure temp rature 123 3 9 Correction lecture temp rature ambiante 123 3 10 Entr e contac...

Page 108: ...1 APER U DE LA COMMANDE DISTANCE fig 1 r f 3541Z230 R v 04 11 2021 FR 108...

Page 109: ...dication jour de la semaine 13 Indication heures et minutes 14 Indication mode OFF 15 Indication fonctionnement manuel chauffage 16 Indication fonctionnement automatique chauffage 17 Indication foncti...

Page 110: ...____________________________________________________________________________________________________________ 2 2 Phase 2 R glage du programme hebdomadaire automatique Apr s avoir r gl l heure et le jo...

Page 111: ...hangeront rapidement 3 Appuyer sur la touche L indication de la temp rature ambiante l int rieur de la maison se met clignoter appuyer sur les touches pour modifier le niveau de temp rature par incr m...

Page 112: ...anche 3 Tranche 4 Tranche 5 Tranche 6 Lundi Heure d but Niveau de temp rature Mardi Heure d but Niveau de temp rature Mercredi Heure d but Niveau de temp rature Jeudi Heure d but Niveau de temp rature...

Page 113: ...ouche affichant le pictogramme Le chauffage est teint et activ uniquement si la temp rature ambiante devient inf rieure 5 C fonction de protection contre le gel dans la maison La chaudi re de tout typ...

Page 114: ...R gler ensuite la valeur de la temp rature ambiante en appuyant les touches par incr ments de 0 1 C En maintenant le bouton enfonc la temp rature changera rapidement Le fonctionnement manuel sera main...

Page 115: ...structions ci dessous pour activer et r gler la fonction Vacances 1 Appuyer sur la touche Le symbole commence clignoter le symbole appara t affichage continu et l indication de l heure et des minutes...

Page 116: ...selon une courbe de compensation sp cifique Avec le r glage de la temp rature volutive la temp rature r gl e via R glage de la temp rature de chauffage devient la temp rature maxi d part installation...

Page 117: ...qualifi Noter que l utilisateur pourra faire des adaptations ou ajustements ventuels pour am liorer le confort Si la temp rature ambiante est inf rieure la valeur d sir e il est conseill de d finir un...

Page 118: ...tallation Temp rature ext rieure Temp rature d part installation 1 Appuyer sur la touche pendant 3 secondes 2 L cran affiche le param tre CU 3 Appuyer sur la touche jusqu afficher le param tre OF 4 Ap...

Page 119: ..._________________________________________________________ Pour r gler le programme automatique hebdomadaire proc der comme d crit au paragraphe tape2 R glage du programme automatique hebdomadaire en s...

Page 120: ...e de 3 C par heure Ilestdoncimportantqueleprogrammedechauffageautomatiquesoitprogramm enfonctiondel heure laquellevoussouhaitez chauffer et non de l heure laquelle vous souhaitez d marrer le syst me d...

Page 121: ...aires quotidiennes de 2 6 4 Appuyer sur n importe quelle autre touche pour quitter le menu 3 6 Temp rature minimum chauffage Suivre les instructions suivantes pour r gler la valeur minimale de l eau d...

Page 122: ...anuel du syst me R gler sur 2 l aide des touches pour activer le remplissage automatique du syst me 4 Appuyer sur n importe quelle autre touche pour quitter le menu Attention R gler le remplissage man...

Page 123: ...our s lectionner F 4 Appuyer sur n importe quelle autre touche pour quitter le menu 3 9 Correction lecture temp rature ambiante Suivrelesinstructionsci dessouspourcorrigerlalecturedelatemp ratureambia...

Page 124: ...eindre le chauffage lorsque le contact est ferm R gler sur 1 l aide des touches pour r gler la temp rature ambiante sur une valeur fixe pr r gl e via le param tre suivant P9 lors de la fermeture du co...

Page 125: ...en crits que lus dans la chaudi re 0 par d faut ou bien seulement lus 1 1 Appuyer sur la touche pendant 3 secondes 2 L cran affiche le param tre CU 3 Appuyer plusieurs fois sur la touche jusqu affiche...

Page 126: ...tion du r tro clairage suivre les instructions ci dessous 1 Appuyer sur la touche pendant 3 secondes 2 L cran affiche le param tre CU 3 Appuyer plusieurs fois sur la touche jusqu afficher le param tre...

Page 127: ...quip es d un capteur uniquement T4 Consigne temp rature eau de d part calcul e par la commande distance P5 Puissance actuelle du br leur F6 Vitesse actuelle du ventilateur pour chaudi res condensatio...

Page 128: ...uent des blocages permanents marqu s de la lettre A et du pictogramme pour r tablir le fonctionnement appuyer sur la touche D autres anomalies provoquent des blocages temporaires marqu s de la lettre...

Page 129: ...ireautomatiqueetder initialiserlesparam tresutilisateur Appuyer simultan ment sur les touches pendant 10 secondes seule la mention RE clignotante est affich e A tout moment si vous rel chez les touche...

Page 130: ...la commande distance en utilisant le jeu de vis de fixation fourni et en prenant soin de faire passer les 2 conducteurs dans les trous pratiqu s au dessus des bornes Utiliser les bornes COM pour le r...

Page 131: ...nali res maximum 6 P4 Temp rature minimum chauffage P5 Remplissage circuit 0 D sactiv e P6 S lection unit de mesure temp rature 0 C P7 Correction lecture temp rature ambiante 0 P8 S lection fonctionne...

Page 132: ...du chauffage des locaux Description V 3 Kit chronocommande distance VI 4 Kit chronocommande distance combin e avec une sonde ext rieure install es sur une chaudi re quip e d un br leur modulant VIII 5...

Page 133: ...nds 147 3 6 Heating minimum temperature 147 3 7 System filling 148 3 8 Temperature unit of measure selection 149 3 9 Room temperature reading correction 149 3 10 Telephone contact input 150 3 11 Proto...

Page 134: ...1 REMOTE CONTROL OVERVIEW fig 1 code 3541Z230 Rev 04 11 2021 EN 134...

Page 135: ...ure manual increase button 11 Heating program time bands 12 Day of the week 13 Hours and minutes 14 OFF mode 15 Manual heating operation 16 Automatic heating operation indication 17 Vacation function...

Page 136: ...2 2 Step 2 Setting the automatic weekly program After setting the time and day the Remote Control will follow the preset automatic program The heating program includes 6 daily time bands for the temp...

Page 137: ...ide the house starts blinking press the buttons to change the temperature level in 0 1 C increments By keeping the button pressed the temperature will change rapidly 4 Press the button The 6 daily tim...

Page 138: ...and 3 Band 4 Band 5 Band 6 Monday Start time Temperature level Tuesday Start time Temperature level Wednesday Start time Temperature level Thursday Start time Temperature level Friday Start time Tempe...

Page 139: ...n To re enable heating and return to the previously set operation mode press the button again displaying the symbol The boiler of any type will deliver domestic hot water Automatic heating operation i...

Page 140: ...erapidly Manualoperationwillbemaintaineduntilanotheroperationmodeisselected 2 4 Step 4 DHW Heating temperature adjustment Heating Press the button the display shows the actual heating circuit water te...

Page 141: ...e and set the Vacation function 1 Press the button The symbol starts blinking the symbol appears steady and the hour and minutes indication becomes 00 01 which represents the time remaining at the end...

Page 142: ...reases according to a specific compensation curve With Sliding Temperature adjustment the temperature set via the Heating temperature adjustment becomes the maximum system flow temperature It is advis...

Page 143: ...tion by qualified personnel The user can still make further adjustments for better comfort Iftheroomtemperatureislowerthanthedesiredvalue itisadvisabletosetahigherordercurveandviceversa Proceed by inc...

Page 144: ...ystem flow temperature External temperature System flow temperature 1 Press the button for 3 seconds 2 The display shows parameter CU 3 Press the button until parameter OF is displayed 4 Press the but...

Page 145: ...____________________________________________________________________________________________ Tosettheautomaticweeklyprogram proceedasdescribedinpar Phase2 Settingtheautomaticweeklyprogram selectingthe...

Page 146: ...this case the room temperature will be raised by 3 C per hour The automatic heating program should therefore be programmed according to the time when warmth is wanted and not the desired heating syst...

Page 147: ...e number of daily time bands from 2 to 6 4 Press any other button to exit the menu 3 6 Heating minimum temperature Follow the instructions below to set the heating circuit water minimum value in steps...

Page 148: ...manual system filling Set to 2 using the buttons to activate automatic system filling 4 Press any other button to exit the menu Attention Set manual filling on the boiler control board In manual opera...

Page 149: ...using the buttons to select F 4 Press any other button to exit the menu 3 9 Room temperature reading correction Follow the instructions below to correct the room temperature reading between 2 C and 2...

Page 150: ...et to 0 using the buttons to turn heating off when the contact is closed Set to 1 using the buttons to adjust the room temperature to a fixed pre set value via the next parameter P9 when the contact c...

Page 151: ...ts can be both read and written in the boiler 0 default or only written 1 1 Press the button for 3 seconds 2 The display shows parameter CU 3 Press the button until parameter FS is displayed 4 Check t...

Page 152: ...backlight duration follow the instructions below 1 Press the button for 3 seconds 2 The display shows parameter CU 3 Press the button repeatedly until parameter D2 is displayed 4 Use the buttons to mo...

Page 153: ...it return water temperature Only for boilers equipped with sensor T4 Flow water temperature setpoint calculated by the remote control P5 Actual burner power F6 Actual fan speed Only for condensing boi...

Page 154: ...nt shutdowns indicated with the letter A and the symbol to restore operation just press the button Other faults cause temporary shutdowns indicated with the letter F which are automatically reset as s...

Page 155: ...at the procedure for the automatic weekly program and reset the user parameters Press the buttons together for 10 seconds only the message RE blinking is displayed Releasing the buttons at any time be...

Page 156: ...the back of the Remote Control to the wall with the set of fastening screws provided making sure to run the 2 wires inside the holes located above the terminals Use the COM terminals for the electrica...

Page 157: ...aximum number of daily time bands 6 P4 Heating minimum temperature P5 System filling 0 Deactivated P6 Temperature unit of measure selection 0 C P7 Room temperature reading correction 0 P8 Telephone co...

Page 158: ...g energy efficiency Description V 3 Remote timer control kit VI 4 Remote timer control kit combined with external probe installed on boiler equipped with modulating burner VIII 5 Zone manager kit comb...

Page 159: ...aximaal aantal tijdvakken per dag 173 3 6 Minimum verwarmingstemperatuur 173 3 7 Installatie vullen 174 3 8 Selectie meeteenheid temperatuur 175 3 9 Correctie lezen kamertemperatuur 175 3 10 Ingang te...

Page 160: ...1 OVERZICHT VAN DE THERMOSTAAT afb 1 code 3541Z230 Rev 04 11 2021 NL 160...

Page 161: ...de week 13 Aanduiding uren en minuten 14 Aanduiding modus OFF 15 Aanduiding handbediende werking verwarming 16 Aanduiding automatische werking verwarming 17 Aanduiding vakantiefunctie 18 Aanduiding br...

Page 162: ...______________________ 2 2 Fase 2 Instellen van het automatische weekprogramma Nadat de tijd en dag zijn ingesteld voert de thermostaat het vooraf ingestelde automatische programma uit Het verwarmings...

Page 163: ...pperen druk op de toetsen om de temperatuur te veranderen in stappen van 0 1 C Houd de toets ingedrukt om de temperatuur snel te veranderen 4 Druk op de toets De 6 tijdvakken van de dag knipperen 5 Dr...

Page 164: ...ogramma noteren Tijdvak 1 Tijdvak 2 Tijdvak 3 Tijdvak 4 Tijdvak 5 Tijdvak 6 Maandag Begintijd Temperatuur Dinsdag Begintijd Temperatuur Woensdag Begintijd Temperatuur Donderdag Begintijd Temperatuur V...

Page 165: ...et symbool verschijnt De verwarming wordt uitgeschakeld en alleen geactiveerd als de kamertemperatuur onder 5 C daalt deze maatregel heeft tot doel om vorst in huis te voorkomen Elke soort verwarmings...

Page 166: ...olgens de kamertemperatuur in in stappen van 0 1 C door op de toetsen te drukken Door de toets ingedrukt te houden verandert de temperatuur snel De handbediende werking blijft van kracht zolang er gee...

Page 167: ...zingen op om de vakantiefunctie in te stellen en te activeren 1 Druk op de toets Het symbool begint te knipperen het symbool verschijnt vast en de aanduiding van de uren en de minuten wordt 00 01 wat...

Page 168: ...nstallatie volgens een vastgestelde stooklijn verlaagd Met de weersafhankelijke temperatuurregeling wordt de temperatuur die is ingesteld met Regelen verwarmingstemperatuur de maximale aanvoertemperat...

Page 169: ...oneel worden ingeregeld Ter verhoging van het comfort kan de gebruiker echter ook enige aanpassingen programmeren Als de kamertemperatuur lager blijkt dan de gewenste waarde wordt aanbevolen een hoger...

Page 170: ...voertemperatuur installatie Buitentemperatuur Aanvoertemperatuur installatie 1 Druk 3 seconden op de toets 2 Op het display wordt de parameter CU weergegeven 3 Druk op de toets totdat de parameter OF...

Page 171: ..._______________________________________________________________________________________________ Om het automatische weekprogramma in te stellen ga te werk zoals beschreven in paragraaf Fase2 Instellin...

Page 172: ...t is dus belangrijk dat de automatische verwarming geprogrammeerd wordt op grond van het tijdvak waarin comfortabele warmte gewenst wordt en niet volgens het tijdstip waarop de verwarmingsinstallatie...

Page 173: ...te wijzigen van 2 tot 6 4 Druk op een willekeurige toets om het menu te sluiten 3 6 Minimum verwarmingstemperatuur Volg onderstaande aanwijzingen op om de minimumwaarde van het water in het verwarming...

Page 174: ...stallatie te activeren Stel 2 in met de toetsen om automatisch vullen van de installatie te activeren 4 Druk op een willekeurige toets om het menu te sluiten Let op Stel handmatig vullen in op de stuu...

Page 175: ...F te kiezen 4 Druk op een willekeurige toets om het menu te sluiten 3 9 Correctie lezen kamertemperatuur Volg onderstaande aanwijzingen op om de uitlezing van de kamertemperatuur te corrigeren van 2...

Page 176: ...om de verwarming uit te schakelen wanneer het contact gesloten wordt Stel in op 1 met de toetsen om de omgevingstemperatuur op een vaste vooringestelde waarde te regelen via de volgende parameter P9...

Page 177: ...s geschreven kunnen worden in de ketel 0 default of alleen geschreven 1 1 Druk 3 seconden op de toets 2 Op het display wordt de parameter CU weergegeven 3 Druk herhaaldelijk op de toets totdat de para...

Page 178: ...r van de backlight verlichting te veranderen 1 Druk 3 seconden op de toets 2 Op het display wordt de parameter CU weergegeven 3 Druk herhaaldelijk op de toets totdat de parameter D2 verschijnt 4 Werk...

Page 179: ...it uitsluitend voor verwarmingsketels met sensor T4 Setpoint temperatuur aanvoerwater berekend door de thermostaat P5 Momenteel brandervermogen F6 Momentele ventilatorsnelheid uitsluitend voor condens...

Page 180: ...ken aangeduid met de letter A en het symbool de werking wordt hervat door op de toets te drukken Andere storingen veroorzaken tijdelijke blokkeringen aangeduid met de letter F Deze worden automatisch...

Page 181: ...ogramma worden herhaald en moeten de gebruikersparameters opnieuw worden ingesteld Houd de toetsen tegelijkertijd 10 seconden ingedrukt nu wordt alleen de tekst RE knipperend weergegeven Als u de toet...

Page 182: ...enA Bevestigvervolgenshetachterstedeelvandethermostaataandemuurmetdemeegeleverdebevestigingsschroeven en zorg dat de 2 draden door de gaten boven de klemmen lopen Gebruik voor de elektrische aansluiti...

Page 183: ...Maximaal aantal tijdvakken per dag 6 P4 Minimum verwarmingstemperatuur P5 Installatie vullen 0 Niet actief P6 Selectie meeteenheid temperatuur 0 C P7 Correctie lezen kamertemperatuur 0 P8 Selectie wer...

Page 184: ...effici ntie van de omgevingsverwarming Beschrijving V 3 Kit externe klokthermostaat VI 4 Kit met externe klokthermostaat gekoppeld aan een buitensonde gemonteerd op een ketel met modulerende brander...

Page 185: ...191 2 4 4 192 3 193 3 1 193 3 2 194 3 3 197 3 4 198 3 5 199 3 6 199 3 7 200 3 8 201 3 9 201 3 10 202 3 11 203 3 12 CH DHW 203 3 13 203 3 14 204 4 205 4 1 205 4 2 206 4 3 206 4 4 206 4 5 206 4 6 207 4...

Page 186: ...1 1 3541Z230 04 11 2021 EL 186...

Page 187: ...1 2 3 4 5 6 7 8 9 10 11 12 13 14 15 16 17 18 19 20 21 22 23 24 25 26 27 28 RESET 29 OpenTherm 30 ECO 3541Z230 04 11 2021 EL 187...

Page 188: ...0 59 4 __________________________________________________________________________________________________________________________________________________________________________________ 2 2 2 6 1 6 00...

Page 189: ...1 6 1 DAY 1 1 2 10 3 0 1 C 4 6 5 2 2 4 6 3 4 5 6 5 7 DAY 2 2 6 3541Z230 04 11 2021 EL 189...

Page 190: ...1 2 3 4 5 6 3541Z230 04 11 2021 EL 190...

Page 191: ...2 3 3 5 C 5 C 6 00 00 1 3541Z230 04 11 2021 EL 191...

Page 192: ...0 1 C 6 0 1 C 2 4 4 1 C 1 C 3541Z230 04 11 2021 EL 192...

Page 193: ...3 3 1 1 45 1 5 C 1 00 01 2 1 00 01 1 45 00 45 3 3541Z230 04 11 2021 EL 193...

Page 194: ...3 2 1 10 1 3 2 CU 1 3 3541Z230 04 11 2021 EL 194...

Page 195: ...0 3541Z230 04 11 2021 EL 195...

Page 196: ...20 40 1 3 2 CU 3 OF 4 1 C 5 3541Z230 04 11 2021 EL 196...

Page 197: ..._______________________________________________________________________________________________________________________________________________________________________________ 2 1 3 EC Economy CO Comf...

Page 198: ...3 4 00 00 3 C 1 3 2 CU 3 P2 0 1 2 3 C 4 C 0 5 C 3541Z230 04 11 2021 EL 198...

Page 199: ...3 5 6 1 6 2 1 3 2 CU 3 P3 2 6 4 3 6 1 C 1 3 2 CU 3 P4 1 C 4 3541Z230 04 11 2021 EL 199...

Page 200: ...3 7 1 3 2 CU 3 P5 0 1 2 4 bar bar 3541Z230 04 11 2021 EL 200...

Page 201: ...3 8 C F 1 3 2 CU 3 P6 0 C 1 F 4 3 9 2 C 2 C 0 1 C 1 3 2 CU 3 P7 0 1 C 4 3541Z230 04 11 2021 EL 201...

Page 202: ...3 10 1 3 2 CU 3 P8 0 1 P9 4 5 P9 P8 1 0 1 C 6 60 3541Z230 04 11 2021 EL 202...

Page 203: ...3 11 1 3 2 CU 3 OT 4 1 3 12 CH DHW 0 1 1 3 2 CU 3 FS 4 1 3 13 1 3 2 CU 3 D1 4 3541Z230 04 11 2021 EL 203...

Page 204: ...3 14 1 3 2 CU 3 D2 4 3541Z230 04 11 2021 EL 204...

Page 205: ...4 4 1 T1 T2 T3 T4 P5 F6 F7 P8 M V 3541Z230 04 11 2021 EL 205...

Page 206: ...4 2 5 1 4 3 A F 4 4 E92 4 5 E93 3541Z230 04 11 2021 EL 206...

Page 207: ...4 6 10 RE 10 3541Z230 04 11 2021 EL 207...

Page 208: ...4 7 1 5 m 2 COM AUX A 2x0 75mm2 2x2 5mm2 50m 3541Z230 04 11 2021 EL 208...

Page 209: ...5 12 00 Day 1 20 C 5 C CU 0 OF 30 C P1 0 P2 0 P3 6 P4 P5 0 P6 0 C P7 0 P8 0 P9 20 C OT OpenTherm 1 FS 0 D1 LCD 2 D2 10 3541Z230 04 11 2021 EL 209...

Page 210: ...EL 811 2013 V 3 VI 4 VIII 5 3 3541Z230 04 11 2021 EL 210...

Page 211: ......

Page 212: ...Fabbricato in Tunisia Fabricado en T nez Wyprodukowano we Tunezji Fabriqu en Tunisie Made in Tunisia Vervaardigd in Tunesi Via Ritonda 78 a 37047 San Bonifacio Verona Italy...

Reviews: