20
(15190) PreLOG
Operating Instructions
Operating Instructions
Data Logger PreLOG (15190)
9.2.2
Setup – PreLOG Con
fi
guration
The function “
PreLOG Con
fi
guration
” is used to con
fi
gure PreLOGs.
Tip: Please note that a PreLOG can only be con
fi
gured if it is connected to the con
fi
guring PC!
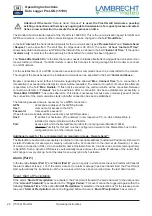
The window “
PreLOG Con
fi
guration
” has 4 tabs: “
General
”, “
PreLOG Internal Communication
”, “
Alarm (Part
1)
” and “
Alarm (Part 2)
.” In the tab “
General
” you can specify the “
Station Identi
fi
cation
” and “
Operating Mode
”
as well as the “
PC Settings
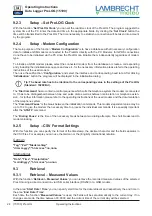
” for the communication. In the tab “
PreLOG Internal Communication
” you can
specify the settings of the PreLOG for the communication via modem. For further information on the con
fi
guration
of the modem respectively the initialisation commands for the modem, please refer to chapter 9.2.4 (p. 22) and
the documentation of the modem in use. In the tabs “
Alarm (Part 1)
” and “
Alarm (Part 2)
” you can de
fi
ne certain
events at which the PreLOG will transmit a standardised alarm message via GPRS modem.
General
Station Identi
fi
cation
The “
Serial number
” and the date of the “
Last Con
fi
guration
” will be obtained from the PreLOG which is selected
under “
Setup – Select Current Station
.” They are used to identify the station. The standard station number is
0001. This value should only be changed if, and only if, multiple PreLOG systems are in the same network or are
used with GPRS communication. Numbers between 0001 and 9999 are allowed.
Tip: The station number
“
0
”
ist reserved. Every PreLOG will react with it on requests, but no
PreLOG can be con
fi
gured to have the station number
“
0
.”
If the station number of the PreLOG differs from the number saved in the PreLOG-Commander, please
fi
rst check
if the correct station is selected (“
Setup – Select Current Station
”). If you know the station number, enter it in the
fi
eld and press the tabulator key. An “
Enter
” button will then appear, click on this to
fi
nish the process. Afterwards
communication with the connected PreLOG should work again. If you do not know the station number, enter the
station number “
0
” instead. “
Request CFG
” you receive the con
fi
guration data of the connected station and thereby
the current station number. Before closing the window save the data by pressing the “
Save
” button.
Operating Mode
Since the PreLOG is a pulse logger, it is mainly used to record amounts of precipitation over time. To use it this
way one selects in the
fi
eld “
Time Base
” the duration in min over which the pulses are added up. If instead of a
time “
Individual Pulses
” is selected, the PreLOG records each pulse with a corresponding timestamp. The pulses
will be recorded with the speci
fi
ed resolution factor or if necessary with the corresponding intensity-dependent
corrected value and a timestamp. The sums are calculated respectively and recorded with timestamp, too.
In the
fi
eld “
Resolution Factor
” you can enter the amount of precipitation in mm/m² which corresponds to a
tipping bucket pulse of the connected precipitation sensor. In case of precipitation sensors of the type 1518H3,
15188 and 15189 this is 0.1 mm/pulse for the 2 cm³ tipping bucket and 0.2 mm/pulse for the 4 cm³ tipping bucket.
If a rain[e] is connected, the resolution factor has to be selected in accordance to the rain[e] settings (smallest
possible value: 0.01).
For LAMBRECHT precipitation sensors without an integrated precipitation correction or signal linearisation the
PreLOG speci
fi
c linearisation can be activated by checking the box for “
Signal Linearisation
.” It compensates
the intensity-dependent measuring error due to the principle of tipping bucket precipitation sensors. It means that
precipitation amounts (individual pulses as well as sums) will be recorded corrected depending on the intensity.
If needed the PreLOG can “
Calculate Sum Since Switch On
” (amount of precipitation since the PreLOG was
switched on) and “
Calculate Sum Since Last Retrieval
.” These options can be activated with the corresponding
check boxes. The recorded precipitation amount since the last retrieval will be reset to zero automatically after
each retrieval. The values will be recorded and displayed in mm/m². Removing the battery and disconnection from
any power supply will reset both values to zero, too.


