background image

Exclusive to Howdens Joinery.co

Page _  10

Replacing the Lamps                                                                                       


Halogen lamps that may need to be replaced 
periodically. 

To do this, ensure that the power is switched off and 
the lamps have had time to cool.

‡


‡

Unscrew the lamps and replace with new 
lamps of the same type and wattage.

Lamp replacement is not covered by your
guarantee

.


The lamps on this appliance should only be used
during operation of the cooker hood. They should
not be left on permanently and used as a main
lighting source. The extractor is for domestic use
only.


Press latch towards side of extractor

2 Lower 

 to remove.

The Carbon Filters   


Carbon 

 have a limited life. We advise you 

to change them when there is a noticeable drop 
in performance. The intervals between changing 
the 

 will depend entirely upon the amount of 

cooking you do, but on average they will last about 
6 months. Please quote the part refrence number
HJA2900 


(pack of 2) when re-ordering.

‡

To gain access to the carbon 


of


all


remove the grease 

 as above. 

‡

Remove the old 

 and install new charcoal


 by turning them gently

1

2

LAMONA 

Appliances

28w

Summary of Contents for HJA2450-2

Page 1: ...User Installation Guide HJA2450 2 Stainless Steel Chimney Extractor...

Page 2: ...seful tips about usage Warning for possible hazards to health and property Warning possibility of electric shock This appliance is marked according to the European Directive 2012 19 EU on Waste Electr...

Page 3: ...tion and operation 08 Extractor layout 08 Control panel layout 08 Care and maintenance 09 General Cleaning 09 Grease Filters 09 Carbon Filters 10 Replacing the Lamps 10 Installation 11 Methods of extr...

Page 4: ...or other purposes Commercial use will void the guarantee The manufacturer shall not be liable for any damage caused by improper use installation or handling errors This product is not intended to be u...

Page 5: ...oduct when your judgment or coordination is impaired by the use of alcohol and or drugs Product must be disconnected from the mains during installation maintenance cleaning and repair procedures Repai...

Page 6: ...installed by a qualified person in accordance with the regulations in force otherwise the guarantee may become void Electrical products can be dangerous to children Keep children away from the product...

Page 7: ...icity In case of any damage switch off the product and disconnect it from the mains To do this turn off the fuse at the fuse box Make sure that fuse rating is compatible with the product packaging acc...

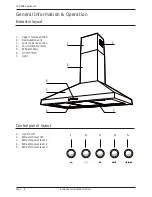
Page 8: ...chimney section 4 Fan and light controls 5 Extractor body 6 7 Light General Information Operation 2 3 4 5 1 Extractor layout Control panel layout 1 Light on off 2 Extractor Power off 3 Extractor powe...

Page 9: ...nd a mild detergent NEVER use abrasive cleaners Care and maintenance To avoid the possibility of fire adhere strictly to all of the recommendations included in this booklet paying particular attention...

Page 10: ...ft on permanently and used as a main lighting source The extractor is for domestic use only 1 Press latch towards side of extractor 2 Lower to remove The Carbon Filters Carbon have a limited life We a...

Page 11: ...o the outlet of the extractor Installation Ducting kit Supplied Separately Vent through external wall or ceiling Filtered air recirculated Charcoal filters are not required if the extractor is to be d...

Page 12: ...ractor body a two piece telescopic decorative chimney one brackets ducting connector four 10mm screws six 32mm screws and six rawl plugs 1 Main Extractor Body 2 Upper Chimney 3 Lower Chimney 4 Vent Ad...

Page 13: ...ities are adhered to concerning the discharge of exhaust air Ensure adequate room ventilation is provided when the extractor is used in the same room as appliances supplied with energy other than elec...

Page 14: ...ssories required to install the hood are inside the hood t a minimum of 700mm if required t chimney bracket to the wall using a 6 mm diameter drill t t With the help of an assistant locate the hood on...

Page 15: ...to the electricity supply see electrical connections page t Secure the lower chimney bracket to the wall using the screws provided t provided on the lower chimney bracket t the ceiling t Extend the u...

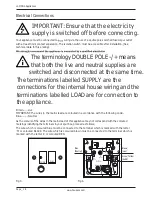
Page 16: ...in the mains lead are coloured in accordance with the following code Blue Neutral Brown Live As the colours of the wires in the mains lead of this appliance may not correspond with the coloured markin...

Page 17: ...does as usual ensure any venting is not obstructed The extractor works normaly but smells linger unwanted smells Product does not operate The mains fuse maybe defective or has tripped Check fuses in...

Page 18: ...nufacturer s instructions and used for normal domestic purposes This guarantee does not cover accidental damage misuse or alternations which are likely to affect the product The guarantee is invalid i...

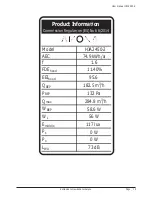
Page 19: ...ser manual HJA2450 2 Model HJA2450 2 AEC 74 9 kWh a f 1 6 FDEhood 11 40 EEIhood 95 6 QBEP 182 5 m3 h PBEP 132 Pa Qmax 284 8 m3 h WBEP 58 6 W WL 56 W Emiddle 117 lux Ps 0 W Po 0 W LWA 73 dB Product Inf...

Page 20: ...If supplied please stick your self adhesive product rating plate here or make a note of the product serial number below in the box below for future reference Serial Number v2 08 10 15...

Reviews: