background image


22 

Completing the installation 
 

o


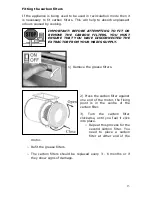
If you are setting the appliance to recirculation mode, then you 
should now fit the two carbon filters. See the “Fitting the carbon 

filters” section on page 13 - 14. 


o


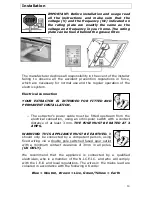
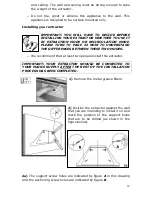
The  electrical  connection  must  correspond  to  the  electrical 

requirement noted on the rating plate, which is placed inside the 
extractor.  The  appliance  should  now  be  connected  to  the 

electrical  supply.  See  page  14  -  15  for  detailed  information  on 
the electrical connection. 


o


Use  a  stainless  steel  cleaner  and  polish  on  the  stainless  steel 

sections of the appliance. 


o


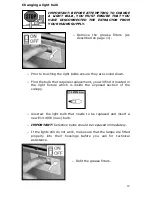
Refit the grease filters and then switch on the mains 
supply to the appliance. Check that the appliance is 

operating  correctly  by  selecting  each  speed  and 
switching the light bulbs on and off. 


Extraction mode or recirculation mode? 
 

What  is  the  difference  between  extraction  and  recirculation 
modes? 


o


To get optimum performance from your extractor, the air will be 

taken out of the room via external ducting.


o


Unfortunately if you live in a flat or the hood is too far from an 
outside wall, this may not be possible. The only alternative is to 

recirculate the air.


o


In recirculation mode stale air is taken via the grease filter, and 

passed through a charcoal filter for purification. The air then re-
enters the kitchen via an opening in the extractor

.  


What is a charcoal filter and do I need one?


o


All extractors have grease filters but if you are using  it hood in 
recirculation  mode,  then  charcoal  filters  must  be  fitted  in 

addition to the grease filters.  


o


IMPORTANT: 

If  you  are  using  the  appliance  in  recirculation 

mode,  then  PLEASE  NOTE  that  some  of  the  vent  in  the  upper 

chimney section must be exposed. You will have to take this into 
account  when  calculating  the  minimum  height  of  the  extractor 
when installed.  


Summary of Contents for HJA2480

Page 1: ...60cm Extractor LAM2401 Black Instillation User Instruction HJA2480 Stainless Steel Issue 4 Apr 2012...

Page 2: ...ing 10 The grease filters 10 Maintenance 11 13 Removing and cleaning the grease filters 11 Changing a light bulb 12 Fitting the carbon filters 13 Installation 14 22 Electrical connection 14 15 Before...

Page 3: ...upply Cut off and render any plug useless Cut the cable off directly behind the appliance to prevent misuse This should be undertaken by a competent person o The packaging materials are environmentall...

Page 4: ...ation Use Regulations the Building Regulations issued by the Department of the Environment the Building Standards Scotland Consolidated Regulations issued by the Scottish Development Department o It i...

Page 5: ...all the way through o Keep young children from using playing with or tampering with the cooker hood Older children and infirm persons should be supervised if they are using the cooker hood o Your extr...

Page 6: ...The lights on this appliance should only be used during operation of the extractor They should not be left on permanently and used as a lighting source o The extractor should not be exposed to a dire...

Page 7: ...mm 933 mm Width 600 mm Depth 475 mm DIMENSIONS OF CHIMNEY SECTION 175 mm x 220 mm Your stainless steel extractor is fitted with o High extraction tangential motor o Push button control operation o 3...

Page 8: ...2 62 dB If you are using the appliance in recirculation mode then PLEASE NOTE that some of the vent in the upper chimney section must be exposed You will have to take this into account when calculatin...

Page 9: ...one water resistant film to protect the stainless steel surfaces To use your extractor o A ON OFF button o B Speed selection buttons Low speed Medium speed High speed o C Light on off button o Before...

Page 10: ...r grill with mild liquid detergents and a new damp cloth o If you are using the appliance in recirculation mode then be sure to replace the carbon filters at the recommended intervals see section on F...

Page 11: ...e and pulling them away from the extractor o Soak the grease filters in hot water and washing up liquid for about an hour o Rinse them off thoroughly with hot water o Repeat the process if required o...

Page 12: ...cooled down o Find the bulb that requires replacement you will find it located in the light fixture which is inside the exposed section of the canopy o Unscrew the light bulb that needs to be replaced...

Page 13: ...VE DISCONNECTED THE EXTRACTOR FROM YOUR MAINS SUPPLY 1 Remove the grease filters 2 Press the carbon filter against one end of the motor the fixing point is in the centre of the carbon filter 3 Turn th...

Page 14: ...CTOR IS INTENDED FOR FITTED AND PERMANENT INSTALLATION o The extractor s power cable must be fitted upstream from the electrical connection using an omni polar switch with a contact distance of at lea...

Page 15: ...g of the extractor o Ensure that all electrical connections are carried out by a suitably qualified person o Before commencing installation of the extractor the grease filters should be removed o Chec...

Page 16: ...OW TO UNDERSTAND THE DIFFERENCES BETWEEN THESE TWO MODES o We recommend that at least two people install this extractor IMPORTANT YOUR EXTRACTOR SHOULD BE CONNECTED TO YOUR MAINS SUPPLY AFTER THE REST...

Page 17: ...holes in the wall on the positions that you have marked in step 2 4 Insert rawl plugs into all of the holes that you have drilled 5 Fasten the support screws halfway in leaving them 10 mm out of the w...

Page 18: ...18 7 Fully tighten the support screws A and then screw the anchoring screws B through the relevant holes in the extractor Fully tighten the anchoring screws into the wall...

Page 19: ...ross section of at least 150 cm o The maximum distance between the coupling and your discharge outlet should be 3 metres with one 90 degree bend For each additional 90 degree bend the maximum distance...

Page 20: ...ide measurements of both sides of chimney section D on the wall with a pencil and then remove chimney section D 11 Take the flat bracket E and place it between the two pencil marks that you made in st...

Page 21: ...the extractor and fix it using the two screws that are supplied o Secure the top of chimney section C to the flat bracket using the screws provided o Slide chimney section D inside of chimney section...

Page 22: ...mode What is the difference between extraction and recirculation modes o To get optimum performance from your extractor the air will be taken out of the room via external ducting o Unfortunately if yo...

Page 23: ...chen is not well ventilated enough o If the extractor is set up for recirculation mode check that the carbon filters do not need replacing o If the extractor is set up for extraction mode check that t...

Page 24: ...24 Your Guarantee...

Page 25: ...25...

Page 26: ...26...

Page 27: ...27...

Page 28: ...28...

Reviews: