


9
Using your extractor
IMPORTANT: THIS PROCESS MUST BE FOLLOWED
BEFORE THE EXTRACTOR IS USED FOR THE FIRST
TIME.
o
You should use a good quality stainless steel cleaner and polish
on ALL of the stainless steel areas of your extractor, before it is
used for the first time.
o
This will help to leave a silicone water-resistant film to protect
the stainless steel surfaces.
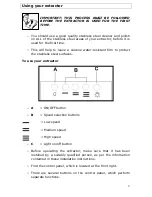
To use your extractor
o
A
= ON/OFF button
o
B
= Speed selection buttons
= Low speed
= Medium speed
= High speed
o
C
= Light on/off button
o
Before operating the extractor, make sure that it has been
installed by a suitably qualified person, as per the information
contained in these installation instructions.
o
Find the control panel, which is located at the front right.
o
There are several buttons on the control panel, which perform
separate functions.
Summary of Contents for HJA2480
Page 24: ...24 Your Guarantee...
Page 25: ...25...
Page 26: ...26...
Page 27: ...27...
Page 28: ...28...


