background image

_ 13

User manual LAM1625

Installation

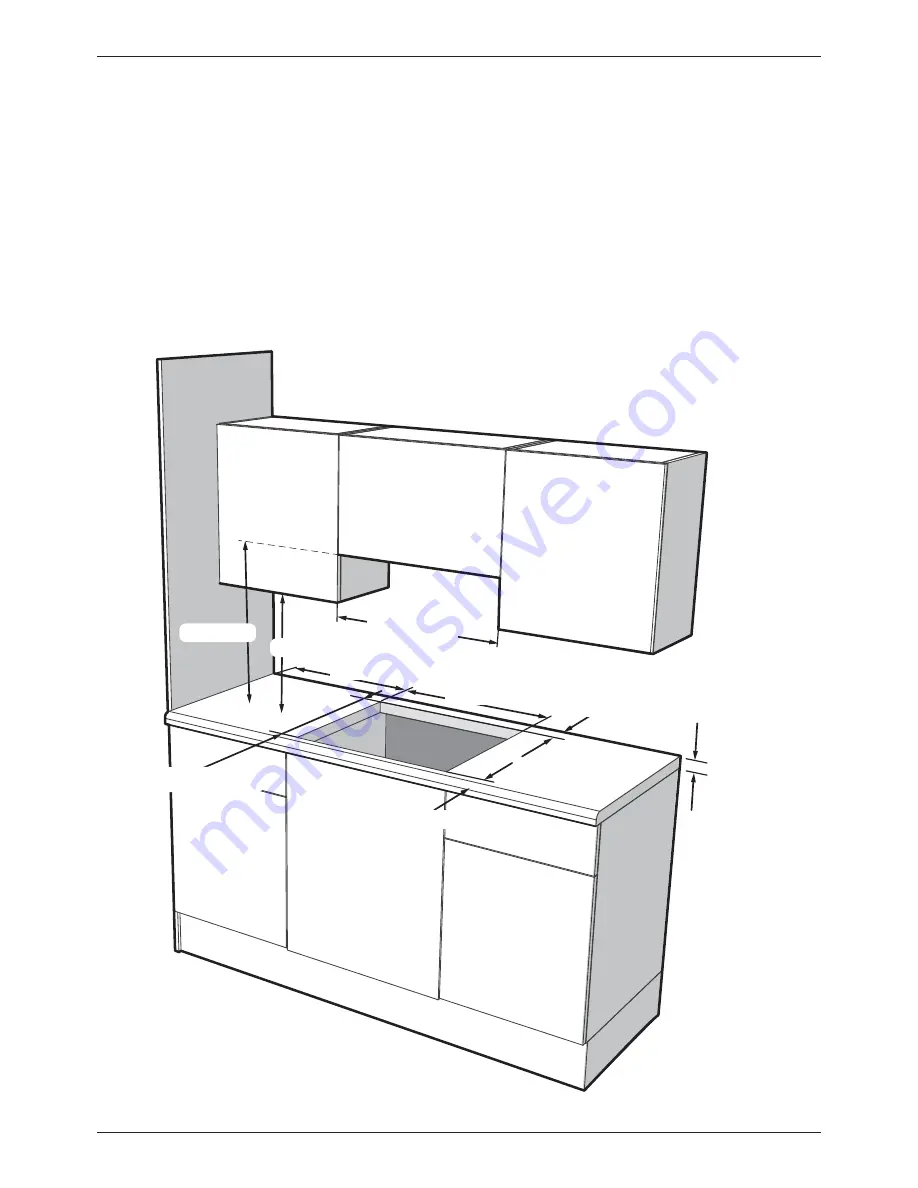
Clearances and dimensions – requirements

‡

No shelf or overhang of combustible material 
should be closer than 650mm above the hob.

‡

There must be a minimum clearance of 50mm 
between the edges of the hob and any side 
walls; this clearance must be maintained up to 
420mm above the worktop. 


‡

When installing an extractor hood above the 
hob, refer to its manufacturer’s instructions 
Clearances and dimensions – requirements 

‡

There must be a minimum clearance of 50mm 
between the rear edge of the hob and the rear 
wall. This clearance must be maintained up to 
650mm above the worktop (unless otherwise 
stated in your extractor manual) 


Minimum height to extractor


as recommend in extractor 

 instruction 

manual

*

(

737.5mm (77cm Hobs)

50mm min

50mm Min

50mm min

420mm min

487.5mm (77cm Hobs)

Minimum distance
between carcasses must 
be equal to width of hob 

*

650mm min

30mm min /

50mm max

Summary of Contents for LAM1625

Page 1: ...User Installation Guide LAM1625 5 Zone Ceramic Touch Control Hob ...

Page 2: ...belled accordingly with the crossed out wheeled bin symbol This indicates for disposal purposes at end of life that these products must be taken to a recognised collection points such as local authority sites local recycling centres This appliance Complies with European Community Directives CE for household and similar electrical appliances and Gas appliances where applicable This appliance confor...

Page 3: ...If you have an Electrical Fire 06 03 Using your hob 08 Touch controls 08 Controls layout 08 Initial setup 08 Functions 09 Timed cooking 10 Safety shut off 10 04 Cleaning and Maintenance 11 Ceramic hob glass 11 05 Trouble Shooting 12 06 Installation 13 General Information 13 Positioning 13 Connect to the electricity supply 16 Technical Data 17 07 Your guarantee 18 ...

Page 4: ...ously supervised This appliance can be used by children aged from 8 years and above and persons with reduced physical sensory or mental capabilities or lack of experience and knowledge if they have been given supervision or instruction concerning the use of the appliance in a safe way and understand the hazards involved Children shall not play with the appliance Cleaning and user maintenance shall...

Page 5: ...e Àammable liquids or items in the vicinity of this appliance WARNING Do not modify this appliance General Always ensure that pan bases are dry stable DQG ÁDW EHIRUH XVLQJ WKHP RQ WKH KRE Always match the size of pan to the cook zone do not use large pans on small zones or vice versa Always position pans over the centre of the cook zone and turn the handles to a safe posi tion so they cannot be kn...

Page 6: ...means of a external timer or seperate remote control system Deep fat frying presents more dangers in your kitchen 1HYHU ÀOO D SDQ RU RWKHU GHHS IDW IU HU PRUH than one third full of oil R QRW XVH D ÀUH H WLQJXLVKHU RQ D SDQ RI burning oil the force of the extinguisher can VSUHDG WKH ÀUH DQG FUHDWH D ÀUHEDOO I RX KDYH DQ HOHFWULFDO ÀUH LQ WKH NLWFKHQ Pull the plug out or switch off the power at the...

Page 7: ...right lights such as cooker hood and ensure the appliance is not in direct sunlight This is to enable the electronic controls to calibrate its sensitivity against natural ambient lighting approx 30 seconds Failure to observe the above will result in the hob not functioning correctly Display showing FL To rectify remove all strong lighting sources and re apply power The hob should complete the cali...

Page 8: ...QJ RU DIWHU VHFRQGV WKH hob will auto set the hob power and will beep DQG VWRS ÁDVKLQJ To adjust the power setting see use the slider DV LQ ÀJ Repeat as necessary for the other zones Switching a zone off Touch the required cook zone key until the RQH GLVSOD ÁDVKHV QRZ UHWXUQ WKH SRZHU OHYHO WR E XVLQJ WKH VOLGHU DV LQ ÀJ XDO RQH I ÀWWHG Note The dual zone is where the inner ring of the heating ele...

Page 9: ...e 00 also two Red LEDs will LOOXPLQDWH WKH ÀUVW RQH ZLOO EH ÁDVKLQJ RQ WKH timer to indicate the activated timed cook zone and the second one 00 Indicates that the time can be adjusted 8VLQJ WKH Ǘµ RU 9µ V PEROV VHW WKH WLPH required in minutes To check remaining time Touch the symbol for the desired zone followed by the timer symbol To adjust the set time Touch the symbol for the desired zone fol...

Page 10: ...bborn marks a specialist hob scraper or cleaner can be used Do not use steam cleaners or high pressure cleaning equipment Regular cleaning will prevent any salts or minerals from accumulating on your hob and discolouring the glass Wipe any spillage as soon as possible Clean the hob top as regularly as possible this will prevent any build up of grease which may EH D ÀUH KD DUG Foods with high sugar...

Page 11: ...er interface temperature sensor short circuit Touch NTSC Error FE App off When the fault disappears User interface temperature sensor open circuit Touch NTc Error Ft App off When the fault disappears User interface overtemperature 96ºC Touch NTc Error switching off all heaters Fc App off When user interface temperature 89ºC EEPROM fault Eeprom Checksum Error FH App off Microcontroller A D converte...

Page 12: ...h this product type Note Avoid installing the appliance next to doors and under windows This will avoid the potential for hot cookware being knocked off the hob when doors and windows are opened Risk of burns Built in appliances may only be used after they have been built into suitable built in units and surfaces that meet the required standards Positioning Choosing your installation We recommend ...

Page 13: ...or hood above the hob refer to its manufacturer s instructions Clearances and dimensions requirements There must be a minimum clearance of 50mm between the rear edge of the hob and the rear wall This clearance must be maintained up to 650mm above the worktop unless otherwise stated in your extractor manual Minimum height to extractor as recommend in extractor instruction manual 737 5mm 77cm Hobs 5...

Page 14: ...ion QVWDOO WKH VSLUH FOLSV VKRZQ LQ ÀJ Place the hob in the aperture checking the hob glass is covering the work top along all four sides Set the front edge of the appliance parallel with the front of the work top Locate and attach the securing clamps as required Tighten the screws so that the hob is pulled down ÀUPO DJDLQVW WKH ZRUNWRS WKXV HQVXULQJ D JRRG seal Recessed method Recess the work top...

Page 15: ...e with parts of the cabinet If necessary cut away cabinetry and use appropriate À LQJ EUDFNHWV IRU RXU LQVWDOODWLRQ Typical Installation positions Typical Installation positions Seal Underside of hob Secure the hob to the worktop by means of the brackets provided taking the thickness of the worktop into account ÀJ Worktop Screw Bracket Spire clip 1 2 3 4 30mm 40mm 50mm 1 2 3 4 70 90cm Appliances o...

Page 16: ...n Scheme who will comply with the required local regulations Connection should be made with a suitable cable Ensure that you route all mains electrical cables well away from any adjacent heat source such as an oven or grill Firstly open the terminal block cover using a small ÁDW EODGHG VFUHZGULYHU LQ WKH GRRU UHOHDVH WDEV shown Strip the wires connect to the terminal block as shown in the terminal...

Page 17: ...ZHU 5DWLQJ 9 50Hz kW 7 53kW Hob Details Cook Zone Normal Power Rating kW 230V LH Front 1 65 LH Rear 1 1 Center dual RH Rear 0 69 2 0 1 1 RH Front 1 65 Hob Dimensions W X D X H mm 770 x 520 Cut Out Required W x D mm 737 5 x 487 5 Cable Type HORR F5 4 0mm 3 core or equivalent Installation ...

Page 18: ...perated in accordance with the manufacturer s instructions and used for normal domestic purposes This guarantee does not cover accidental damage misuse or alternations which are likely to affect the product The guarantee is invalid if the product is tampered with or repaired by any unauthorised person 7KH JXDUDQWHH LQ QR ZD DIIHFWV RXU VWDWXWRU RU OHJDO ULJKWV What to do if you need to report a pr...

Page 19: ...cooking zones 5 HeaƟng technology Ceramic ႇ FL 180mm RL 150mm FR 180mm RR 150mm Centre 210mm ECelectric cooking FL 200 Wh kg RL 184 5 Wh kg FR 200 Wh kg RR 194 2 Wh kg Centre 185 4 Wh kg ECelectric hob 192 4 Wh kg Commission RegulaƟon EU No 66 2014 Product InformaƟon ...

Page 20: ...Z If supplied please stick your self adhesive product rating plate here or make a note of the product serial number below in the box below for future reference Serial Number 083316802 v3 17 11 15 ...

Reviews: