background image

2

www.howdens.com

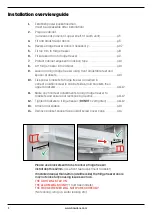
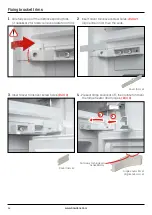
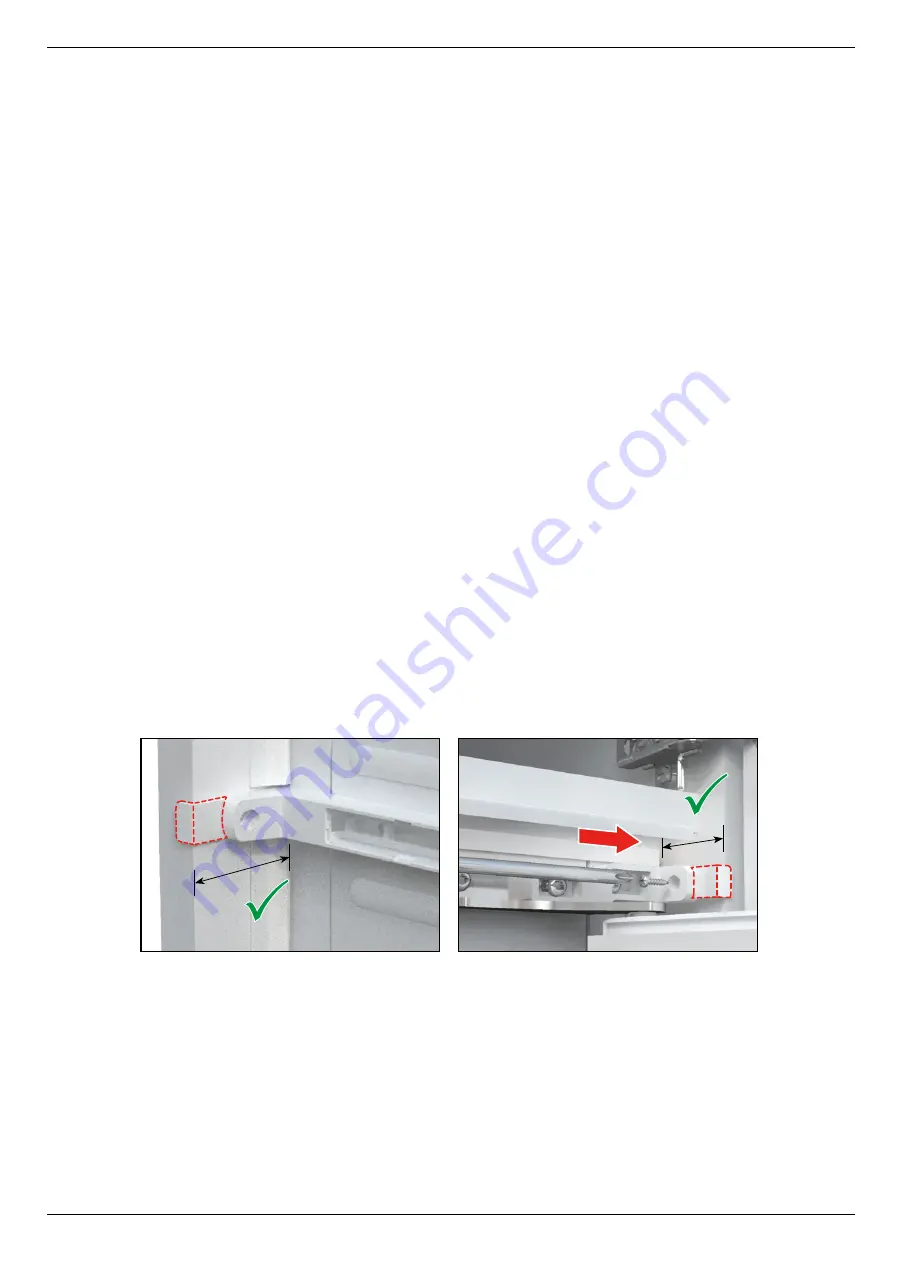
42mm

42mm

Please use brackets with tabs to ensure fridge freezer  
install depth is 42mm. 

(Use front feet adjustment to assist)

If installed deeper than 42mm (at either side) the fridge freezer doors 
may not close fully causing issues such as:- 

THE LIGHT WILL STAY ON


THE ALARM WILL SOUND


(*Frost free models)


THE FRIDGE FREEZER WILL NOT WORK CORRECTLY


(Not cooling, icing-up, water leaking etc.)

Installation overview guide

1.


Establish power socket location,  


(must be accessible after installation)

2.


Prepare cabinet,  


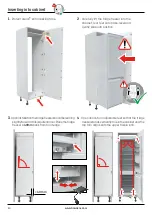
(remove back panels, fit upper shelf, fit plinth vent). . . . . . . . . . . . .p.5

3.


Fit and adjust décor doors . . . . . . . . . . . . . . . . . . . . . . . . . . . . . . . . . . . . .p.5

4.


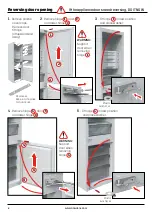
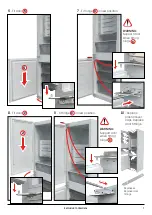
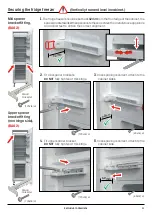
Reverse fridge freezer doors if necessary  . . . . . . . . . . . . . . . . . . . . . .p.6-7

5.


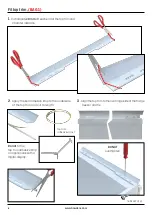
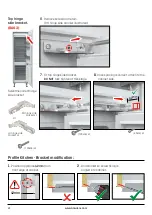
Fit top trim to fridge freezer  . . . . . . . . . . . . . . . . . . . . . . . . . . . . . . . . . . . .p.8   

6.


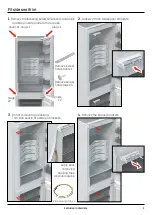
Fit side seal trim to fridge freezer. . . . . . . . . . . . . . . . . . . . . . . . . . . . . . .p.9 

7.


Protect cabinet edges with masking tape  . . . . . . . . . . . . . . . . . . . . . .p.10

8.


Lift fridge freezer into cabinet . . . . . . . . . . . . . . . . . . . . . . . . . . . . . . . . . .p.10

9.


Level and align fridge freezer using front adjustable feet and 


spacer brackets  . . . . . . . . . . . . . . . . . . . . . . . . . . . . . . . . . . . . . . . . . . . . . . .p.10

10.

  Fix spacer brackets to fridge freezer and when in  


correct position screw to cabinet sides, (mid brackets then 


upper brackets). . . . . . . . . . . . . . . . . . . . . . . . . . . . . . . . . . . . . . . . . . . . . . . .p.11-12

11.

  Make any final feet adjustments to align fridge freezer to  


brackets and ensure correct spacing depths . . . . . . . . . . . . . . . . . . .p.11-12

12.

  Tighten brackets to fridge freezer, (

DO NOT

 overtighten)  . . . . . . . .p.11-12

13.

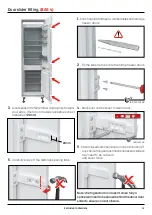
  Attach door sliders  . . . . . . . . . . . . . . . . . . . . . . . . . . . . . . . . . . . . . . . . . . . .p.13

14.

  Remove bracket spacer tabs, install screw cover caps. . . . . . . . . .p.14

Summary of Contents for TA52002

Page 1: ...ing and use of the appliance l The appliance should be fitted by a suitably competent and qualified person l Please keep these instructions in a safe place for future reference l Danger of suffocation...

Page 2: ...nth vent p 5 3 Fit and adjust d cor doors p 5 4 Reverse fridge freezer doors if necessary p 6 7 5 Fit top trim to fridge freezer p 8 6 Fit side seal trim to fridge freezer p 9 7 Protect cabinet edges...

Page 3: ...loves when handling NOTE If the electricity cable is damaged it must be replaced by a competent person WARNING Do not use extension cables adapters WARNING This appliance must be earthed The electric...

Page 4: ...e bracket x1 BAG 3 RH Hinge cover x2 LH Hinge cover x2 BAG 5 Plastic washer x2 BAG 6 Screw hole plug x4 Screw hole cover x2 Remove parts bags from salad crisper drawer Top trim x1 Top trim adhesive st...

Page 5: ...he pre drilled holes indicated IMPORTANT Goodairflowaroundthefridgefreezeris essential for optimum performance and energy saving Ventilation channels must be provided AIRFLOW Plinth vent must be fitte...

Page 6: ...upwardsand away 2 Remove hinge 1 door 2 and lower hinge 3 4 Remove hinge 4 door 5 and lower hinge 6 3 Fit hinge 1 in new position and place washer 5 Fit hinge 4 in new position and place washer 4 5 6...

Page 7: ...door fittings 6 Fit door 5 8 Fit door 2 7 Fit hinge 6 in new position 9 Fit hinge 3 in new position WARNING Support door when fitting hinge 3 10 Replace plastic cover caps Replace door fittings 5 2 WA...

Page 8: ...self adhesive strip to the underside of the top trim and cut to length 1 Cutindicated3mmoffeachendofthetoptrimand chamfer inwards 3 Alignthetoptrimtothenonhingesideofthefridge freezer and fix DO NOT o...

Page 9: ...ugs x5 Apply seal removing backing tape asyouprogress Side sealing strip x1 1 Removethefollowingscrewholecoversandplugs and keep in safe place for future use Fit side seal trim 2 Loosely attach two sp...

Page 10: ...0mm back from front edge 4 Open doors turn adjustable feet so that the fridge freezerstandsverticallytrueinthecabinetandthe top trim aligns with the upper fascia infill 2 Carefully lift the fridge fre...

Page 11: ...1 Thefridgefreezershouldbesetback42mmfromthefrontedgeofthecabinet the spacerbracketswillsettheappliancetothecorrectdepth Carefullymoveappliance and adjust feet to obtain the correct alignment 2 Fit m...

Page 12: ...6 Remove screw and retain RH hinge side bracket illustrated 8 Oncespacingiscorrect attachtothe cabinet side 7 Fit top hinge side bracket DO NOT fully tighten at this stage Top hinge side bracket BAG...

Page 13: ...door 5 Carefully snap off the distance spacing tabs 6 Open closedoorscheckingforcorrectfunction if anycabinethingeadjustmentisnecessarysliders may need to be re fixed Add cover trims Note If refriger...

Page 14: ...ixing bracket trims 1 Carefully snap off the distance spacing tabs if necessary for finish remove bracket and trim 2 Insert cover trims over screw holes BAG 2 Clip centre in first then the ends 3 Inse...

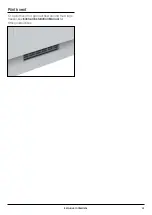
Page 15: ...15 ExclusivetoHowdens Plinth vent Fit a plinth vent for good airflow around the fridge freezer see Kitchen Installation Manual for fitting instructions...

Page 16: ...f Trading a copy of the Howdens Terms and Conditions is available upon request Copyright 2021 Howden Joinery Ltd All rights reserved Howden Joinery Ltd Thorpe Road Howden East Yorkshire DN14 7PA Engla...

Reviews: