


• DO NOT move or carry the bassinet with the infant inside of it.
• DO NOT use bassinet on a table or other elevated surface.
• SUFFOCATION HAZARD: Infants can suffocate:
• In gaps between an extra pad and side of the bassinet.
• On soft bedding.
• NEVER add a mattress, pillow, comforter or padding. Use ONLY the pad
provided by the manufacturer.
• If a sheet is used with the pad, use only the one provided by the manufacturer
or one specifically designed to fit the dimensions of the bassinet.
• WARNING - Prevent possible strangulation or entanglement. NEVER use
crib sheet or cover unless it fits securely on crib mattress.
• ONLY use a mattress that is long and wide enough so the gap between the
mattress and the two sides forming one corner of the bassinet is NO MORE
THAN 25 mm (1 inch) when the mattress is pushed into the opposite corner
of the bassinet.
• NEVER use plastic shipping bags or other plastic film as a mattress cover not
sold and intended for that purpose as this may cause suffocation.
• Strings can cause strangulation!
DO NOT suspend strings over a product or
attach strings to toys. DO NOT place items with a string around a child’s
neck, such as canopy strings or pacifier cords.
•
DO NOT place bassinet near a window where cords from blinds or drapes
may strangle a child. Child may also fall out of window.
•
DO NOT place cords, straps or similar items that could become wound
around a child’s neck in or near the bassinet.
•
DO NOT place bassinet near a radiator, stove or other heat or ignition source
that could cause overheating of child or may ignite bassinet/bedding.
• To reduce the risk of SIDS, pediatricians recommend healthy infants be
placed on their back to sleep unless otherwise advised by your physician.
• Use bassinet with only one child in it at a time.
CONSUMER INFORMATION
(continued)
SAFETY WARNINGS
!
LAMONT HOME
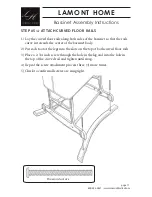
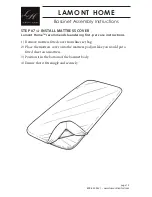
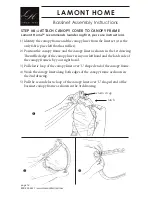
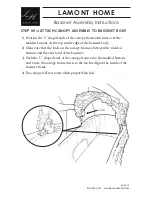
Bassinet Assembly Instructions
page 5
800-553-5621 • www.lamontlimited.com