Lampert Tools USA
2020
12
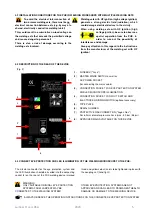
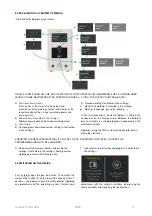
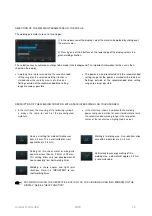
SELECTION OF THE WELDING PARAMETERS ON THE PUK U5:
The welding parameters are set in two stages:
1) In the upper area of the display, select the metal to be welded by sliding over
the metal names.
2) Pressing one of the 5 buttons on the lower edge of the display selects the
given welding situation.
This selection causes numerous settings to be made in the background. The important information for the user is then
shown on the display:
•
A welding time is preselected and the recommended
setting range for the selected welding situation is
marked under the scale by means of a blue bar.
Settings outside of the recommended blue setting
range are always possible.
•
The power is also preselected and the recommended
setting range for the power is marked with a blue bar.
Settings outside of the recommended blue setting
range are always possible.
DESCRIPTION OF THE WELDING SITUATION WITH ASSOCIATED SYMBOL ON TOUCHSCREEN:
•
In the start level, the meaning of the following symbols
is always the same for each of the preconfigured
materials.
•
In the start level shows in addition to the welding
power and pulse duration for each stored material also
the recommended working range in the respective
scales of the touchscreen, highlighted in colour.
Universal setting for material thicknesses
from 0.3 mm. This is well suited for most
applications (≥
0.3 mm).
Setting for thin sheet metal or wire parts
equal to or less than ca. 0.3
mm (≤
0.3 mm).
This setting offers very low development of
heat, especially for short welding times.
Welding in sharp angles and tight joint
situations. Here it is IMPORTANT to use
short welding times.
Melting of welding wire. Use identical alloy
wire with a diameter of ca. 0.4 mm.
Particularly low-energy melting of thin
welding wire, a diameter of approx. 0.2 mm
is recommended.
PUSHING/TOUCHING THE RESPECTIVE BUTTON FOR 2 SEC.
BRINGS UP AN INFO WINDOW ON THE
DISPLAY. SEE 6.3 "HELP FUNCTION"
Summary of Contents for PUK U5
Page 1: ...Operating manual PUKU5 ...


