background image

4

   Website : www.sav-doviris.com

• Please read these instructions carefully before starting to assemble the greenhouse.

• Please ensure that all the components mentioned in this instruction  are present in the box and 

• Please follow the steps in the order indicated by the manual.

• Please keep this assembly instruction in a safe place for future reference.

• Please wear gloves, shoes and safety goggles when assembling the greenhouse.

• Follow the safety instructions of the tools you use for this assembly.

• In case of bad weather (rain, wind, thunderstorm, ...), do not set up your greenhouse.

• The greenhouse must be assembled by 2 people.

• Plastic bags and small components should be kept out of reach of children. Keep children away from  

the assembling area. 

• Aluminium is a metal with electrical conductivity, keep aluminium profiles away from any electrical 

• Not all heat-producing appliances (barbecue, torch, ...) can be stored in the greenhouse.

• The greenhouse must be positioned and fixed on a horizontal and even ground, not exposed to wind.

• Check the abscence of networks (water, electricty, gas) underneath the installation site of the greenhouse.

• Beware, do not climb on the roof : risk of fall and serious injuries.

• To clean your greenhouse, use clear soapy water.

• Do not use acetone, abrasive cleaners or other special detergents to clean the panels. 

• Grease the door rail regularly.

• Clear the roof of snow and leaves.

(except the greenhouse base). You can do so once the glass and panels are in place. 

SAFETY WARNINGS


IMPORTANT

ASSEMBLY INSTRUCTIONS

MAINTENANCE TIPS

CUSTOMER SERVICE


check the quantities.

• Do not bolt all the elements together permanently before the complete assembling of the product 

• In case of heavy snowfall, do not allow snow to accumulate on the roof.

source.  

Summary of Contents for 788687

Page 1: ...module 2 55 x 1 93 x 2 08 m 4 90 m2 1 25 x 1 93 x 2 08 m 2 40 m2 Extension Erweiterung Extension 2 55 m 1 93 m 2 08 m 12 5 cm 1 37 m 0 60 m 2 55 m 1 93 m 2 08 m 1 25 m 1 93 m 2 08 m 3 80 m 2 1 SERRES GEWÄCHSHÄUSER GREENHOUSES ALLIUM 4 90 M2 7 30 M2 ...

Page 2: ... personnes Lessachetsplastiqueset lespetits composantssontàtenir horsdeportée desenfants Eloignezles enfants de la zone de montage source électrique Toutappareilproduisantdelachaleurnedoitpasêtrestockédanslaserre barbecue chalumeau Attention ne pas monter sur le toit risque de chute et de blessures graves En cas de forte chute de neige ne pas laisser la neige s accumuler sur le toit Pour nettoyer ...

Page 3: ... allen Nicht alle wärmeerzeugenden Geräte Grill Brenner dürfen im Gewächshaus gelagert werden StellenSiesicher dasseskeineNetze Wasser StromoderGas unterdemInstallationsortgibt DasGewächshausmussaufeinemhorizontalenundebenen nichtdemWindausgesetztenBoden Achtung nichtaufdasDachsteigen Sturz undschwereVerletzungsgefahr Bei starkem Schneefall den Schnee nicht auf dem Dach ansammeln lassen VerwendenS...

Page 4: ...sametalwithelectricalconductivity keepaluminiumprofilesawayfromanyelectrical Notallheat producingappliances barbecue torch canbestoredinthegreenhouse Thegreenhousemustbepositionedandfixedonahorizontalandevenground notexposedtowind Checktheabscenceofnetworks water electricty gas underneaththeinstallationsiteofthegreenhouse Beware donotclimbontheroof riskoffallandseriousinjuries Tocleanyourgreenhous...

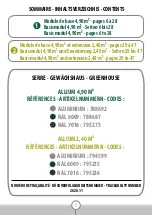
Page 5: ... 788692 RAL 6009 788687 RAL 7016 795275 ALLIUM 4 90 M2 RÉFÉRENCES ARTIKELNUMMERN CODES ALUMINIUM 794599 RAL 6009 795235 RAL 7016 795236 ALLIUM 2 40 M2 Moduledebase4 90m2 pages6à28 Basismodul4 90m2 Seiten6bis28 Basicmodul4 90m2 pages6to28 1 Moduledebase4 90m2etextension2 40m2 pages29à47 Basismodul4 90m2undErweiterung2 40m2 Seiten29bis47 Basicmodul4 90m2andextension2 40m2 pages29to47 2 ...

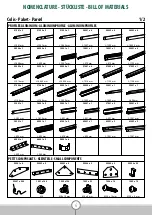
Page 6: ...1650 mm 30001 x 1 L 1862 mm 32001 x 1 L 628 mm 33001 x 1 L 393 mm 34001 x 2 L 1612 mm 35001 x 1 L 621 mm 36001 x 1 L 621 mm 37001 x 2 L 621 mm 38001 x 2 L 1241 mm 39001 x 1 L 634 mm 40001 x 1 L 602 mm 41001 x 2 L 518 mm 42001 x 1 L 602 mm 43001 x 2 L 1241 mm 43002 x 2 L 1241 mm 45001 x 1 L 400 mm 46001 x 2 L 250 mm W001 x 4 W002 x 2 W003 x 4 W004 x 2 W005 x 2 W006 x 52 W007 x 204 1001 x 146 M6 100...

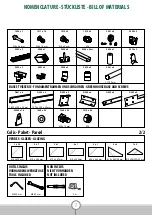
Page 7: ...1 x 16 M6 x 35 mm 1006 x 1 2023 x 2 2028 x 2 2032 x 2 2041 x 2 2022 x 2 2006 x 60 m 2005 x 2 2004 x 1 2003 x 2 2010 x 2 2009 x 1 M6 x 12 mm M6 1 x 36 610 x 610 mm 2 x 7 610 x 544 mm 3 x 1 610 x 467 mm 4 x 1 610 x 229mm 5 x 1 600 x 544 mm 6 x 4 610 x 464 38 mm 7 x 2 610 x 20 234 20 mm NOMENCLATURE STÜCKLISTE BILL OF MATERIALS VERRES GLÄSER GLAZING Colis Paket Parcel 2 2 5 m M6 10 mm NON INCLUS NICH...

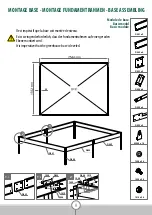
Page 8: ...4 1010 D002 D002 30 D005 D001 1010 1008 1 2 Module de base Basismodul Basic module MONTAGE BASE MONTAGE FUNDAMENTRAHMEN BASE ASSEMBLING 8 Il est impératif que la base soit montée de niveau Es ist zwingend erforderlich dass der Fundamentrahmen auf einer geraden Ebene montiert wird It is imperative that the greenhouse base is leveled ...

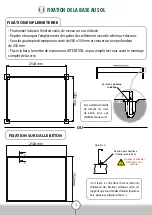
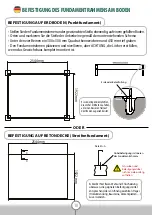
Page 9: ...complet de la serre FIXATION EN PLEINE TERRE 2544 mm 1922 mm 6 0 4 5 2 1 Niveau 0 sol fini OU 2544 mm 406 125 Niveau 0 sol fini 1922 1922 mm 450 mm 300 mm FIXATION SUR DALLE BÉTON 450 mm 300 mm Remplissage terre ou béton Ilestvivementconseillé de remplir les trous de béton pour une meilleure tenue au sol 6 0 4 2544 1922 A A Il est laissé à votre libre choix et décision l utilisation des fixations ...

Page 10: ... erst füllen wenn das Gewächshaus komplett montiert ist BEFESTIGUNG AUF ERDBODEN Punktfundament BEFESTIGUNG AUF BETONDECKE Streifenfundament 450 mm 300 mm Erde oder Betonfüllung Es wird dringend empfohlen die Löcher mit Beton zu füllen um einen besseren Halt auf dem Boden zu gewährleisten 406 125 Niveau 0 sol fini 2544 1922 2544 mm 1922 mm 6 0 4 5 2 1 Niveau 0 sol fini 2544 1922 A A Es bleibt Ihre...

Page 11: ...of the greenhouse FIXING ON SOIL 2544 mm 1922 mm 6 0 4 5 2 1 Niveau 0 sol fini OR 406 125 Niveau 0 sol fini 2544 1922 2544 mm 1922 mm 450 mm 300 mm FIXING ON CONCRETE SLAB 450 mm 300 mm Earth or concrete filling It is strongly recommended to fill the holes with concrete for a better hold on the ground 6 0 4 5 2 1 Niveau 0 sol fini 2544 1922 A A It remains to your free choice and decision to use th...

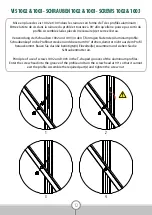
Page 12: ...er Schrauben 1002 und 1003 in den T förmigen Nuten der Aluminiumprofile Schraubenkopf in die Profilnut stecken und diesen um 90 drehen damit er nicht aus dem Profil herauskommt Bauen Sie das die benötigte n Einzelteil e zusammen und ziehen Sie die Schraubenmutter an Principle of use of screws 1002 and 1003 in the T shaped grooves of the aluminium profiles Enter the screw head into the groove of th...

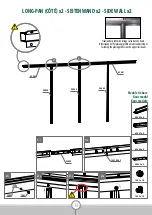
Page 13: ...berenQuerträger Fasteningtheglazingprofilesontheuppercrossbeam LONG PAN CÔTÉ x2 SEITENWAND x2 SIDE WALL x2 2 1 2 2 2 3 2 4 1002 1001 1002 x 14 1001 x 14 W002 x 2 43002 x 2 43001 x 2 25002 x 6 1 1 1 2 1001 1002 W002 43002 43001 25002 25002 25002 2 1 Module de base Basismodul Basic module ...

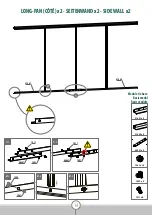
Page 14: ... 1002 1001 1011 x 8 1002 x 6 1001 x 14 46001 x 2 01001 x 2 01002 x 2 01002 01001 2 1 2 2 2 3 2 1 1001 46001 1001 46001 1011 1011 LONG PAN CÔTÉ x2 SEITENWAND x2 SIDE WALL x2 Module de base Basismodul Basic module ...

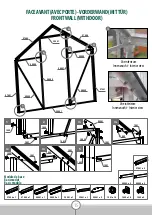
Page 15: ...dule de base Basismodul Basic module 1 2 3 4 5 5 2 3 1 3 2 5 4 1 4 2 1 1002 1002 1002 1001 1001 1001 1002 1003 1002 1002 1001 1001 1001 1001 W001 27001 x 2 27004 x 1 27005 x 1 29001 x 1 29002 x 1 30001 x 1 32001 x 1 W001 x 2 1001 x 18 1002 x 16 1003 x 2 08002 x 2 08005 x 2 27001 30001 27001 29002 29001 08002 08002 08005 08005 27005 32001 27004 ...

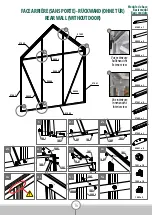
Page 16: ...ismodul Basic module Vueintérieure Innenansicht Interiorview Vueextérieure Außenansicht Exteriorview 3 3 1 2 3 4 5 1002 x 16 1003 x 2 1001 x 18 W001 x 2 27003 x 1 27002 x 1 27001 x 2 25004 x 1 25003 x 1 08004 x 1 08002 x 2 01003 x 1 08002 08002 25004 08004 25003 01003 27001 27002 27003 27001 FACEARRIÈRE SANSPORTE RÜCKWAND OHNETÜR REARWALL WITHOUTDOOR ...

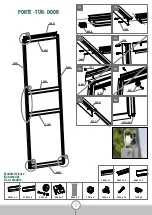
Page 17: ...1 36001 37001 37001 35001 34001 34001 18001 1004 1004 1004 1001 18001 1003 2001 1012 1001 36001 x 1 37001 x 2 2001 x 2 2002 x 2 2003 x 2 1001 x 4 1003 x 2 1004 x 16 1012 x 2 18001 x 1 34001 x 2 35001 x 1 PORTE TÜR DOOR Module de base Basismodul Basic module ...

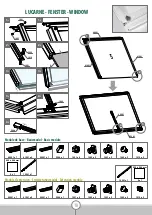
Page 18: ...x 2 1005 x 2 1015 x 2 5 x 1 15001 x 1 5 3 1 600 x 544 mm 40001 x 1 41001 x 2 42001 x 1 2004 x 1 1001 x 4 1002 x 2 1005 x 2 1015 x 2 5 x 1 15001 x 1 600 x 544 mm 1003 x 2 1003 x 2 2 1 1015 1001 1002 3 4 42001 15001 LUCARNE FENSTER WINDOW Module de base Basismodul Basic module Module d extension Erweiterungsmodul Extension module ...

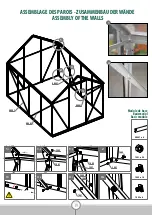
Page 19: ...2 4 2 DÉVISSER ABSCHRAUBEN UNSCREW 08001 x 4 1001 x 20 1002 x 16 1003 x 4 1001 1001 1002 1002 08001 08001 08001 08001 1001 1002 1 2 3 4 ASSEMBLAGE DES PAROIS ZUSAMMENBAU DER WÄNDE ASSEMBLY OF THE WALLS 1 4 Module de base Basismodul Basic module ...

Page 20: ... W004 x 2 W005 x 2 1001 1011 1001 1002 1001 1002 1001 1003 1001 1002 25001 25001 25001 25001 25001 25001 38001 1001 38001 W004 W003 W005 W004 45001 1002 38001 x 2 25001 x 6 45001 x 1 1 3 2 5 4 MONTAGE DES PROFILÉS DE TOITURE MONTAGE DER DACHPROFILE ASSEMBLING THE ROOF PROFILES Module de base Basismodul Basic module ...

Page 21: ...3 2 2 1 1 3 2 1 1001 1001 1002 1002 08003 08003 08003 08003 08003 1003 x 4 1002 x 8 1001 x 12 08003 x 4 MONTAGE DES TENDEURS ET GOUSSETS SPANNVORRICHTUNG UND VERBINDER WIND BRACES AND GUSSETS Module de base Basismodul Basic module ...

Page 22: ...SCHRAUBEN UNSCREW DÉVISSER ABSCHRAUBEN UNSCREW DÉVISSER ABSCHRAUBEN UNSCREW 1 4 3 2 Module de base Basismodul Basic module FIXATION DE LA SERRE SUR LA BASE BEFESTIGUNG DES GEWÄCHSHAUSES AM FUNDAMENTRAHMEN FASTENING THE GREENHOUSE ONTO THE GREENHOUSE BASE 2 Crochetàpositionner Hakenanbringen Attachhook ...

Page 23: ...x 1 1006 x 1 1002 x 2 1003 x 3 1001 x 6 2009 x 1 2 3 1 2 4 1003 10001 1001 MONTAGE PORTE RAIL MONTAGE TÜR SCHIENE ASSEMBLING DOOR RAIL Recommandation graissagerégulier Empfehlung regelmäßigschmieren Recommendation greaseregularly 3 Hautdeporte ObererTürbereich Upperdoorarea Module de base Basismodul Basic module ...

Page 24: ...ALLING THE GLAZING SEAL Module de base Basismodul Basic module Le joint caoutchouc est à poser sur les profilés de toiture parois et porte Die Gummidichtung ist auf allen Dach Wand und Türprofile anzubringen The rubber seal is to be attached on all the roof wall and door profiles ...

Page 25: ... 1 1 1 1 1 1 1 1 1 1 1 1 1 1 6 6 7 1 1 1 1 1 5 1 1 1 1 1 1 1 1 1 1 1 1 1 2 2 2 4 5 6 6 7 2 3 4 b 1 Couper le joint pour passage de la pièce 39001 VITRAGE POSE LUCARNE 2005 x 2 1005 x 4 1002 x 2 1001 x 2 W007 x 204 W006 x 52 39001 x 1 610 x 610 610 x 544 610 x 467 610 x 229 610 x 464 38 610 x 20 234 20 7 x 2 6 x 4 4 x 1 3 x 1 2 x 7 1 x 36 Nousvousconseillonsd installer lesverresniveauparniveau duba...

Page 26: ... 1 1 1 1 1 1 1 1 1 1 1 1 1 1 6 6 7 1 1 1 1 1 5 1 1 1 1 1 1 1 1 1 1 1 1 1 2 2 2 4 5 6 6 7 2 3 4 b 1 VERGLASUNG FENSTER EINBAUEN 2005 x 2 1005 x 4 1002 x 2 1001 x 2 W007 x 204 W006 x 52 39001 x 1 610 x 610 610 x 544 610 x 467 610 x 229 610 x 464 38 610 x 20 234 20 7 x 2 6 x 4 4 x 1 3 x 1 2 x 7 1 x 36 Basismodul WirempfehlenIhnen dieGläserEbenefür Ebeneanzubringen vonuntennachoben Dichtung schneiden ...

Page 27: ...1 1 1 1 1 1 1 1 1 1 1 1 1 1 1 1 6 6 7 1 1 1 1 1 5 1 1 1 1 1 1 1 1 1 1 1 1 1 2 2 2 4 5 6 6 7 2 3 4 b 1 Cut the seal to let part 39001 through GLAZING INSTALLING WINDOW 2005 x 2 1005 x 4 1002 x 2 1001 x 2 W007 x 204 W006 x 52 39001 x 1 610 x 610 610 x 544 610 x 467 610 x 229 610 x 464 38 610 x 20 234 20 7 x 2 6 x 4 4 x 1 3 x 1 2 x 7 1 x 36 Basic module Weadviseyoutoinstalltheglazing levelbylevel fro...

Page 28: ...emboutdefaîtière pièce2010 AbdeckungderFirstspitze Einzelteil2010 Roofridgeendcover part2010 2023 x 2 2028 x 2 2032 x 2 2041 x 2 58001 x 4 2022 x 2 1005 x 4 2010 x 2 1 2 3 4 MONTAGE DES PIÈCES PLASTIQUES MONTAGE DER KUNSTSTOFFTEILE INSTALLING THE PLASTIC PARTS Module de base Basismodul Basic module ...

Page 29: ...29 Module de base 4 90 m2 module d extension 2 40 m2 Basismodul 4 90 m2 Erweiterungsmodul 2 40 m2 Basic modul 4 90 m2 extension module 2 40 m2 SERRE GEWÄCHSHAUS GREENHOUSE ALLIUM 7 30 M2 ...

Page 30: ... 1 15001 x 1 L 270 mm 25001 x 4 L 1133 mm 25002 x 4 L 1214 mm 38002 x 1 L 1244 mm 39001 x 1 L 634 mm 40001 x 1 L 602 mm 43003 x 2 L 1244 mm 42001 x 1 L 602 mm 41001 x 2 L 518 mm 45001 x 1 L 400 mm 46001 x 2 L 250 mm W002 x 2 W004 x 2 W006 x 14 W007 x 60 W005 x 2 W011 x 2 W012 x 4 1003 x 6 M6 x 8 mm 1002 x 58 M6 x 12 mm 1001 x 80 M6 1015 x 2 M6 NOMENCLATURE EXTENSION STÜCKLISTE ERWEITERUNG BILL OF ...

Page 31: ...009 x 24 1008 x 24 W008 x 16 D005 x 4 D022 x 2 D003 x 2 D004 x 4 D002 x 4 D001 x 2 D002 D002 D005 D005 D005 D005 D002 D002 D006 D006 D001 D001 30 3788 mm 1 2 1010 x 8 1009 x 8 1008 x 8 W008 x 6 D022 x 2 D003 x 2 D006 x 2 Il est impératif que la base soit montée de niveau Es ist zwingend erforderlich dass der Fundamentrahmen auf einer geraden Ebene montiert wird It is imperative that the greenhouse...

Page 32: ... EN PLEINE TERRE 3788 mm 2544 mm 1244 mm 1922 mm 6 0 4 5 2 1 Niveau 0 sol fini OU 3788 mm 2544 mm 1244 mm 406 125 Niveau 0 sol fini 1922 1922 mm 450 mm 300 mm FIXATION SUR DALLE BÉTON 450 mm 300 mm Remplissage terre ou béton Ilestvivementconseillé de remplir les trous de béton pour une meilleure tenue au sol 6 0 4 5 2 1 Niveau 0 sol fini 2544 1922 A A Il est laissé à votre libre choix et décision ...

Page 33: ...n das Gewächshaus komplett montiert ist BEFESTIGUNG AUF ERDBODEN Punktfundament BEFESTIGUNG AUF BETONDECKE Streifenfundament 450 mm 300 mm Erde oder Betonfüllung Es wird dringend empfohlen die Löcher mit Beton zu füllen um einen besseren Halt auf dem Boden zu gewährleisten 406 125 Niveau 0 sol fini 2544 1922 3788 mm 2544 mm 1244 mm 1922 mm 6 0 4 5 2 1 Niveau 0 sol fini 2544 1922 A A Es bleibt Ihre...

Page 34: ...e FIXING ON SOIL 3788 mm 2544 mm 1244 mm 1922 mm 6 0 4 5 2 1 Niveau 0 sol fini OR 406 125 Niveau 0 sol fini 2544 1922 3788 mm 2544 mm 1244 mm 1922 mm 450 mm 300 mm FIXING ON CONCRETE SLAB 450 mm 300 mm Earth or concrete filling It is strongly recommended to fill the holes with concrete for a better hold on the ground 6 0 4 5 2 1 Niveau 0 sol fini 2544 1922 A A It remains to your free choice and de...

Page 35: ...der Schrauben 1002 und 1003 in den T förmigen Nuten der Aluminiumprofile Schraubenkopf in die Profilnut stecken und diesen um 90 drehen damit er nicht aus dem Profil herauskommt Bauen Sie das die benötigte n Einzelteil e zusammen und ziehen Sie die Schraubenmutter an Principle of use of screws 1002 and 1003 in the T shaped grooves of the aluminium profiles Enter the screw head into the groove of t...

Page 36: ...TENWAND x2 SIDE WALL x2 Fixationdesprofilésdevitragesurlatraversehaute BefestigungderVerglasungsprofileamoberenQuerträger Fasteningtheglazingprofilesontheuppercrossbeam Module de base Basismodul Basic module Module d extension Erweiterungsmodul Extension module 43003 43001 25002 25002 25002 25002 25002 43002 1 2 1 2 1 1 2 1 2 2 2 3 2 4 1001 1002 ...

Page 37: ...02 x 2 1011 x 8 1002 x 4 1001 x 12 46001 x 2 01006 x 2 LONG PAN CÔTÉ x2 SEITENWAND x2 SIDE WALL x2 Module de base Basismodul Basic module Module d extension Erweiterungsmodul Extension module 01001 01006 01002 1 2 2 2 2 3 2 1 1 2 1 1 1001 46001 1001 46001 1011 1011 ...

Page 38: ... withdoor page15 Montagedelafacearrière sansporte page16 MontagederRückwand ohneTür Seite16 Assemblingtherearwall withoutdoor page16 Montagedelaporte page17 MontagederTür Seite17 Assemblingthedoor page17 Montagedelalucarne page18 MontagedesFensters Seite18 Assemblingthewindow page18 Puisreveniràlapage39 DannzurückaufSeite39 Thenbacktopage39 ...

Page 39: ...c module 4 1 4 2 3 1 3 2 2 1 3 1 1 1 2 2 1 3 4 DÉVISSER 1001 1002 x 16 1003 x 4 1001 x 20 1001 1001 1001 1002 1003 08001 1002 08001 08001 08001 08001 08001 x 4 1002 ASSEMBLAGE DES PAROIS ZUSAMMENBAU DER WÄNDE ASSEMBLY OF THE WALLS 1 4 ...

Page 40: ...3 x 4 1002 x 22 1001 x 34 W005 x 2 W004 x 2 W003 x 4 45001 x 1 38001 x 2 25001 x 6 W005 x 2 W004 x 2 45001 x 1 38002 x 1 25001 x 4 1001 x 22 45001 1001 1002 1001 1003 1001 W004 W003 1002 38001 25001 25001 25001 25001 25001 38001 38002 38001 1001 W004 1011 1001 1001 1002 W005 1002 1003 x 4 1002 x 10 1011 x 8 MONTAGE DES PROFILÉS DE TOITURE MONTAGE DER DACHPROFILE ASSEMBLING THE ROOF PROFILES 1 2 ...

Page 41: ...1002 08003 1001 1001 W011 1001 1003 08003 1002 1001 x 12 08003 x 4 1002 x 28 1001 x 28 W012 x 4 W011 x 2 08003 08003 MONTAGE DES TENDEURS ET GOUSSETS SPANNVORRICHTUNG UND VERBINDER WIND BRACES AND GUSSETS Module de base Basismodul Basic module Module d extension Erweiterungsmodul Extension module ...

Page 42: ...08 FIXATION DE LA SERRE SUR LA BASE BEFESTIGUNG DES GEWÄCHSHAUSES AM FUNDAMENTRAHMEN FASTENING THE GREENHOUSE ONTO THE GREENHOUSE BASE Module d extension Erweiterungs modul Extension module Module de base Basismodul Basic module 2 Crochetàpositionner Hakenanbringen Attachhook ...

Page 43: ...orarea 1 2 2 3 4 4 1 1 1002 10001 4 3 4 2 33001 1001 1003 4 1 1003 10001 1001 1001 1 3 1003 1001 1001 10001 1006 2009 MONTAGE PORTE RAIL MONTAGE TÜR SCHIENE ASSEMBLING DOOR RAIL 3 Module de base Basismodul Basic module Recommandation graissagerégulier Empfehlung regelmäßigschmieren Recommendation greaseregularly ...

Page 44: ...oirpage24 Puiscontinuez b 1 Couper le joint pour passage de la pièce 39001 Crochets devitrage Clips devitrage 2005 x 2 W007 x 60 2006 x 19m 2005 x 2 W006 x 14 39001 x 1 1002 x 2 1001 x 2 2 x 3 1 x 12 1005 x 4 1005 x 4 1002 x 2 1001 x 2 W007 x 204 W006 x 52 39001 x 1 Module de base Module d extension 610 x 610 610 x 544 610 x 467 610 x 229 610 x 464 38 610 x 20 234 20 7 x 2 6 x 4 4 x 1 3 x 1 2 x 7 ...

Page 45: ...s S 24 Dannfortfahren b 1 Gewächshausklammern Verglasungshaken 2005 x 2 W007 x 60 2006 x 19m 2005 x 2 W006 x 14 39001 x 1 1002 x 2 1001 x 2 2 x 3 1 x 12 1005 x 4 1005 x 4 1002 x 2 1001 x 2 W007 x 204 W006 x 52 39001 x 1 Basismodul Erweiterungs modul 610 x 610 610 x 544 610 x 467 610 x 229 610 x 464 38 610 x 20 234 20 7 x 2 6 x 4 4 x 1 3 x 1 2 x 7 1 x 36 VERGLASUNG FENSTER EINBAUEN Dichtung schneid...

Page 46: ...ghsliding 2 4 5 W007 W006 1005 2005 1002 1001 39001 b b a 2006 1 Attachseal s p 24 Thencontinue b 1 Cut the seal to let part 39001 through Glazing hooks Glazing clips 2005 x 2 W007 x 60 2006 x 19m 2005 x 2 W006 x 14 39001 x 1 1002 x 2 1001 x 2 2 x 3 1 x 12 1005 x 4 1005 x 4 1002 x 2 1001 x 2 W007 x 204 W006 x 52 39001 x 1 Basic module Extension module 610 x 610 610 x 544 610 x 467 610 x 229 610 x ...

Page 47: ...28 x 2 2032 x 2 2041 x 2 58001 x 4 2022 x 2 1005 x 4 2010 x 2 Détailemboutdefaîtière pièce2010 AbdeckungderFirstspitze Einzelteil2010 Roofridgeendcover part2010 Module de base Basismodul Basic module 3 4 1 2 MONTAGE DES PIÈCES PLASTIQUES MONTAGE DER KUNSTSTOFFTEILE INSTALLING THE PLASTIC PARTS 47 ...

Page 48: ...eichtertdasTragenundAnbrigenderGläser Facilitatesthetransportandinstallationoftheglass Permettentdemaintenirlevitragedesserres HaltendieVerglasungderGewächshäuser Maintaintheglazingofthegreenhouses Permettentdefairechevaucherdeuxvitrages ErmöglichtdieÜberlappungvonzweiGlassscheiben Allowstheoverlapoftwoglasses Ventouse Saugnapf Suction cup Clips de vitrage à ressort Federbelastete Gewächshausklamm...

Page 49: ...49 NOTES NOTIZEN NOTES ...

Page 50: ...50 NOTES NOTIZEN NOTES ...

Page 51: ...51 NOTES NOTIZEN NOTES ...

Page 52: ...WWW SERRES LAMS COM WWW GEWAECHSHAUS LAMS COM SERVICE CLIENTS Site internet www sav doviris com KUNDENSERVICE kontakt gewaechshaus lams com ...

Reviews: