70
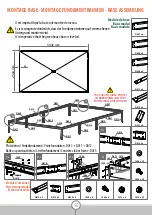
2006 x 105m
2006 x 37m
2
3
14
14
14
14
14
14
14
14
14
14
14
14
14
14
14
14
14
14
14
14
14
14
14
14
14
14
14
14 14
14
14
14 14
14 14
14
14
14
14
14
14
14 14
14
14
14
14
14
14
14
14
14
14
14 14
14
14
14 14
14
14
14
14
12
12
14
1
1
1 1
13
13
14
14
11
11
9
9
12
12
11
11
2006
Pose du joint. Voir page 31.
Puis continuez.
Dichtung anbringen (s. S. 31).
Dann fortfahren.
Attach seal (s. p. 31).
Then continue.
Zum Anbringen der Gläser kann es erforderlich sein, bestimmte Profile
vorübergehend abzuschrauben. Schrauben Sie diese nach der
Anbringung der Gläser wieder fest.
Some profiles may need to be temporarily unscrewed to install the glazing.
Refix the screws correctly after installing the glazing.
Il peut être nécessaire de dévisser temporairement certains profilés
pour la mise en place des verres.
Resserer correctement les vis après la pose des verres.
W007 x 256
W007 x 72
W007
W006 x 76
W006 x 24
W006
14 x 18
610 x 509
1 x 4
610 x 610
9 x 2
610 x 461
11 x 4
610 x 434/8
12 x 4
610 x 468/44
14 x 48
610 x 509
13 x 2
610 x 540
3
2
Module de base
Basismodul
Basic module
Module d’extension
Erweiterungsmodul
Extension module
Clips de vitrage
Gewächshausklammern
Glazing clips
Crochets de vitrage
Verglasungshaken
Glazing hooks
VITRAGE - VERGLASUNG - GLAZING
Nous vous conseillons d’installer les verres niveau par niveau
(du bas vers le haut).
Wir empfehlen Ihnen, die Gläser Ebene für Ebene anzubringen
(von unten nach oben).
We advise you to install the glazing level by level (from bottom to top).
1
Summary of Contents for LAURUS Series
Page 74: ...74 NOTES NOTIZEN NOTES...
Page 75: ...75 NOTES NOTIZEN NOTES...


