Visit our website at: www.lanair.com
43
Section 12 - Service / Maintenance
Cleaning Combustion Chamber/ Heat Exchanger
NOTE: ALWAYS WEAR EYE, FACE AND BREATHING PROTECTION AND PROTECTIVE
CLOTHING WHEN INSPECTING OR CLEANING CHAMBER OR HEAT EXCHANGER.
WARNING: DISCONNECT ALL ELECTRICAL POWER TO HEATER BEFORE
SERVICING
1. Turn thermostat to the lowest setting; the heater must be completely cool to the touch
before attempting to clean the heater (place the fan/limit on the manual position to
start the fan and shorten the cooling time if the unit is hot).
2. Turn off all power to the heater (120 VAC) at the main disconnect.
3. Disconnect the burner cord connecting the burner to the heater.
Do not remove (4)
4. Remove the burner and flame view port from the heater.
5. Remove the galva nized panel covering the cleanout
door (remove five (5) #10 screws from the top and four
(4) #10 screws from the bottom of the panel).
6. Spray all of the screws with penetrating oil to prevent
breakage before removing any of the nuts that secure
the combustion chamber access door. Let set for five
minutes to allow the oil to penetrate.
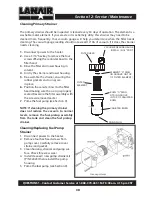
7. Open the clean out door from the heater by removing (8)
1/2 hex head nuts & washers.
8. Clean the heat exchanger chamber and tubes by
using
an industrial type canister vacuum cleaner with a high
efficiency filter, or suitable tool. Remove ash and debris
by vacuuming, shoveling, or slowly brushing the ash from
the combustion chamber, from the front or rear access.
Inspect the combustion chamber and target brick. Use
care when cleaning the combustion chamber area so the
target brick is not disturbed.
Insufficient or irregular cleaning intervals will cause inef-
ficiency, random shutdowns, and extreme damage to the
combustion chamber.
Step 7


