PAGE 4
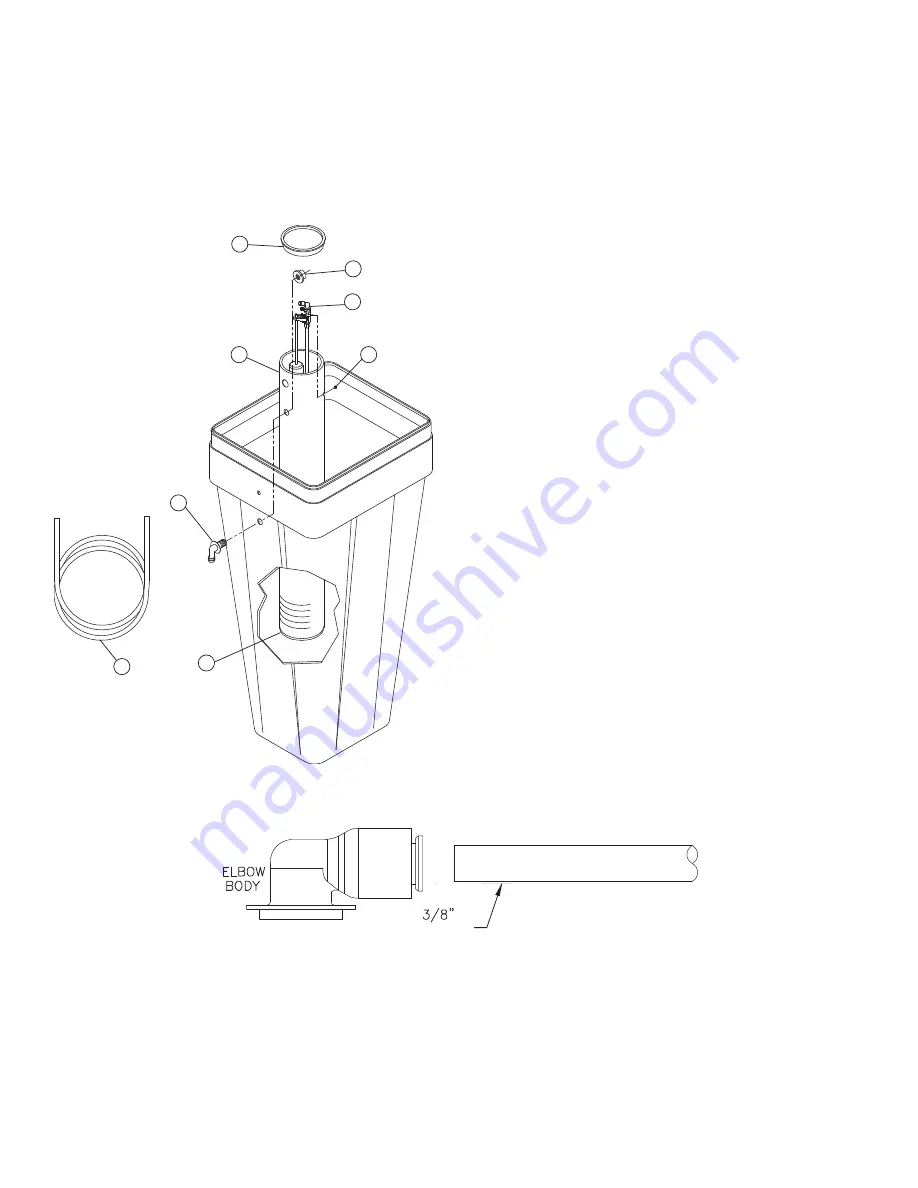
ASSEMBLE THE BRINE TANK:
Install a brine well cap (Item
A) on the bottom of the brine well (Item B). Remove the brine
valve assembly (Item C) from the brine well by removing the
nut (Item D). Attach the brine well to the brine tank with the
two-piece overflow (Items E & F) using the lower holes in
both pieces, as shown. Reinstall the brine valve assembly.
Push brine line polytube (Item G) through the upper holes in
the brine tank and brine well and press the polytube into the
elbow fitting.
A
G
A
F
B
D
C
E
BRINE LINE CONNECTIONS:
Connect the brine line polytubing found with the brine tank to the brine connection on the
control valve. The control valve has a standard refill elbow to which a 3/8” flexible tube can be connected, see
below. Press
the polytube into the brine elbow fitting. Make sure the floor is clean beneath the brine tank and that it is level and smooth.
BRINE LINE FITTING CONNECTIONS
DRAIN LINE FITTING CONNECTION USING 5/8" POLY TUBE
Click to buy NOW!
PD
F-XCHANGE
w
ww
.docu-track.c
om
Click to buy NOW!
PD
F-XCHANGE
w
ww
.docu-track.c
om
POLYTUBE
BRINE TANK OVERFLOW PRECAUTION:
A 1/2” (inside diameter, not provided) gravity drain line should be connected to
the overflow fitting on the side of the brine tank. This overflow is in case of a malfunction in the brine shut off. If the unit is
installed where water may flow in the event of an overflow and cause water damage, connect a length of flexible tubing and
run to a drain below the level of the overflow.
(Do not connect the tubing to the drain line on the control valve. Do not
run tubing above overflow height at any point.)
PROGRAMMING THE CONTROL VALVE:
Note: A quick-reference card is stored inside the front cover of the control valve.
To access this card, slightly pull tabs on side of cover outward and pull cover forward. Plug the electrical cord into a 115
Volt receptacle. DO NOT plug into an outlet controlled by a wall switch or pull chain that could inadvertently be turned off.
Wait a couple of seconds for control valve to “home” itself. Panel should display “TIME” and the time of day will be flashing.
TO INSTALL 5/8” POLY TUBE DRAIN LINE:
The poly tube insert is shipped attached to the drain line elbow’s locking clip.
Press the insert into the drain line (5/8” poly tube not included). Loosen nut of the drain line elbow. Press 5/8” poly tube with
insert into the drain line elbow until it seats on the back of the fitting. Tighten nut.
It is simplest to run the drain line into a sump pump pit or washing machine drain if possible. If this is not practical, a fitting
with a trap must be installed in a sewer line. Place the trap as close to the vent as possible to prevent siphoning of the trap
when large amounts of waste water go through the sewer line. DO NOT pipe the drain line solidly into the waste line, as this
is prohibited by most plumbing codes. The drain line should enter the trap from above so the water will not back up in the
drain line if sewer should become plugged up and the trap overflow. The trap should have a short pipe extending from it to
prevent splashing when water runs into the trap from drain line.
Summary of Contents for 7-FESLER-32B
Page 15: ...PAGE 15 ...


