PAGE 18
ACID NEUTRALIZERS:
Mineral used: Calcite. Calcite will dissolve in proportion to the amount of acid in the raw water. The amount
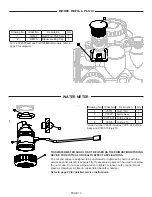
of calcite in the tank should be monitored and replaced periodically. A tank with a dome plug is provided so that calcite may be added
without removing the control valve. To check level of calcite in the mineral tank shut off water supply to the filter. Press and hold the
REGEN
button until the filter goes into backwash. Unplug valve from power supply. This will relieve the pressure in the tank. Remove
hexagonal dome plug. A small amount of water will be lost from the tank. Insert a dipstick into the dome hole until the stick reaches
mineral level. Mark and remove the stick. Measure the marked distance on the stick. This number should never be less than 10”.
Replace calcite before the mineral level is 24” from the dome hole. Adding calcite will displace the water in the tank. This water may be
siphoned out to reduce spillage. As each installation will use a different amount of calcite, monitoring the mineral level once a month
for the first few months of operation should give a fairly good indication as to how frequently the calcite will need to be replenished.
Replace the dome plug. Slowly turn on the water supply to the neutralizer. Allow water to run to drain for a couple of minutes to allow
“Fines” to backwash to drain. Plug valve into power supply.
A pH test kit may also be used to monitor the pH level to help determine when mineral needs to be replenished. Calcite will add
approximately four (4) or more grains per gallon to the original hardness of the raw water. This should be kept in mind when
figuring regeneration cycle for a water softener. If a Corosex/Calcite mixture is recommended to be used (for high flow rates or very low
pH level), mix one part Corosex with four parts Calcite BEFORE adding to the tank. NOTE: 1 cu ft. of calcite = 85 lbs.
IRON FILTERS:
Mineral used: Birm. No chemical regenerant is required, backwash periodically. No hardness is added to the water.
For clear water iron, when the pH is less than seven (7) in the raw water, a water softener should be used in place of the iron filter.
Note: When using Birm for iron removal, it is necessary that the water: contain no oil or hydrogen sulfide, organic matter not to exceed
4-5 ppm, the D.O. content equal at least 15% of iron content with a pH of 6.8 or more. If the influent water has a pH of less that 6.8,
neutralizing additives such as Calcite, Corosex or soda ash may be used prior to the Birm filter to raise the pH. A water having a low
D.O. level may be pretreated by aeration (1-LXIMAIR-). Chlorination greatly reduces Birm’s activity. High concentrations of chlorine
compounds may deplete the catalytic coating.
COLOR, TASTE AND ODOR FILTERS:
Mineral used: Carbon. Used for removal of chlorine, color, taste, odor and low levels of
sulfur, etc. The mineral bed should be backwashed periodically, but will in time reach the maximum absorbency. When this occurs the
carbon should be completely replaced. For removal of chloramines, stronger levels of sulfur, and even iron, special catalytic carbon is
recommended. When catalytic carbon is used for sulfur and iron removal, pretreatment by aeration is recommended to ensure 4 ppm of
D. O. (7-LX125CTAIR-).
SEDIMENT AND TURBIDITY,:
Mineral used: Filter AG. This filter will filter out dirt, silica, etc. down to the 20-40
micron range. In most cases it has a lifetime fill and should be backwashed periodically depending on local conditions. Pressure drop is
very low.
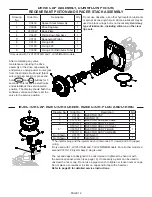
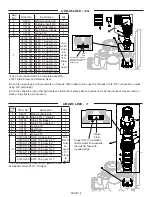
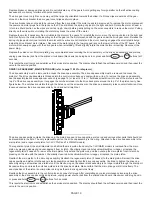
DRIVE ASSEMBLY (refer to pages 11&12 for diagrams):
Remove the valve cover to access the drive assembly.
Disconnect the power source plug (black wire) from the PC board prior to disconnecting the motor or water meter plugs from the PC
board. The power source plug connects to the four-pin jack. The motor plug connects to the two-pin jack on the left-hand side of the PC
board. The water meter plug (gray wire) connects to the three-pin jack on the far right-hand side of the PC board.
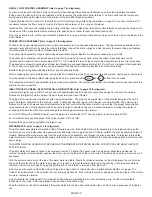
The PC board can be removed separately from the drive bracket but it is not recommended. Do not attempt to remove the display panel
from the PC board. Handle the board by the edges. To remove the PC board from the drive bracket, unplug the power, water meter and
motor plugs from the PC board. Lift the middle latch along the top of the drive bracket while pulling outward on the top of the PC board.
The drive bracket has two plastic pins that fit into the holes on the lower edge of the PC board. Once the PC board is tilted about 45°
from the drive bracket it can be lifted off of these pins. To reinstall the PC board, position the lower edge of the PC board so that the
holes in the PC board line up with the plastic pins. Push the top of the PC board towards the valve until it snaps under the middle latch,
weave the power and water meter wires into the holders and reconnect the motor, water meter and power plugs.
The drive bracket must be removed to access the drive cap assembly and pistons or the drive gear cover. It is not necessary to remove
the PC board from the drive bracket to remove the drive bracket. To remove the drive bracket start by removing the plugs for the power
source and the water meter. Unweave the wires from the side holders. Two tabs on the top of the drive back plate hold the drive bracket
in place. Simultaneously lift the two tabs and gently ease the top of the drive bracket forward. The lower edge of the drive bracket has
two notches that rest on the drive back plate. Lift up and outward on the drive bracket to disengage the notches.
To reassemble, seat the bottom of the drive bracket so the notches are engaged at the bottom of the drive back plate. Push the top of
the drive bracket toward the two latches. The drive bracket may have to be lifted slightly to let the threaded piston rod pass through
the hole in the drive bracket. Maintain a slight engaging force on top of the drive bracket while deflecting the bracket slightly to the left
by pressing on the side of the upper right corner. This helps the drive gears mesh with the drive cap assembly. The drive bracket is
properly seated when it snaps under the latches on the drive back plate. If resistance is felt before latching, then notches are not fully
engaged, the piston rod is not in hole, the wires are jammed between the drive bracket and drive back plate, or the gear is not engaging
the drive cap assembly.
To inspect the drive gears, the drive gear cover needs to be removed. Before trying to remove the gear cover, the drive bracket must
be removed from the drive back plate. (Refer to the instructions above regarding removing the drive bracket from the drive back plate.
The drive gear cover can be removed from the drive bracket without removing the motor or the PC board.) The drive gear cover is held
in place on the drive bracket by three clips. The largest of the three clips is always orientated to the bottom of the drive bracket. With
the PC board facing up, push in and down on the large clip on the drive gear cover. Handle the cover and the gears carefully so that the
gears do not fall off the pegs in the cover.
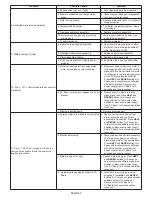
SERVICE INSTRUCTIONS

