background image

-8-

EN

Pressure tank assembly and operation: AR 8 Pro

Adjustable Telescopic Lance

6 - 7 bar / 88 - 100 psi Max.

(5.1)

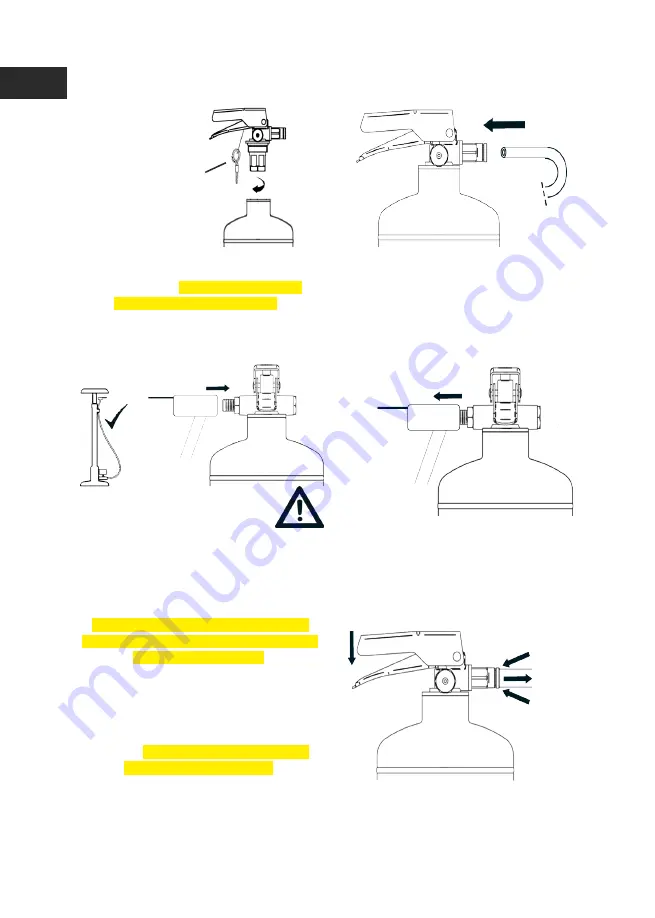
3. Unscrew the metal cap from the tank 

inflator valve before attaching your pump. 

Now connect the pump to the inflator 

valve of the 1L stainless steel tank and 

pressurise to 3 bar / 44 psi.

(Stand the 1L stainless steel tank 

on the ground in an upright position 

whilst pressurising).

4. Disconnect your pump from the inflator 

valve on the tank and screw the metal 

cap back on before carrying out the 

treatment.

5.1. Using the extended lance, insert the 

flexible nozzle into the entrance of the 

nest. Press the trigger on top of the 

1L tank. 

(Do not hold down, press 

trigger in short bursts).

5.2. Once the treatment is finished, hold the lance vertically and collapse down each 

section at a time. Once fully collapsed, remove the powder chamber from the top and 

then press the trigger to release any unused air. Finally, disconnect the tubing kit from 

the trigger outlet valve and repack your kit away.

2. Lay your lance out on the ground or 

prop up against a wall safely. Now 

connect the end of tubing kit and push 

firmly into the trigger outlet valve on the 

1L stainless steel tank.

(5.2)

1. Screw the trigger head onto the 

tank securely. 

(Keep trigger head 

attached after initial use).

*Please note: Safety  

 Key for use when     

 required to prevent  

 accidental discharge.*

Recommended operating 

pressure: 3 bar – 44 psi


Summary of Contents for AR 3 Pro

Page 1: ...AR 3 Operating Manual AR 3 Pro Adjustable Telescopic Lance for Powder Application READ MANUAL BEFORE USE Art Nr AR3 PRO Pro...

Page 2: ...3 Pro Contents List 3 Safety Information 4 Assembly Instructions 5 6 Extending and using the lance 7 Pressure tank assembly and operation 8 Product Care Advice 9 Maintenance Instructions 9 Troubleshoo...

Page 3: ...tity A PVC Protective Carry Tube 1 B Flexible Nozzle 8 mm Diameter x 35 cm 1 C Powder Chamber 1 D 5g Powder Scoop 1 E Lance Lab AR 3 Pro Lance 1 F 1L Stainless Steel Pressure Tank 1 G End Cap 1 H Rubb...

Page 4: ...afety Regulations 1 1 Please read the instruction manual carefully before operating this equipment for the first time 1 2 Please observe the safety and warning regulations 1 3 Failure to observe these...

Page 5: ...removing straps by pulling gently 4 Now unscrew the caps from the top of the powder chamber and the flexible nozzle 5 Use the powder scoop provided to fill the powder chamber Please note powder is no...

Page 6: ...e top of the lance Do not over tighten 10 Bend the flexible nozzle to the required shape and then remove the yellow tip cap To avoid damage do not bend the flexible nozzle sharply 7 Screw on the powde...

Page 7: ...n ensuring the lance remains in the upright position 1 Extend and twist to lock each section Do not pull sections out too forcefully as joints can be over extended Birchmeier Spr htechnik AG Im Stette...

Page 8: ...st Press the trigger on top of the 1L tank Do not hold down press trigger in short bursts 5 2 Once the treatment is finished hold the lance vertically and collapse down each section at a time Once ful...

Page 9: ...product should be cleaned with a soft dry cloth only Do not use volatile substances or cleaning products as these can cause damage Maintenance Instructions AR 3 Pro Adjustable Telescopic Lance Replaci...

Page 10: ...mm Compression push fit outlet valve Check if the inflator valve inner core is not leaking air If air leakage is audible the inflator valve inner core needs tightened Use a standard bike valve core r...

Page 11: ...Tank ARP 06 Inflator valve inner core Inc fitting tool ARP 07 6 mm Compression rush fit outlet valve ARP 08 Red powder chamber cap and yellow flexible nozzle tip cap 2 pcs ARP3 01 AR 3 Pro Replacemen...

Page 12: ...Calculated using Ficam D powder by Bayer plc therefore other insecticidal powders may vary Storage Supplied with 1 25 m PVC Protective Carry tube Weight Assembled lance weight approximately 0 35 Kg 1L...

Reviews: