17
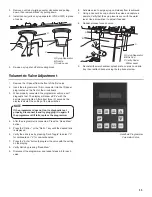
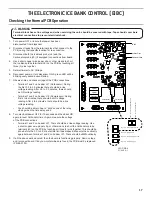
Checking the Normal PCB Operation
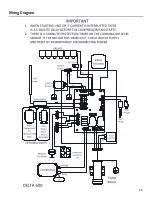
THE ELECTRONIC ICE BANK CONTROL (EIBC)
Agitator
Condensor
Condensor
Compressor
Carbonator
Ice Bank Probe
Carbonator Probe
Agitator
24 VAC
LED DETAIL
SCALE 4 : 1
LED 2 - RL2 - Compressor Speed HIGH /LOW
LED 3 - RL1 - Compressor ON / OF
F
LED 7 - RL6 - Agitator Speed HIGH / LOW
LED 6 - RL5 - Agitator ON / OFF
LED 5 - RL4 - Condensor Speed HIGH /LOW
LED 4 - RL3 - Condensor ON / OFF
Terminal block has ac line voltage and, when servicing the unit, should be covered with tape. Tape should cover bare
electrical connections to prevent electrical shock.
!
WARNING
1.
Turn power OFF or insure that power has been
disconnected from dispenser
2. Disconnect leads from the terminal block that connect to the
PCB, noting their specific location for re-connection.
3. Disconnect both the Ice Bank probe (J6) and the
Carbonator probe (J3) (if equipped) connections from board.
4.
Use a short copper wire, paper clip, or other means to short
the Ice Bank probe terminals (J6) on the PCB by touching all
three (3) pins together.
5. Set multimeter to AC Voltage.
6. Reconnect power or turn dispenser ON. A green LED will be
blinking every second upon startup.
7. Observe time and check voltage of the PCB connections:
8.
Turn electrical power OFF for 15 seconds and then back ON
again to reset Carbonator timer. Again, measure the voltage
of the PCB connections
•
Terminal 1 and 2 on header J21 (Carbonator): During
the first 2.5 to 3.5 minutes there should be a line
voltage reading. After 2.5 to 3.5 minutes, there should
be NO voltage reading.
•
Terminal 1 and 2 on header J18 (Compressor): During
first 4 to 6 minutes, there should be NO voltage
reading. After 4 to 6 minutes, there should be a line
voltage reading.
•
You should be able to hear a “click” sound of the relay
closing when the time delay ends.
•
Terminal 1 and 2 on header J21: There should be a line voltage reading. Use
a short copper wire, paper clip, or other means to short the Carbonator probe
terminals (J3) on the PCB by touching all three (3) pins together. This should be
done before the 2.5 to 3.5 minute time limit has elapsed. Measure the continuity
again between Terminal 1 and 2 on header J21. There should be
NO
continuity.
9. If all the above work as noted, then the board is functioning properly. Remove tape
and reconnect board. If any non-conformities are found, the PCB must be replaced
(PN 64-5132).
Summary of Contents for Delta-600 R-290
Page 23: ...23 Wiring Diagram...

