Section 1: Options & Accessory Set-up
SPL0548 & SPL0560 Snow Pusher 303-454M
11/9/20
10
Pull Back (Optional)
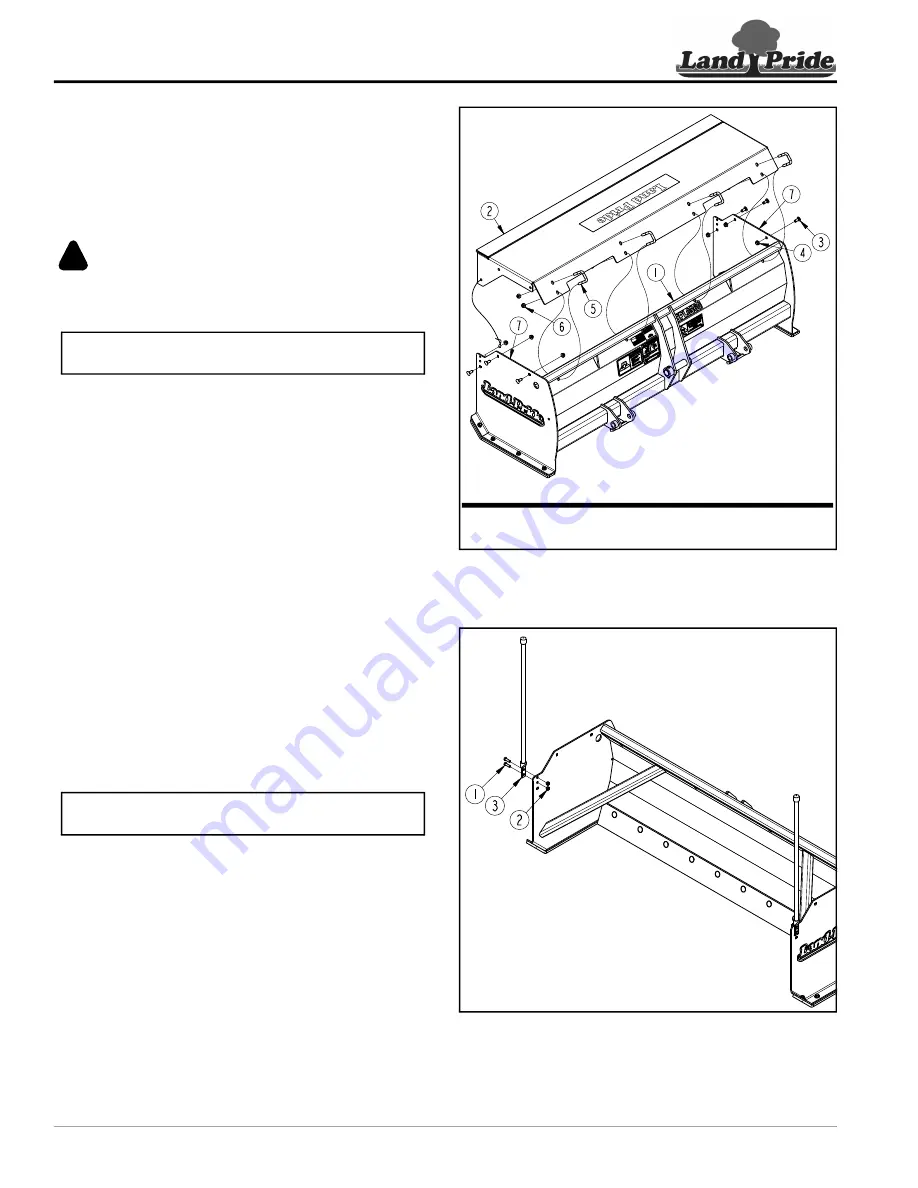
Refer to Figure 1-2:
Land Pride offers an optional pull back (#2). It is shipped
complete with mounting hardware (#3, #4, #5, & #6). This
option will allow operator to pull snow away from garage
doors and other objects while backing up. See Figure 1-2
for part numbers and descriptions.
CAUTION
!
To avoid minor or moderate injury: Be careful not to pinch
fingers, hands, or other body extremities between pull back
and Snow Pusher as unit is attached to the Snow Pusher.
1. Attach back side of pull back to the inside of
moldboard (#1) with 3/8"-16 u-bolts (#5) and hex
whiz nuts (#6). Do not tighten whiz nuts at this time.
2. Attach ends of pull back (#2) to the inside of side
panels (#7) with 3/8"-16 x 1" GR5 carriage bolts (#3)
and hex whiz nuts (#4).
3. Tighten hex whiz nuts (#4 & #6) to the correct torque.
Orange Markers (Accessory)
Part No. 323-026A
Refer to Figure 1-3:
Land Pride offers 28" (71 cm) high orange markers that
can be bolted to the side panels. These assist in locating
outer ends of the Snow Pusher when approaching
buildings, trees, poles, and other obstacles that can
damage the attachment, tractor, or obstacles the Snow
Pusher comes in contact with.
1. Attach orange marker (#3) to the right-hand side
panel with 5/16"-18 x 1" GR5 hex head bolts (#1) and
hex nylock nuts (#2). Tighten nylock nuts to the
correct torque.
2. Repeat step 1 for the left-hand side panel.
IMPORTANT:
The flanges on the pullback may need
to be pulled together to fit unit between side panels.
NOTE:
Orange marker package cannot be used
with pull back option.
Pull Back Option
Figure 1-2
Orange Marker Assembly
Figure 1-3
Part No.
Description
303-450A
PULL BACK ASSEMBLY 48" (14.63 m)
303-449A
PULL BACK ASSEMBLY 60" (18.29 m)
39714
39729


