background image

7/14/08

29

Section 6: Maintenance

4400EX Heavy Duty Off Road Utility Vehicle  720-051M

Table of Contents

carefully to prevent damaging it. Inspect and replace
the element if it is dirty, bent or damaged with a
genuine Land Pride element. Do not use an element
if its sealing surfaces are bent or damaged
.

7.

Check air cleaner base. Make sure it is not bent or
damaged and is secured.

8.

Check element cover. Make sure it is not bent or
damage and that it fits properly. Replace all damaged
air cleaner components.

9.

Inspect the air cleaner base for loose dirt or debris that
may have fallen on it when the element was removed.
Be careful that none of the dirt drops into the intake
throat, remove base and wipe it clean.

10. Check the condition of the rubber seal on the air

cleaner stud, replace it if its condition is questionable
in any way. A new rubber seal is provided with the
replacement paper element in a sealed packaged.

11. Reinstall paper element, precleaner, element cover,

element cover nut, and air cleaner cover. Secure
cover with cover retaining knob.

Order genuine Land Pride parts when replacing the paper
element.

Description

Part No.

Paper Element (65 mm deep)  . . . . . . . . 47-083-03-S

Spark Arrester

!

DANGER

The spark arrester does not stop all fire emitting sparks from
escaping the muffler. Use extreme caution when driving through
dry grass, brush and other fire hazard materials. Never stop or
park the vehicle over combustible materials.

!

WARNING

The muffler is very hot and will burn upon contact. Allow time
to cool before servicing the spark arrester.

!

CAUTION

To maintain efficiency, the spark arrester must be serviced every
100 hours.

!

CAUTION

Be careful not to damage the spark arrester screen when
cleaning.

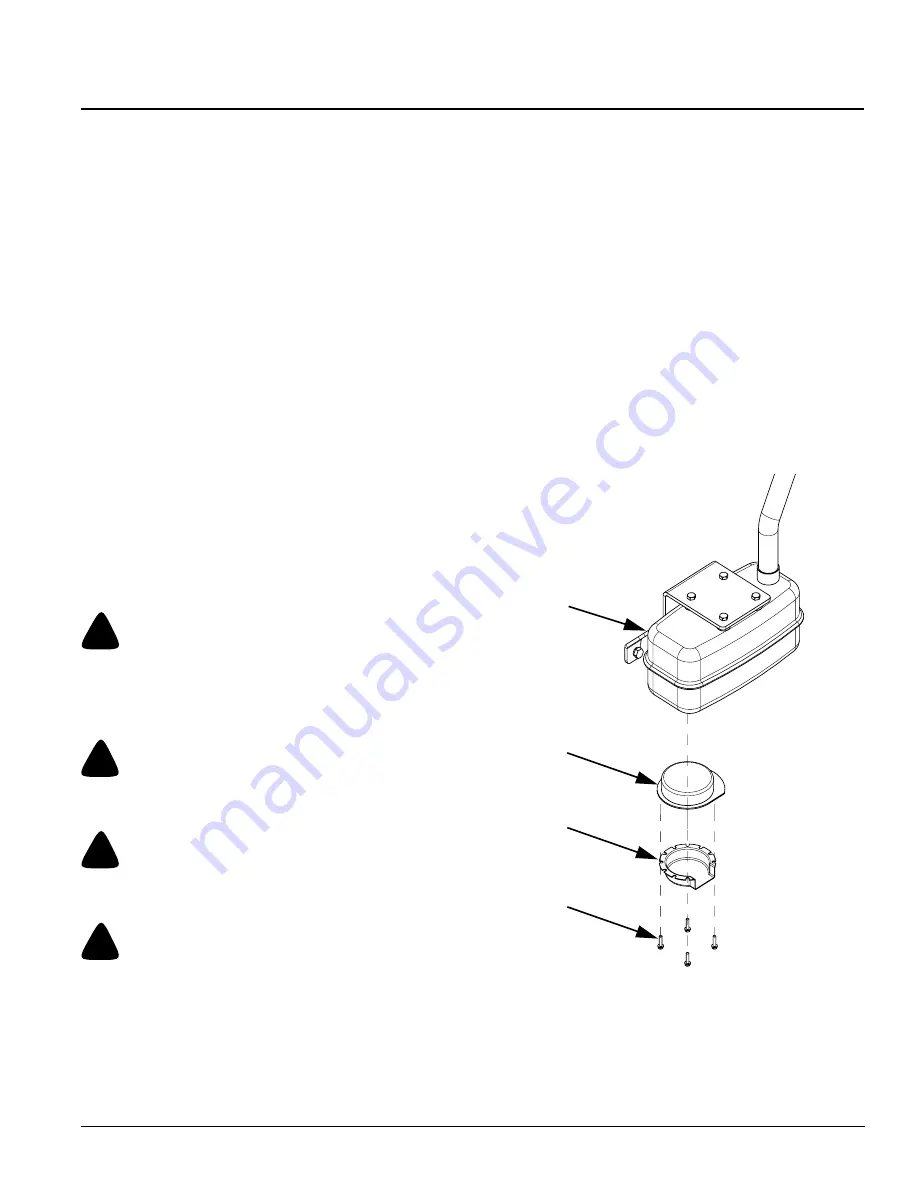
Refer to Figure 6-10

The spark arrester is mounted inside the muffler behind
the muffler exhaust deflector. It is designed to suppress
sparks from escaping the muffler while they are still
glowing.

Spark Arrester Maintenance Schedule

Inspect every 100 hours for carbon build-up and screen
damage.

Clean whenever carbon build-up is visible or whenever
lost of engine power is detected.

Replace when damaged.

Spark Arrester Maintenance Procedure

Refer to Figure 6-10

1.

Remove spark arrester mounting screws, exhaust
deflector and spark arrester from the muffler.

2.

Remove carbon deposits from spark arrester screen
with a wire bristle brush. Be careful not to damage the
spark arrester screen.

3.

Inspect the spark arrester for holes or breaks in the
screen and replace if damaged.

4.

Reattach spark arrester and exhaust deflector to
muffler with mounting screws.

Figure 6-10

Replacement Parts

Description

Part No.

Spark Arrester  . . . . . . . . . . . . . . . . . . . . . . 840-174C

21349

Muffler

Spark

Arrester

Exhaust

Deflector

Mounting

Screws

Summary of Contents for Gondo 4400EX Heavy Duty Off Road Utility Vehicle...

Page 1: ...n you see this symbol the subsequent instructions and warnings are serious follow without exception Your life and the lives of others depend on it Table of Contents 720 051M 7 14 08 4400EX Heavy Duty...

Page 2: ...ation 14 Starting the Engine 14 Dashboard Switches and Instruments 14 Foot Operated Controls 15 Hand Operated Controls 16 Fuel Indicator 16 Steering 17 Driving Conditions 17 Towing the Gondo 18 Travel...

Page 3: ...nloaded free of charge from our website at www landpride com or printed from the Land Pride Service Support Center by your dealer Terminology Right hand and left hand as used in this manual are determ...

Page 4: ...and in all kinds of weather Owner Assistance The safety video should be viewed by the owner and the Warranty Registration card should be filled out by the dealer at the time of purchase The owner shou...

Page 5: ...ardous situation which if not avoided could result in death or serious injury and includes hazards that are exposed when guards are removed It may also be used to alert against unsafe practices CAUTIO...

Page 6: ...rts Make sure parts are in good condition and installed properly Remove build up of grease oil or debris Remove all tools and unused parts from the Gondo before operation Wear Protective Equipment Wea...

Page 7: ...oosely Hanging clothing long hair jewelry etc can catch in the tires and other rotating objects Keep hands feet long hair clothing and jewelry away from moving parts and obvious pinch points to avoid...

Page 8: ...oading Always park on level ground stop engine set park brake and remove ignition key before leaving the vehicle Chock tires if condition warrants Use extreme caution when cresting hills or when visib...

Page 9: ...or replace hydraulic leaks and damaged hoses immediately 21435 Safety Decals 1 Your Gondo Heavy Duty Utility Vehicle comes equipped with all safety decals in place They were designed to help you safel...

Page 10: ...fety Information 4400EX Heavy Duty Off Road Utility Vehicle 720 051M 7 14 08 8 Table of Contents 838 629C Warning Pinch Point or Crushing Hazard 838 492C Caution Maximum Power Source 21440 21443a 2144...

Page 11: ...Important Safety Information 4400EX Heavy Duty Off Road Utility Vehicle 720 051M Table of Contents 838 489C Warning Rollover Hazard 838 491C Warning Improper Use 21439 21439 838 486C Warning General U...

Page 12: ...4400EX Heavy Duty Off Road Utility Vehicle 720 051M 7 14 08 10 Table of Contents 838 628C Warning Load Rating and Trailer Towing Information 21442 838 490C Caution Stop Engine 21438 21441 838 508C War...

Page 13: ...ction 2 Important Safety Information 4400EX Heavy Duty Off Road Utility Vehicle 720 051M Table of Contents Warning Label Included with Seat Warning Check Seat mounting 21345 20971 838 444C Danger Muff...

Page 14: ...place ___Check headlights to make sure they are working and are properly mounted Each vehicle must undergo a Pre Delivery Inspection by the Dealer Listed below is an example of the checklist that is i...

Page 15: ...cle controls have been explained ___Fuel transportation and storage procedures have been explained ___Fluid fill and lubrication points have been located and explained to the customer ___Customer has...

Page 16: ...safety violation and could result in voiding the warranty General Operation Starting the Engine Follow starting procedures displayed at the gearshift lever and as noted below Section 4 Operating Inst...

Page 17: ...el and add if low See your authorized Land Pride dealer if oil level shows full on 1 2 3 4 21438 5 8 21342 6 7 the dipstick and oil light stays on after the engine is running 8 Power Plug Outlet 12 vo...

Page 18: ...r The park brake lever is located on the floor board right of the operator and should be set at all times the vehicle is not in operation Push the lever forward to the horizontal position to set the b...

Page 19: ...Do not drive through water that is higher than the bottom of the floor board Always enter the water slowly and continue traveling slowly through the water to minimize splashing The vehicle could stall...

Page 20: ...times more than its own weight Because of this it is important that you know the vehicle s capability and how to operate it in a way that will not damage the vehicle or injure yourself or others Alwa...

Page 21: ...inflate a tire Consider adding a puncture sealant to your tires as a preventative measure 3 Check for any loose or missing parts and definitely make those needed repairs before going anywhere It is es...

Page 22: ...airly clean and free of obstacles Maintain a slow steady speed disturbing the stream bed as little as possible If you submerge the engine you will lose forward momentum and power If you submerge the e...

Page 23: ...ing over rough terrain The Turf Tire is a good selection when one wants to preserve the terrain being traveled over Golf courses parks and other maintained areas make the Turf Tire an excellent choice...

Page 24: ...naling a problem Visually inspect the vehicle for any abnormal wear or damage A good time to detect potential problems is while performing scheduled maintenance service Correcting the problem as quick...

Page 25: ...the axle b Rear tires Refer to Figure 6 2 Place jack under the main frame just in front of the axle 4 Jack vehicle only high enough to do the work intended 5 Support vehicle securely with jack stands...

Page 26: ...ing negative black cable to the negative post WARNING Sparks can cause a battery gas explosion which will result in personal injury Keep battery terminals from touching any metal parts when removing o...

Page 27: ...its wheels on the ground If this is not possible then refuel the equipment on the truck or trailer using a portable container and not a gasoline dispenser nozzle If a gasoline dispenser nozzle must be...

Page 28: ...as Do not dump fuel on the ground IMPORTANT Never use methanol gasoline containing methanol and or gasohol containing more than 10 ethanol These fuels can damage the vehicle s fuel system Do not mix o...

Page 29: ...lt dressings Any of these will destroy the belt composition in a very short time CAUTION Make certain to keep fingers from getting caught between belt and pulley when rotating belt over pulley Replace...

Page 30: ...aner Squeeze excess water out and allow time to air dry 6 Saturate precleaner with new engine oil and gently squeeze all excess oil out 7 Inspect precleaner element for holes and tears before reinstal...

Page 31: ...sparks from escaping the muffler Use extreme caution when driving through dry grass brush and other fire hazard materials Never stop or park the vehicle over combustible materials WARNING The muffler...

Page 32: ...whichever comes first Maintenance Schedule Maintenance Operation Daily Every 25 Hrs Every 100 Hrs Every 200 Hrs Every 6 Mos Every Season Refer to Page Check Engine Oil level X 31 Check Hydraulic Flui...

Page 33: ...tor s Manual provides additional information necessary to keep the engine in top operating condition Follow all maintenance procedures provided in the Engine Operator s Manual Engine Oil Maintenance S...

Page 34: ...ew replacement filter in a shallow pan with the open end up Pour new engine oil in through the threaded center hole until oil reaches the bottom of the threads Allow one or two minutes for the oil to...

Page 35: ...d to ensure long life of the differentials It is extremely important to use proper type and weight of oil Also it is important to check and change oil as outlined in the maintenance schedule below Dif...

Page 36: ...s low 4 Replace fill plug and tighten securely Figure 7 8 NOTE Running vehicle low on transmission oil can damage transmission and void its warranty 6mo 100hrs 21358 Engine Muffler Transmission Plug T...

Page 37: ...ir immediately if low or if hydraulics are operating poorly Hydraulic Fluid Type and Capacity See also Section 10 Specifications and Capacities on page 40 Type of fluid Dextron 3 automatic transmissio...

Page 38: ...ity 3 or 4 pumps of the grease gun Stop adding grease if lubricant emerges through the seals Rotating Bearing Surfaces Refer to Figure 7 14 and Figure 7 15 The swivel tube is located in the rear frame...

Page 39: ...Gasoline evaporates if left in carburetor for long periods forming gum and varnish deposits in the carburetor These deposits will cause engine flooding and loss of power 8 Clean dirt and chaff from c...

Page 40: ...aterials needed to repair the vehicle body All tools paint and materials should be purchased locally 8 Polish to a high luster or as required to match surrounding material 9 Wipe clean with soft clean...

Page 41: ...ials See note on page 37 1 000 rpm buffing tool DeWalt 849 Evercoat Body Filler Easy Sand Sanding Pad DuPont Full Thane Primer 421 15 DuPont 3939 Cleaner DuPont Sealer 42470 DuPont Chroma Base Clear C...

Page 42: ...Keyed Rear Cargo Box Capacity 1800 lbs Battery 300 cca Maximum Tongue Weight 250 lbs Spark Arrestor Standard Maximum Towing Capacity 2500 lbs Headlights Standard Wheel Base 68 Tail Lights Standard Tr...

Page 43: ...fluid to the master cylinder Brake line is broken Replace brake line Brake line has air in it Bleed brake line and add brake fluid Master cylinder is defective Replace master cylinder Electrical syste...

Page 44: ...plugged Allow engine to cool Clean cooling fins with high pressure air Engine oil level is low Add specified engine oil Carburetor air intake tube is plugged Clean air intake tube Air cleaning elemen...

Page 45: ...umps out of gear With gear shift in neutral adjust shifter link at transmission to be in neutral position Park brake doesn t work Park brake cable is broken Replace park brake cable Park brake cable i...

Page 46: ...switch Steering does not track correctly Improper tire inflation Inflate all tires to correct tire pressure Hydraulic steering cylinder is not operating properly Inspect thoroughly and replace or tigh...

Page 47: ...3 4 10 235 170 360 265 510 375 M18 X 1 5 220 165 350 260 485 355 3 4 16 260 190 405 295 570 420 M20 X 2 5 280 205 440 325 610 450 7 8 9 225 165 585 430 820 605 M20 X 1 5 310 230 650 480 900 665 7 8 14...

Page 48: ...Section 12 Appendix 4400EX Heavy Duty Off Road Utility Vehicle 720 051M 7 14 08 46 Table of Contents Notes...

Page 49: ...pre delivered by an authorized Land Pride Utility Vehicle dealer 4 Limitations This warranty shall not apply to or include any of the following a Repair or replacement required as result of I accident...

Page 50: ...Corporate Office P O Box 5060 Salina Kansas 67402 5060 USA www landpride com...

Reviews: