15
Section 1: Assembly & Set-up
MPS2607, MPS2609, & MPS2611 Multi-Purpose Seeder 329-301M
Table of Contents
8/8/23
Small Seeds Zero Adjustment Set-up
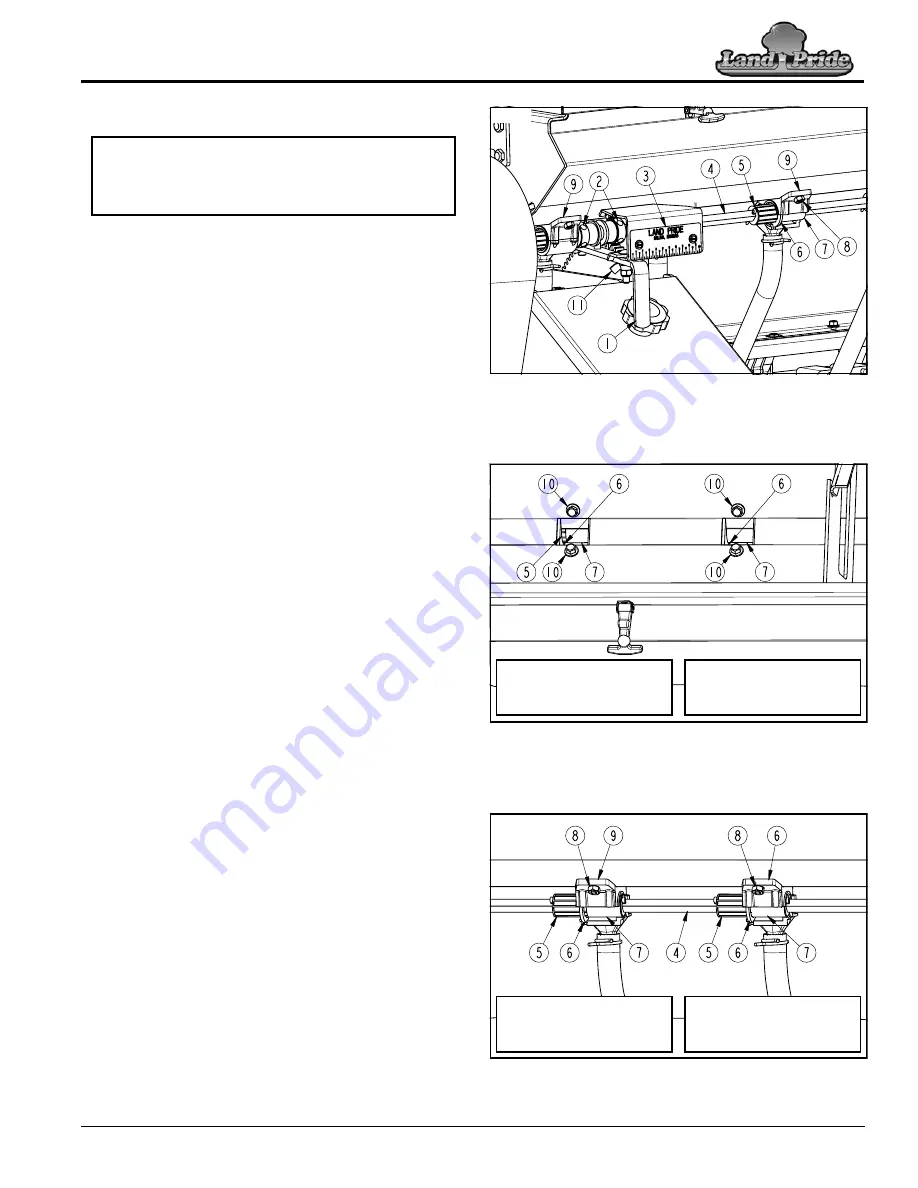
Refer to Figure 1-4:
The small seeds seed cups (#9) must be checked to
make sure all cup sleeves (#7) are against seed cup
sprocket washers (#6) with seed rate adjustment
lever (#1) set at 0. Start by checking the right-hand small
seeds seedbox with the 0-100 guide scale (#3).
Adjust Right-Hand Small Seeds Seedbox
Refer to Figure 1-4:
1.
Loosen wing nut (#11).
2.
Move adjustment lever (#1) to 100 on guide
scale (#3) and back to 0.
3.
Refer to Figure 1-5
&
Figure 1-6:
Open the right-
hand small seeds seedbox lid and inspect all cup
sleeves (#7) to verify they are against sprocket
washers (#6). Sprockets (#5) should not be visible.
Refer to Figure 1-4
,
Figure 1-5
,
&
Figure 1-6:
4.
Make the following adjustments if cup sleeves (#7)
are not against sprocket washers (#6) or if seed rate
adjustment lever (#1) stops before it gets to 0:
a. Loosen set screws in lock collars (#2).
b. Move drive shaft (#4) toward lock collars (#2) until
it stops. It will stop when one or more sleeves (#7)
come against sprocket washers (#6).
c. Hold drive shaft (#4) in this position and move
adjustment lever (#1) to 0.
d. Tighten set screws in lock collars (#2) to the
correct torque.
5.
If adjustment lever (#1) is at 0 and some of the cup
sleeves (#7) are not against sprocket washers (#6),
then adjust those cups as follows:
a. Loosen hex nuts (#8) and move seed cups (#9)
away from seed sprockets (#5) until they stop.
b. Tighten 1/4"-20 hex nuts (#8) to the correct torque
for GR5 bolts (#10).
c. When completed, tighten wing nut (#11).
Adjust Left-Hand Small Seeds Seedbox
Refer to Figure 1-4:
1.
Loosen wing nut (#11). Move seed rate adjustment
lever (#1) to 100 and back to 0.
Refer to Figure 1-4
,
Figure 1-5
,
&
Figure 1-6:
2.
Open the left-hand small seeds seedbox lid and
verify cup sleeves (#7) are against washers (#6) and
sprockets (#5) are not visible.
3.
If some of the cup sleeves (#7) are not against
sprocket washers (#6), then adjust those cups as
instructed in steps 5a-5c above.
NOTE:
Reference Figure 1-4 and Figure 1-6:
Seed cups (#9) are illustrated with a cut-out in the
sprocket to illustrate seed cup washers (#6) and
seed cup sleeves (#7) located inside the cups.
Small Seeds Zero Adjustment Set-up
Figure 1-4
Small Seeds Seed Cups Viewed From Inside The Seedbox
Figure 1-5
Small Seeds Seed Cups Viewed From Beneath Seedbox
Figure 1-6
73353
Incorrect Set-up
Sleeve (#7) is not against
sprocket washer (#6)
Correct Set-up
Sleeve (#7) is against
sprocket washer (#6)
39706
Incorrect Set-up
Sleeve (#7) is not against
sprocket washer (#6)
Correct Set-up
Sleeve (#7) is against
sprocket washer (#6)
73354


