38
Section 4: Grass Seed Rate Adjustment
MPS2607, MPS2609, & MPS2611 Multi-Purpose Seeder 329-301M
Table of Contents
8/8/23
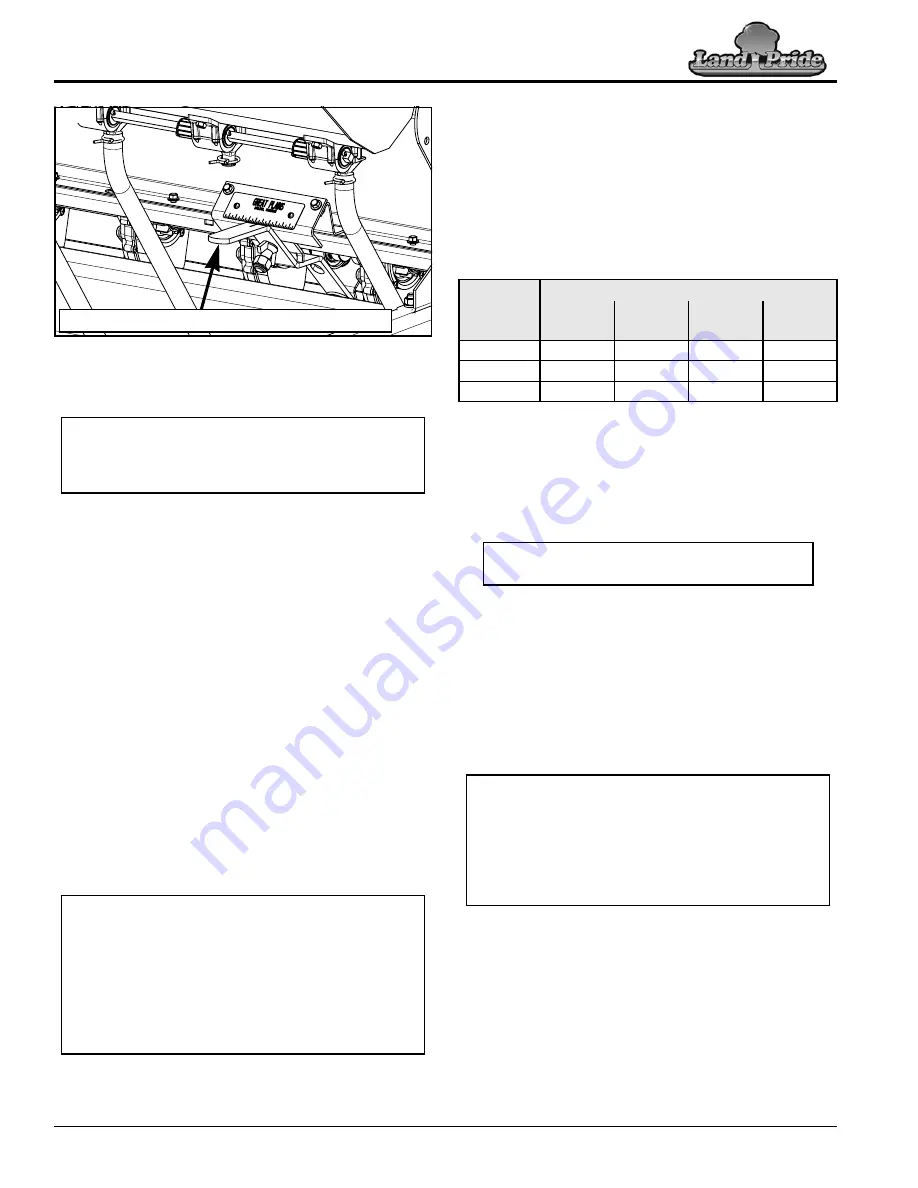
Grass Seed Rate Adjustment Lever
Figure 4-2
Grass Seed Rate Adjustments
1.
Use English seed charts on pages 40-42 and Metric
seed charts on pages 43-45 to help determine
seeding rate.
a. Decide which drive range is required (low or high
range). If necessary, change the grass seeds
transmission speed to accommodate correct
speed range. See
“Grass Seeds Transmission”
on page 32.
b.
Refer to
Figure 4-2:
Move seed rate adjustment
lever to cup setting number obtained from the
seed rate charts. For best results, first move
adjustment lever all the way to the left and then to
the desired setting. Increase setting if seed is
lighter than average. Decrease setting if seed is
heavier than average.
2.
Refer to
Figure 2-13 on page 33:
Disengage small
seeds with lock in/out pin (#5) and native seeds with
lock in/out pin (#3).
3.
Continue with
“Calibrate Grass Seed Dispersal”
below.
Calibrate Grass Seed Dispersal
1.
Attach seed rate crank to the all seeds drive sprocket.
Refer to
“Seed Rate Crank Instructions”
on
page 39.
Grass Seed Rate Adjustment Lever (Cup Setting)
73481
NOTE:
To determine seed rates for seeds not listed
in the charts, compare weight and size to those
listed and use a similar setting. Follow steps 1 to 11
to calibrate seed rate.
IMPORTANT:
Seed rates provided in the charts may
be inconsistent with actual seeding rates due to
seed size, weight, treatment, moisture content, ratio
of inert material to seed, different seed mixtures,
humidity, and ground preparation. Minor
adjustments to the cup setting may be needed to
compensate. We recommend that you test and adjust
your seeder using the calibration procedures listed
below to help ensure an accurate seeding rate.
2.
Partition off three of the seed discharge openings
located inside the grass seeds seedbox.
3.
Pour seed over the three discharge openings.
Do not
allow any seed to reach any of the other openings.
4.
Crank rear roller clockwise to make sure the drive
system is working properly and the seed cups are
free from foreign matter.
5.
Place a drop cloth under the seeder to collect all of
the seeds that are metered out.
6.
Crank rear roller clockwise the number of rotations
noted in the table above. Be sure to check the three
feed cups to make sure each cup has plenty of seed
coming into it.
7.
Weigh the seed which has been metered out and
divide that weight by three to get the number of
pounds or kilograms per seed cup.
8.
Next, multiply number of pounds or kilograms per
seed cup by the number of seed cups on the grass
seeds seedbox to arrive at weight “A”.
9.
If Weight “A” is calculated based on:
1/10 acre, then “A” x 10 = lbs/acre
1000 sq ft, then “A” x 43.56 = lbs/acre
1000 sq ft, then “A” x 1 = lbs/1000 sq ft
1/20 hectare, then “A” x 20 = kgs/hectare
100 sq meters, then “A” x 100 = kgs/hectare
100 sq meters, then “A” x 10 = kgs/1000 sq m
10. If calculated grass seed rate is different than the
suggested settings in the charts, then increase or
decrease the seed cup adjustment lever shown in
Figure 4-2.
11. Repeat calibration procedure if seed cup adjustment
lever position was moved in the step above.
12. Remove and store seed rate crank. For detailed
instructions, refer to
“Store Seed Rate Crank”
on
page 39.
Model
No
No. of Rear Roller Rotations to Cover
1/10
Acre
1000 Sq.
Ft.
1/20
Hectare
100
Sq. M
MPS2607
266
61
329
66
MPS2609
207
48
256
52
MPS2611
169
39
209
42
NOTE:
If total weight for 3 seed cups is in
ounces, divide that weight by 48 instead of 3.
NOTE:
Field conditions will affect seeding rates.
Check amount of seed being used by noting size of
area being seeded, amount of seed added to the
seeder, and level of seed in the seedbox.
Minor adjustments to the seed rate adjustment lever
may be necessary if the seeder is seeding more or
less seed than desired.


