Section 1: Assembly & Set-up
9/28/18
RB1660, RB1672, RB1684, RB2672, RB2684, & RB2696 Rear Blades 301-375M
8
3-Point Hook-Up
DANGER
!
To avoid serious injury or death:
Always check all blade hardware for tightness before moving
or working around the unit. Make sure moldboard pivot and
tilt retaining hardware is tightened to the correct torque. The
moldboard can fall from the its pivot mount or tilt mount if
retaining hardware is loose or missing.
WARNING
!
To avoid serious injury or death:
•
Lightweight tractors with rear attached implements may need
weights added to the front to maintain steering control.
Consult your tractor Operator’s Manual to determine proper
weight requirements and maximum weight limitations.
•
Always shut tractor down using “Tractor Shutdown
Procedure” provided in this manual before allowing anyone
including the operator to hook-up and unhook implement.
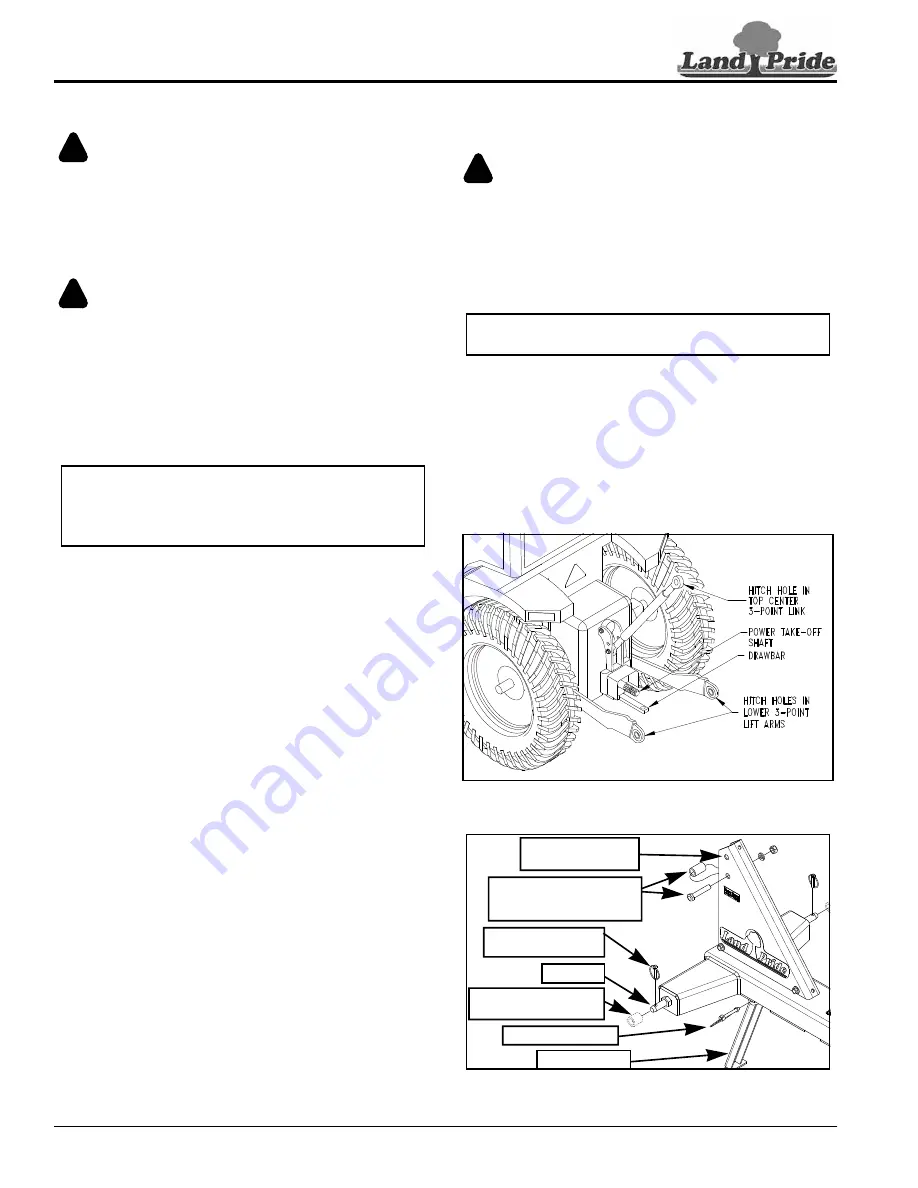
Refer to Figure 1-3 & Figure 1-4:
1.
Ensure lower arms are stabilized to prevent
excessive side movement.
2. Slowly back tractor up to the Rear Blade while using
3-point hydraulic control to align hitch holes in lower
3-point lift arms with hitch pins on implement.
3. Engage tractor park brake, shut engine off, and
remove key before dismounting from tractor.
4. With lower lift arms properly aligned, slide lift arm
hitch holes onto implement hitch pins. Secure lower
arms in place with customer supplied linchpins.
5. Connect top center link hitch hole to center link
mounting hole in hitch using customer supplied
3/4" clevis pin and linchpin.
6. Rotate park stand up to transport position and secure
with wire retaining pin.
NOTE:
Land Pride’s Quick Hitch can be attached to
the tractor to provide quick and easy 3-point hook-
up and detachment. See your nearest Land Pride
dealer to purchase a Quick-Hitch.
Hydraulic Hook-Up
Refer to Figure 2-1 on page 10:
WARNING
!
To avoid serious injury or death:
Never fully extend or retract hydraulic cylinder(s) without
first checking to make sure the implement does not make
contact with tractor tires. Extending implement into the
tractor tires can result in loss of control and damage to the
1.
Connect hydraulic hoses (#18 & #19) to tractor
duplex outlet.
2. With Rear Blade hitched to a tractor, raise blade off
the ground and operate hydraulic cylinder lever
slowly to angle blade back and forth. Make sure the
blade does not make contact with tractor tires.
3. Continue to cycle hydraulic cylinder back and forth
until it has been purged of air. (Cylinder rod will move
smoothly when purged.)
Tractor 3-Point Hitch
Figure 1-3
Series 3-Point Hitch
Figure 1-4
NOTE:
“RB16 Series Hydraulic Angling Kit”
on page 10 if installing hydraulic option.
37298
3325
Hitch Pin
Linchpins Supplied
By Customer
Wire Retaining Pin
Park Stand
Cat. I Center Link
Mounting Holes
Quick Hitch Hardware
(Bolt, Lock Washer, Nut,
and Spacer)
Quick Hitch Bushings
Supplied By Customer


