Section 2: Options & Accessories
7/13/20
RCD1884 Rotary Cutters 326-355M
16
Section 2: Options & Accessories
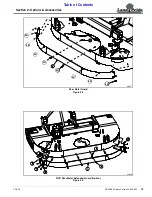
Skid Shoe Accessory
Refer to Figure 2-1:
326-341A
RCD1884 SKID SHOES
The RCR1884 cutter is supplied with welded-on skid
shoes. Replaceable skid shoes (Sold as an accessory)
can be bolted to the weld-on skid shoes to increase
protection against side panel wear.
WARNING
!
To avoid serious injury or death:
Excessive wear on skid shoes can damage side panels, cause
inadequate operation of cutter, and create a safety hazard.
Always replace skid shoes at the first sign of wearing thin.
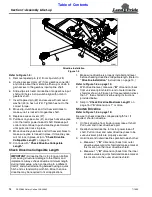
1. Attach skid shoes (#1) to front left and right corners of
the cutter with 3/8"-16 x 1" GR5 plow bolts (#2), flat
washers (#4), and locknuts (#3).
2. Tighten locknuts to the correct torque.
Skid Shoe Accessory
Figure 2-1
Weld-on Skid Shoe
Replaceable Skid Shoe
33003
Front and Rear Guards
Land Pride strongly recommends front and rear safety
guards be installed on this cutter to help stop objects from
being thrown out from under the cutter at high speeds.
When cutting along highways and in areas where people
or animals may be present, always use front and rear
guards on your cutter.
Front Corner Deflectors (Standard)
Refer to Figure 2- 2 on page 17:
326-490L
FRONT CORNER DEFLECTORS
Front corner deflectors are included with the cutter and
should be installed before installing the front guard.
1. Install corner deflectors (#2) with 3/8"-16 x 1" GR5
carriage bolts (#3) and hex whiz nuts (#6). Draw nuts
up snug, do not tighten.
Front Rubber Guard (Option)
Refer to Figure 2- 2 on page 17:
326-342A
RCR1884 FRONT RUBBER GUARD
1. Install front rubber guards (#1) with 1/2"-13 x 1 1/4"
GR5 carriage bolts (#4) and hex whiz nuts (#5). Draw
nuts up snug, do not tighten.
2. Adjust front guard (#1) and corner deflectors (#2) to
fit evenly against each other.
3. Tighten all whiz nuts (#5 & #6) to the correct torque.
Front Single Chain Guard (Option)
Refer to Figure 2-3 on page 17:
326-449A
FRONT SINGLE CHAIN GUARD
The Single Chain Guard option provides a better flow of
air under the cutter resulting in a more evenly discharge
of cut material.
1. Attach front single chain guard (#1) to deck front with
1/2"-13 x 1 1/4" GR5 carriage bolts (#2) and hex whiz
nuts (#3). Draw nuts up snug, do not tighten.
2. Adjust front chain guard (#1) and corner
deflectors (#2 in Figure 2- 2) to fit evenly against each
other.
3. Tighten all chain guard hex whiz nuts (#3) and corner
deflector hex whiz nuts (#6 in Figure 2- 2)to the
correct torque.


