Section 1: Assembly & Set-Up
10/23/20
RCR1860 & RCR1872 Rotary Cutters 312-849M
15
Driveline Hook-Up
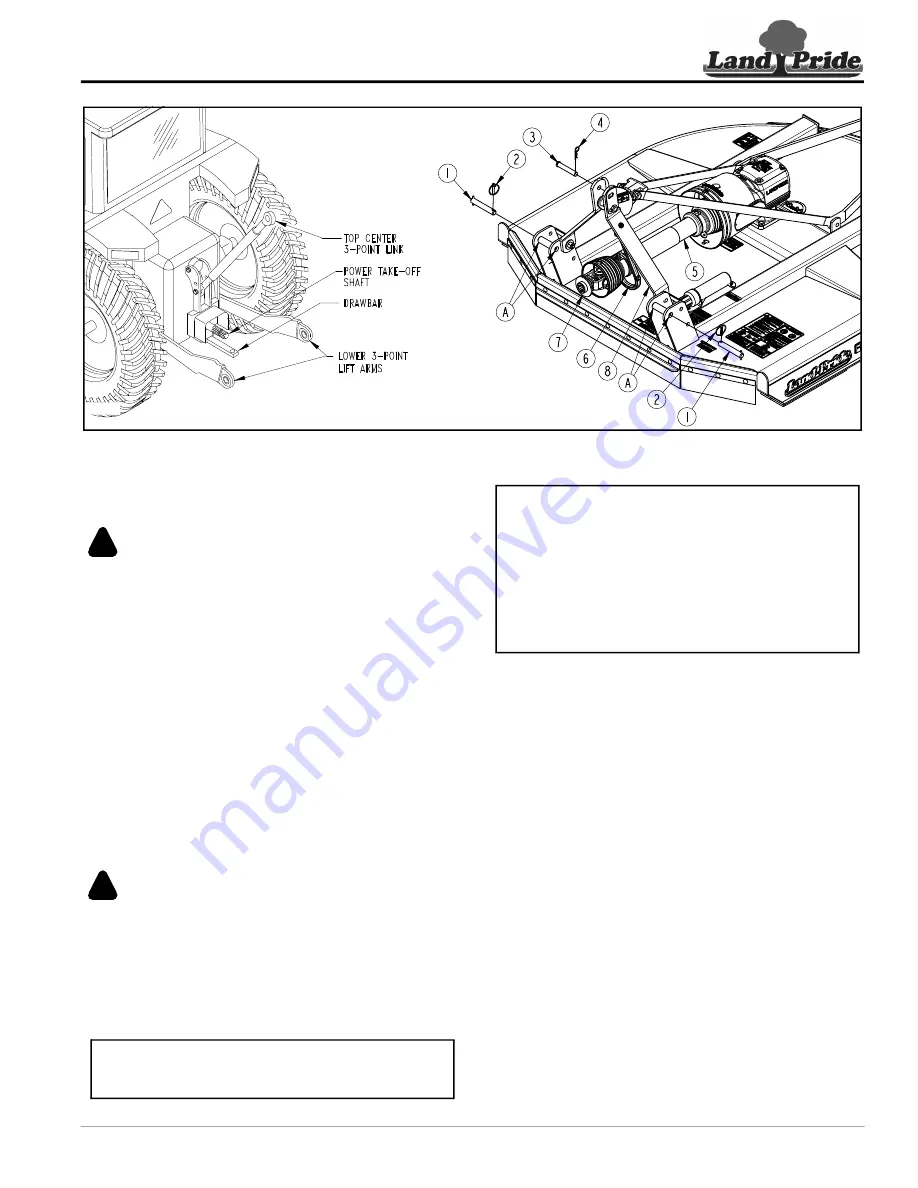
Refer to Figure 1-4:
DANGER
!
To avoid serious injury or death:
•
Tractor power take-off shaft shield, driveline shields, and
gearbox shaft shields must be installed and in good working
condition to avoid driveline entanglement and projectiles
•
Do not engage power take-off while hooking-up or
unhooking the driveline, or while someone is standing near
the driveline. A person’s body and/or clothing can become
•
Do not use a power take-off adapter. The adapter will
increase strain on the tractor’s power take-off shaft causing
possible damage to shaft and driveline. It will also defeat
the purpose of the tractor’s power take-off shield.
•
Make certain driveline yokes are securely fastened at each
end. A loose yoke can work free allowing the driveline to
rotate uncontrollably causing implement damage and
bodily injury or death to anyone nearby.
WARNING
!
To avoid serious injury or death:
•
Always follow “Tractor Shutdown Procedure” provided in
this manual before dismounting the tractor.
•
Check driveline when lowering implement to make sure it
does not interfere with the tractor drawbar at maximum
depth. If needed, shut tractor off and move or remove
drawbar to prevent driveline damage.
An additional driveline may be
required if implement is attached to more than one
tractor or if a Quick Hitch is used.
1. If driveline collapsible length has not been checked,
“Check Driveline Collapsible Length”
page 16. Otherwise, continue with step 2 below.
2. Park tractor and cutter on a level surface.
3. Shut tractor down before dismounting. Refer to
4. If tractor drawbar interferes with the driveline during
hook-up, disconnect driveline and move drawbar
forward, to the side, or remove.
5. Remove driveline (#5) from driveline support (#6).
Driveline support is spring loaded and will rotate up
against A-frame (#8).
6. Pull back on driveline pull collar (#7) and push yoke
onto the tractor power take-off shaft. Release pull
collar and continue to push driveline yoke forward
until pull collar pops out and locks in place.
7.
Pull on driveline yokes at the tractor and implement
end to make sure they are secured to the tractor
power take-off shaft and implement gearbox shaft.
8. The tractor’s lower 3-point arms should be adjusted
for lateral float. Please consult your tractor’s manual.
9. Continue with
“Check Driveline Interference”
Drivelines with friction clutches must
go through a “run-in” prior to initial use and after long
periods of inactivity. For detailed instructions, see
“Slip-Clutch Protected Drivelines”
IMPORTANT:
Check driveline minimum collapsible
length before completing
Structural damage to the tractor and cutter can occur
if this check is not made. Refer to
Tractor Hook-Up
Figure 1-4
21422A
37298


