Section 1: Assembly & Set-up
RCF2784 & RCR2684 S/N Rotary Cutters 326-364M
7/26/19
21
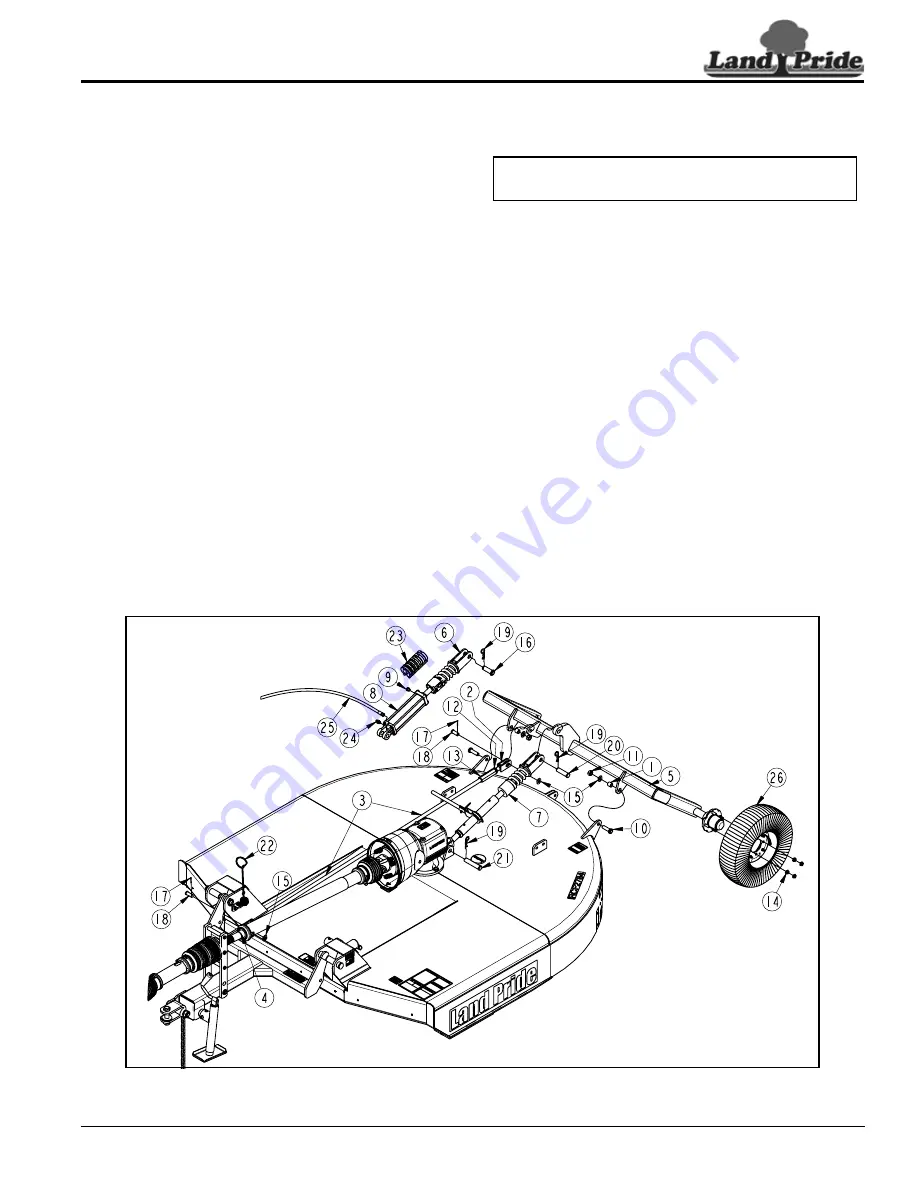
Axle Assembly
Refer to Figure 1-13:
1.
Install tailwheels (#26) to axle frame (#5) with hex
flange locknuts (#14). Tighten locknuts to the correct
torque.
2.
Attach axle frame (#5) to rear deck lugs with
3/4"-10 x 2 1/2" GR5 cap screws (#10), spacer
tubes (#1), flat washers (#15), and locknuts (#11).
Tighten nuts to the correct torque.
3.
Install ratchet jack (#7) or hydraulic cylinder (#8) to
deck assembly as follows:
Ratchet Jack Installation:
a. Attach base of ratchet jack (#7) to mounting lugs
behind gearbox with 1" x 4 3/4" clevis pin (#21) as
shown. Secure clevis pin with hairpin cotter (#19).
b. Operate ratchet lever to extend or shorten ratchet
jack until spring cushioned end of ratchet jack
aligns with hole in axle frame (#5).
c. Insert 1" x 3 3/16" clevis pin (#20) and secure with
hairpin cotter (#19).
NOTE:
Tailwheel on right-hand side is not shown to
allow easier viewing of balloons.
1.
Remove rubber protective sleeve (#23) from gearbox
input shaft and discard.
2.
Remove coupling bolt (#8) from end of slip-clutch.
3.
Unsnap one end of both access doors (#26) and
rotate doors open.
4.
Slide slip-clutch end of driveline onto gearbox input
shaft until holes in slip-clutch align with notch in
gearbox input shaft.
5.
Secure driveline (#25) to gearbox input shaft with
coupling bolt (#8), spring lock washer (#20), and hex
nut (#14). Tighten hex nut to the correct torque.
6.
Move slip-clutch back and forth several times to
make certain it is locked onto the gearbox shaft.
7.
Rotate access doors (#26) closed and snap in place.
8.
Insert jackshaft end of driveline (#25) through
bearing in bearing support assembly (#5).
9.
Pull bearing in bearing support assembly (#5)
against driveline (#25) and tighten set screw in
bearing collar against driveline jackshaft.
10. Attach driveline (#24) to jackshaft on driveline (#25)
by pulling back on pull collar (#29) and pushing yoke
onto the jackshaft. Release pull collar and continue
to push yoke forward until pull collar locks in place.
11. Move driveline yoke back and forth several times to
make sure yoke is locked in place.
Trail-Type Axle Assembly (RCF2784 Only)
Figure 1-13
33269


