background image

Section 4: Maintenance & Lubrication 

Table of Contents

RTA2562, RTA2570, & RTA3576 Rotary Tillers 311-254M

1/18/21

24

Driveline Maintenance

Before each use, check that the driveline is securely 

fastened and that all driveline shields are in place, 

undamaged and in working order. Replace driveline and 

shields as needed. Order only genuine Land Pride parts 

from your local Land Pride dealer.

DANGER

!

To prevent serious injury or death:  

Tractor power take-off shaft shield, driveline shields, and 

gearbox shaft shields must be installed and in good working 

condition to avoid driveline entanglement and projectiles 

flying off of the driveline.

Always disconnect driveline from the tractor before 

servicing the drivetrain and components powered by the 

drivetrain. A person can become entangled in the drivetrain 

if the tractor is started and the power take-off is engaged.

WARNING

!

To prevent serious injury or death:  

Always follow “Tractor Shutdown Procedure” provided in 

this manual before dismounting the tractor.

Do not operate a broken or bent driveline. Such a driveline 

will break apart while rotating at high speeds and can cause 

serious injury or death. Always remove the implement from 

use until the damaged driveline can be repaired or replaced.

Slip Clutch Protected Driveline

The tiller drive components are protected from shock 

loads with either a coil spring slip clutch or a Belleville 

spring slip clutch. Refer to Figure 1-2 and Figure 1-3 on 

page 11 to determine which driveline protection is 

included with this tiller. Refer to instructions for 

“Slip 

Clutches With Coil Springs”

 or 

“Slip Clutches With 

Belleville Springs” 

below.

Before each use, check that all driveline shields and 

drivelines are in place, undamaged and in working order. 

Replace shields and drivelines as needed. Order only 

genuine Land Pride parts from your local Land Pride 

dealer.

DANGER

!

To prevent serious injury or death:  
Tractor power take-off shaft shield, driveline shields, and 

gearbox shaft shields must be installed and in good working 

condition to avoid driveline entanglement and projectiles 

flying off of the driveline.

WARNING

!

To prevent serious injury or death:  
Do not operate a broken or bent driveline. Such a driveline 

will break apart while rotating at high speeds and can cause 

serious injury or death. Always remove the implement from 

use until the damaged driveline can be repaired or replaced.

Slip Clutches With Coil Springs

Drive components are protected from shock loads by a 

friction slip clutch. The clutch must be capable of 

slippage during operation to protect the gearbox, 

driveline, and other drive train parts.

WARNING

!

To avoid serious injury or death:  

Always follow “Tractor Shutdown Procedure” provided in 

this manual before dismounting the tractor.

A slip clutch that has been in use or has slipped for as little 

as only two or three seconds during run-in may be too hot 

to touch. Allow a hot clutch to cool before working on it.

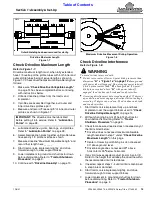
Clutch Run-In

Figure 4-4

Clutch Run-In

Refer to Figure 4-4:

Friction clutches should be “run-in” prior to initial 

operation and after long periods of inactivity. To prevent 

driveline and gearbox damage, repeat clutch “run-In” at 

the beginning of each season and when moisture and/or 

condensation seizes the inner friction plates.
1. Using a pencil or other marker scribe a line across the 

exposed edges of the clutch plates and friction disks.

2. Carefully loosen each of the 8 spring retainer nuts by 

exactly 2 revolutions. It will be necessary to hold the 

hex end of the retainer bolt in order to count the exact 

number of revolutions.

3. Start the tractor and engage the driveline drive for 

2-3 seconds to permit slippage of the clutch 

surfaces. Disengage the driveline, then re-engage a 

second time for 2-3 seconds. Disengage driveline, 

shut off tractor, and remove key. Wait for all 

components to stop before dismounting from tractor.

IMPORTANT: 

Prior to initial operation and after 10 

days of inactivity, slip friction disks to remove 

oxidation and moisture. Moisture allows disks to slip 

easily. Oxidation can prevent disk from slipping 

causing driveline damage. This damage is NOT 

covered under the warranty.

30560

Summary of Contents for RTA2562

Page 1: ...in French Language please see your Land Pride dealer Read the Operator s Manual entirely When you see this symbol the subsequent instructions and warnings are serious follow without exception Your li...

Page 2: ...rdered the weights and measurements are no longer accurate for your machine Update the record by adding the machine weight and measurements provided in the Specifications Capacities Section of this ma...

Page 3: ...hutdown Procedure 9 Park Stand Assembly 10 Hitch and Guard Assembly 10 Driveline Installation 11 Tractor Hook Up 12 Driveline Hook Up 13 Check Driveline Collapsible Length 14 Check Driveline Maximum L...

Page 4: ...e appropriate App on your smart phone open the App point your phone on the QR code and take a picture Dealer QR Locator The QR code on the left will link you to available dealers for Land Pride produc...

Page 5: ...dren to play on the power machine or implement Use extra caution when backing up Before the tractor starts to move look down and behind to make sure the area is clear Safety at All Times Careful opera...

Page 6: ...Remove all tools and unused parts from equipment before operation Do not weld or torch on galvanized metal as it will release toxic fumes Tire Safety Tire changing can be dangerous and must be perform...

Page 7: ...ith the control of the power machine Riders can be struck by objects or thrown from the equipment Never use tractor or implement to lift or transport riders Prepare for Emergencies Be prepared if a fi...

Page 8: ...silica particles This dust can cause serious injury to the lungs silicosis There are guidelines which should be followed if crystalline silica quartz is present in the dust Be aware of and follow OSH...

Page 9: ...Important Safety Information 1 18 21 5 This page left blank intentionally...

Page 10: ...rest dealer visit our dealer locator at www landpride com 3 Some new equipment installed during repair requires safety labels to be affixed to the replaced component as 10363 specified by Land Pride W...

Page 11: ...Important Safety Information Table of Contents RTA2562 RTA2570 RTA3576 Rotary Tillers 311 254M 1 18 21 7 22228 22228 818 552C Rotating Driveline Hazard Keep Away 818 540C Shield missing Do Not operate...

Page 12: ...oint hitch Category 1 mounting The RTA25 has a 25 75 hp tractor requirement and the RTA35 has a 35 95 hp requirement These Land Pride Tillers have uses and applications in landscaping nurseries garden...

Page 13: ...fore attempting assembly check the following items Having all the needed parts and equipment readily at hand will speed up your assembly task and will make the job as safe as possible Check for fasten...

Page 14: ...bars with 5 8 11 x 1 1 2 long bolts 8 lock washers 9 and nuts 10 Do not tighten bolts at this time 2 Install spacer 3 between upper 3 point hitch plates 1 2 with 5 8 x 3 1 2 long bolt 11 lock washer...

Page 15: ...cover 4 2 Remove gearbox shaft protector 26 and discard Coil Spring Slip Clutch Driveline a Remove existing nut flat washer and conical dog pin from slip clutch end of driveline b Slide coupler onto t...

Page 16: ...nearest Land Pride dealer to purchase a Quick Hitch Refer to Figure 1 4 1 Make sure you have read and follow all Safety Alerts and Important notes listed in this section 2 The tiller is equipped with...

Page 17: ...a driveline while at an angle exceeding 25 degrees up or down The driveline can break and send projectiles IMPORTANT Check driveline collapsible and maximum length before completing Driveline Hook Up...

Page 18: ...ng structural damage to the tractor and implement Always check driveline minimum length during initial setup and when connecting to a different tractor More than one driveline may be required to fit a...

Page 19: ...ng Operation Figure 1 8 Check Driveline Interference Refer to Figure 1 8 WARNING To avoid serious injury or death Do not raise center of lower 3 point hitch pins more than dimension A in Figure 1 4 on...

Page 20: ...4M 1 18 21 16 Down Pressure Kit Optional Refer to Figure 1 9 Spring loaded rear deflector deflects flying debris and levels the freshly tilled soil See manual 311 134M included with the Down Pressure...

Page 21: ...eline or while someone is standing near the driveline A person s body and or clothing can become entangled in the driveline Keep yourself and all others away from rotating tines and drive train Always...

Page 22: ...rpm power take off speed or equipment breakage may result IMPORTANT Make sure all safety labels are in their proper location and in good condition before operation Follow all directions on the safety...

Page 23: ...the Tiller to the tractor cut the Drive line to proper length Run in the clutch and gone through the Operating Checklist If you have missed any of these steps please complete them before proceeding No...

Page 24: ...against the chain Then back stud off counterclockwise 1 4 turn 3 Re lock nylock jam nut while holding the head of the bolt in place Chain Tightener Figure 3 1 10366 Skid Shoe Adjustment Refer to Figur...

Page 25: ...up to compress springs 6 to desired pressure 3 Tighten slide collar set screws Rear Deflector Figure 3 3 NOTE Too much pressure will cause premature wear on the rear deflector 14709 Hitch Offset Refer...

Page 26: ...ckets Sprockets and roller chain should be checked for wear annually by a qualified person Replacing a worn roller chain will extend the life of the sprockets Be sure to replace worn sprockets when re...

Page 27: ...fer to Figure 4 3 WARNING To avoid serious injury or death Used tines can be very sharp Always wear gloves when handling tines to protect against cuts 1 Remove 2 cap screws and fasteners from tine to...

Page 28: ...hields must be installed and in good working condition to avoid driveline entanglement and projectiles flying off of the driveline WARNING To prevent serious injury or death Do not operate a broken or...

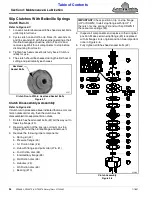
Page 29: ...s 1 springs 2 and bolts 3 Each friction disc 4 must then be separated from the metal surface adjacent to it 33024 IMPORTANT Keep track of order and orientation of your clutch components during disasse...

Page 30: ...dicated that one or more friction disks did not slip then the clutch must be disassembled into separate friction disks 1 Rotate 8 hex head socket bolts 2 all the way out to free stop flange 3 2 Record...

Page 31: ...coating of oil may be applied to worn surfaces in lieu of painting to minimize oxidation 5 Replace all damaged or missing decals 6 Lubricate as noted in Ordering Replacement Parts on page 27 7 Drain a...

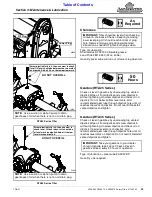
Page 32: ...Multi purpose grease lube Multi purpose oil lube Intervals in hours at which lubrication is required Lubrication Legend Driveline Profiles Disconnect driveline from the tractor and slide apart Clean a...

Page 33: ...crewing top vented dipstick Wipe oil from dipstick and screw dipstick in without tightening Unscrew dipstick and check oil on dipstick If below level mark on dipstick add recommended gear lube through...

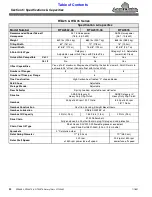
Page 34: ...hieve full 5 offset Cannot offset with Quick Hitch Number of Flanges 8 9 8 Number of Tines per Flange 6 Tine Construction High Carbon heat treated C shaped blades Skid Shoes Adjustable Storage Stands...

Page 35: ...Series RTA35 Series 26803 26801 RTA2562 67 5 8 1 72 m RTA2570 RTR2570 75 5 8 1 92 m RTA3576 81 5 8 2 07 m 30 3 4 78 cm 40 1 2 103 cm 29 73 7 cm 39 1 4 99 7 cm RTA2562 31 1 2 80 cm RTA R2570 35 1 2 90...

Page 36: ...stand Allows for easy hook up and storage Adjustable skid shoes Control depth with various settings Wear shield or left skid shoe Shield protects lower portion of chain cover from wearing due to drag...

Page 37: ...correctly installed Obstacles are entangled in tines and or rotor Lower hitch clevises are in the wrong position Lower tractor 3 point arms Increase tractor rpm Adjust skid shoes Replace tines Check t...

Page 38: ...205 150 285 210 M16 X 1 5 155 115 240 180 335 245 5 8 18 150 110 230 170 325 240 M18 X 2 5 195 145 310 230 405 300 3 4 10 235 170 360 265 510 375 M18 X 1 5 220 165 350 260 485 355 3 4 16 260 190 405 2...

Page 39: ...s not designed Misuse also specifically includes failure to properly maintain oil levels grease points and driveline shafts Claims under this Warranty should be made to the dealer which originally sol...

Page 40: ...Corporate Office P O Box 5060 Salina Kansas 67402 5060 USA www landpride com...

Reviews: