background image

Installation

 29

washer. Firmly tighten hardware, install plastic finish cap. 
Repeat for opposite side. Return to lower crank arm 
hardware and tighten securely.

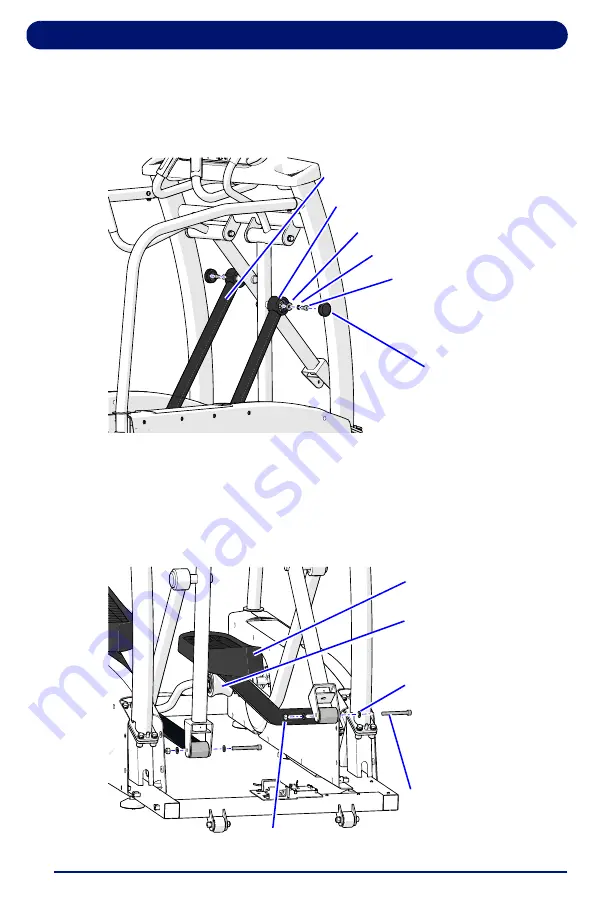
Figure 2-14. Installing Upper Crank Arm

16. Attach foot pedal tubes to bottom of vertical stride arm with 

(1) M10x85 socket head cap screw, M10 flat washer and 
M10 nylon lock nut. Firmly tighten hardware. Repeat step 
with opposite side.

Figure 2-15. Attaching Foot Pedal Tubes

Crank Arm (L)

Crank Arm (R)

M10 Flat Washer

M10 Split Washer

Finish Cap

M10x20 Socket 
Head Cap Screw

Foot Pedal

M10 Nylon Lock Nut

M10 Flat Washer

M10x85 Socket 
Head Cap Screw

Roller

Summary of Contents for 90 E7

Page 1: ...Part Number 95001 6 E7 E9 90 Series Elliptical Owner s Manual...

Page 2: ...ts intended use as described in this manual Do not use attachments not recommended by Landice Never operate elliptical if it has a damaged cord or plug if it is not working properly or if it has been...

Page 3: ...onctionne pas correcte ment ou a t endommag e Appelez imm diate ment votre distributeur ou prestataire de services certifi pour qu il l examine et le r pare Tenez le c ble lectrique loign des surfaces...

Page 4: ...ow a minimum clearance of 1 foot 30 5 cm at the rear of the elliptical Familiarize yourself with this manual Be sure you understand the operation of the elliptical before use Always follow basic safet...

Page 5: ...peut avoir comme cons quence en cas de chute que vous soyez immobilis entre le elliptique et un mur la courroie en mouvement pouvant causer des br lures ou autres blessures Laissez un espace d gag d a...

Page 6: ...d to an outlet having the same configuration as the plug No adapter should be used with this product nor should a means for grounding be added to the product Ellipticals marked 200 250 VAC are intende...

Page 7: ...n s une utilisation une tension nominale sup rieure 220 V et quip s en s rie d un c ble lectrique et d une fiche sp cifiques pour permettre le branchement sur une prise adapt e Si le produit doit tre...

Page 8: ...Elliptical Quick Start Guide 8 Elliptical Quick Start Guide Using the Control Panel Cardio Console See page 33 for complete instructions Landice Achieve Console See page 47 for complete instructions...

Page 9: ...STOP to save and exit Repeat the same steps to return the display to English units if desired Elliptical Controls Quick Start Guide To start the elliptical Press START to power up elliptical All displ...

Page 10: ...3 1 Wireless Chest Strap Monitoring System 18 1 3 2 Contact Heart Rate Monitoring System 19 1 4 Elliptical Program Capabilities 20 2 Installation 21 2 1 Tools Required 21 2 2 Unpacking 21 2 3 Assembl...

Page 11: ...Program 54 4 5 Landice Achieve User Programs 55 4 5 1 Learn Mode 56 4 6 Specific Goal Programs 57 4 7 Heart Rate Control Programs 58 4 7 1 Built in HRC Programs 59 4 7 2 User Defined Heart Rate Progr...

Page 12: ...Contents 12...

Page 13: ...Be sure you understand the control panel operation before using the elliptical Register your elliptical Landice backs your elliptical with a strong warranty For the factory to respond if your ellipti...

Page 14: ...Panel Cardio Reading Rack USB Port Cardio USB Port Landice Achieve Table 1 1 Features and Controls Item Description Control Panel Provides workout displays and controls USB Port Provides a charging po...

Page 15: ...heart beats per minute is really an efficiency rating for your entire body The number of times your heart beats during each minute of exercise is a measurement of the intensity of the exercise If you...

Page 16: ...d have to quit In fact the ACSM gives John a specific percentage range of his maximum heart rate to exercise in known as his Target Heart Rate Zone THRZ 1 2 3 Why should I monitor exercise intensity Y...

Page 17: ...e right level of exercise to accomplish this 1 2 4 How do I determine my Target Heart Rate Zone Your THRZ represents the minimum and maximum number of times your heart should beat in one minute of exe...

Page 18: ...u want to reach your exercise goals it s important to stay in your THRZ during workouts A heart rate monitor provides a reminder of the intensity and quality of each workout session Landice heart rate...

Page 19: ...stem can be used in place of the wireless chest strap to perform any of the following functions Monitor your Time in Zone Heart Rate Control HRC program adjustment Help you maintain your Target Pulse...

Page 20: ...dio See page 43 Landice Achieve See page 57 Heart Rate Control HRC Programs The heart rate program will automatically vary the effort based upon your target heart rate This target training maximizes y...

Page 21: ...on 3 long 3 8 Drive 10MM Standard Socket 3 8 Drive 13MM Standard Socket 3 8 Drive 16MM Standard Socket 3 8 Drive 19MM Standard Socket 19MM Open End Combination Wrench Soft Face Mallet Utility Razor Kn...

Page 22: ...through the lower access hole on frame Figure 2 1 Installing Upright onto Frame Mounts 2 Loosely attach upright mounting hardware consisting of 8 M10x40 hex head bolts 8 M10 flat washers and 8 M10 sp...

Page 23: ...o fixed handrail Figure 2 3 O ring Gaskets 4 Attach side hand rails onto upright mounting points hand tighten upper hardware consisting of 4 M8x20 button head cap screws 4 M8 spring washers and 4 M8 f...

Page 24: ...ith opposite side Return to steps 2 and 3 firmly tighten hardware Figure 2 5 Securing Lower Side Hand Rail 6 Slide O ring gaskets down onto side shroud plastics O ring is used to conceal gaps between...

Page 25: ...ss out through access hole at bottom of the frame Figure 2 6 Routing Console Power Harness 8 Route harness along base frame perimeter locking in place with attached harness clips Connect to green powe...

Page 26: ...ar assembly to bottom of upright mounting plate Feed wires up through mounting plate care should be taken to ensure wires are not pinched between mounting plate and CHR bar once installed Secure with...

Page 27: ...upright mounting plate hold console securely in place with one hand and attach to underside of mounting plate using 2 M6x60 black hex head bolts black flat and spring washers rear and 2 M6x55 zinc he...

Page 28: ...14 Connect lower crank arm labeled L and R onto crank bearing assembly Attach with 4 M8x15 socket head cap screws leave hardware loose Figure 2 13 Connecting Lower Crank Arm 15 Install upper crank arm...

Page 29: ...ch foot pedal tubes to bottom of vertical stride arm with 1 M10x85 socket head cap screw M10 flat washer and M10 nylon lock nut Firmly tighten hardware Repeat step with opposite side Figure 2 15 Attac...

Page 30: ...r tube until locked in place Repeat step with opposite side Figure 2 16 Installing Arm Covers 18 Install vertical stride arm pedal arm covers with 2 M5x15 cross head screws Repeat step with opposite s...

Page 31: ...16 Repeat step with opposite side Figure 2 18 Installing Base End Cap Covers 20 Install front cover using 12 Phillips Sheet Metal Screws ST4 2 16 Figure 2 19 Installing Front Cover Base End Cap Cover...

Page 32: ...tall rear step with 2 M6x25 cross head machine screws 23 Verify stability of equipment adjust leveling feet as required using a 19MM open end wrench Figure 2 21 Leveling Feet 24 Plug the elliptical po...

Page 33: ...out of pause mode STOP Press STOP once to pause the elliptical or twice to turn it off Statistical information is cleared when the elliptical is turned off MANUAL The Manual Mode has no limits or par...

Page 34: ...een units of measurement Pressing for longer than 2 seconds causes the effort to decrease at a faster rate Release the key when the display indicates desired effort ARROW KEYS The arrows are used to s...

Page 35: ...the arrow keys To customize the information displayed on the Personalized Stats screen press the button under CUSTOMIZE DISPLAY to edit Use the arrows to toggle through the options and press ENTER to...

Page 36: ...rent MET level based on user weight effort level speed One MET is defined as the energy consumed at rest by the average adult LAP PROGRESS A 1 4 mile 400 meter in metric lap counter LAP COUNTER Number...

Page 37: ...liptical off press 3 9 and START at the same time to view Hidden Menus Use the or keys to move up or down the list Choose Toggle Client Mode and press START button to select setting 3 3 1 Using the El...

Page 38: ...seconds to advance to the first of the motivational screens 8 The elliptical is now ready to use You can vary the speed reading or effort if desired by using the SPEED and EFFORT keys or EXPRESS 1 an...

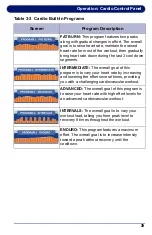
Page 39: ...overall goal of this program is to vary your heart rate by increasing and lowering the effort several times providing you with a challenging cardiovascular workout ADVANCED The overall goal of this pr...

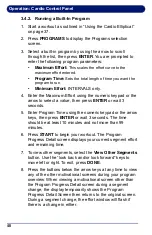
Page 40: ...rogram Time using the numeric keypad or the arrow keys then press ENTER or wait 3 seconds The time should be at least 10 minutes and not more than 99 minutes 6 Press START to begin your workout The Pr...

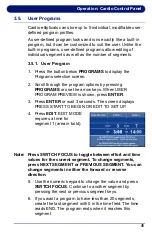
Page 41: ...arrow keys When USER PROGRAM PREVIEW is shown press ENTER 3 Press ENTER or wait 3 seconds The screen displays PRESS START TO BEGIN OR EDIT TO SET UP 4 Press EDIT EDIT MODE requires a time for segment...

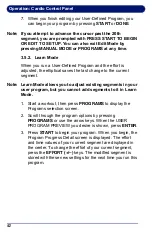
Page 42: ...te Learn Mode allows you to adjust existing segments in your user program but you cannot add segments to it in Learn Mode 1 Start a workout then press PROGRAMS to display the Programs selection screen...

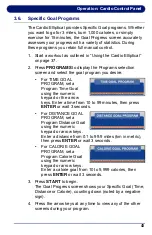
Page 43: ...L PROGRAM set a Program Time Goal using the numeric keypad or the arrow keys Enter a time from 10 to 99 minutes then press ENTER or wait 3 seconds For DISTANCE GOAL PROGRAM set a Program Distance Goal...

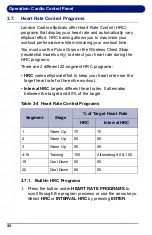
Page 44: ...are 2 different 20 segment HRC programs HRC varies elliptical effort to keep your heart rate near the target heart rate for the entire workout Interval HRC targets different heart rates It alternates...

Page 45: ...3 7 2 User Defined Heart Rate Programs The User Defined Heart Rate Monitoring HRC programs are designed to allow you to set the target heart rate for up to 20 program segments To customize a User Defi...

Page 46: ...FOCUS to change the target heart rate 6 If you want a program to have fewer than 20 segments create the last segment with 0 in the time field and press DONE The time reads END The program ends when it...

Page 47: ...o select MPH Km hr or Revolutions per Minute START Press START to power up elliptical All displays light and the starting effort level is set to Level 1 The START button will also take the elliptical...

Page 48: ...readout Pressing for longer than 2 seconds causes the effort to increase at a faster rate Release the key when the display shows desired effort or speed readout MINUS KEY Press and hold to the to dec...

Page 49: ...dit Use the arrows to toggle through the options and press ENTER to confirm your selections To modify the HIIT sprint and recovery effort values on the HIIT Screen press and hold the button below the...

Page 50: ...Current MET level based on user weight effort level speed One MET is defined as the energy consumed at rest by the average adult LAP PROGRESS A 1 4 mile 400 meter in metric lap counter LAP COUNTER Nu...

Page 51: ...reset to default values 1 Make sure you have read and understand this owner s manual before beginning 2 Plug the elliptical power cord into its outlet 3 Press START The power up screen is displayed 4...

Page 52: ...to 99 minutes Intervals Program requires a minimum speed and effort and the HIIT programs have a fixed time The elliptical will not go above the maximum number unless manually overridden Each program...

Page 53: ...cline HILLS This program features a maximum effort with four series of hills The goal is to increase your cardiovascular while using effort CHALLENGER This program is designed to increase your cardiov...

Page 54: ...conds 5 Enter Program Time using the numeric keypad or the arrow keys then press ENTER or wait 3 seconds The time should be at least 10 minutes and not more than 99 minutes 6 Press START to begin your...

Page 55: ...press ENTER 3 Press ENTER or wait 3 seconds The screen displays PRESS START TO BEGIN OR EDIT TO SET UP 4 Press EDIT EDIT MODE requires a time for segment 1 area in bold Note Press SWITCH FOCUS to tog...

Page 56: ...cannot add segments to it in Learn Mode 1 Start a workout then press PROGRAMS to display the Programs selection screen 2 Scroll through the program options by pressing PROGRAMS or use the arrow keys...

Page 57: ...m that you want to run For TIME GOAL PROGRAM set a Program Time Goal using the numeric keypad or the arrow keys Enter a time from 10 to 99 minutes then press ENTER or wait 3 seconds For DISTANCE GOAL...

Page 58: ...ess Chest Strap residential models only to detect your heart rate during the HRC programs There are 2 different 20 segment HRC programs HRC varies elliptical effort to keep your heart rate near the ta...

Page 59: ...ffort Press ENTER or wait 3 seconds 3 Use the numeric keypad or arrow keys to enter your target pulse The elliptical will vary the effort to help you reach this heart rate Press ENTER or wait 3 second...

Page 60: ...am to edit press the button under HEART RATE PROGRAMS To scroll through the programs either continue pressing HEART RATE PROGRAMS or use the arrow keys Select a User Defined HEART RATE Program to edit...

Page 61: ...inue to program subsequent segments by using the Previous and Next Segment buttons to move from segment to segment 8 When you finish editing your User Defined HRC Program press DONE to save the progra...

Page 62: ...Operation Landice Achieve Control Panel 62...

Page 63: ...For a more accurate VO2 Max calculation take the average of the Balke and Firefighter Fitness Test scores 5 2 Army 2 Mile Fitness Test This is a hands free complete as fast as you can fitness assessm...

Page 64: ...hen the test is complete a US Army assessment rating between 0 100 is displayed based on your time age and gender 5 3 Balke Fitness Test Note You must hold onto the pulse grips or wear the wireless ch...

Page 65: ...Note The calculated target heart rate displayed before you start the test is derived from statistical heart rate capacity averages See Heart Rate Monitoring on page 15 If you are uncomfortable with th...

Page 66: ...s and the elliptical calculates a fitness level based on your performance Your age determines the Table 5 2 Men VO2 Max Age Rating 20 20 29 30 39 40 49 50 59 60 69 69 65 62 58 54 52 50 48 Superior 57...

Page 67: ...ender by using the arrow keys to toggle between MALE and FEMALE Press ENTER or wait 3 seconds Note The calculated target heart rate is displayed before you start the test This heart rate is derived fr...

Page 68: ...Fitness Testing 68 Table 5 4 Firefighter Fitness Test Score VO2 Max Rating 59 Superior 50 58 Excellent 40 49 Good 32 39 Average 32 Low...

Page 69: ...fiber cloth with the cleaner and be sure to wring out any excess liquid prior to cleaning the screen 3 Wipe the surface of the monitor gently in small circles and then allow it to dry Wireless Chest S...

Page 70: ...er no circumstances should the motor cover be removed except by a Landice factory authorized technician AVERTISSEMENT Des tensions l tales et des pi ces mobiles susceptibles de causer des blessures gr...

Page 71: ...reen After reading it straddle the elliptical by stepping on the traction strips on the sides of the running surface and press ENTER The elliptical will systematically test all of the individual compo...

Page 72: ...agnostics Provide technicians the ability to test buttons and calibrate Press and hold STOP to exit diagnostic mode Reprogram Firmware Manufacturer s use ONLY Self Diagnostics Runs an automatic test o...

Page 73: ......

Page 74: ...111 Canfield Avenue Suite A 1 Randolph NJ 07869 Tel 973 927 9010 Fax 973 927 0630 www landice com...

Reviews: