background image


93


DIAGNOSTIC GUIDE 


To Enter Diagnostics  
L7 and L8- 

Press and hold 

Display Key

 then press 

Start Key. 

L7 and L8 Executive model only- 

Press and hold 

Menu Key, 

then press 

Start Key. 


Error Codes shown on Display 


LS (can look like L5)- 

Loss of signal. See Flowchart for LS pages 63,64,69,70 


OS (can look like O5)- 


An 

OS

 or 

05

 error indicates a treadmill 

O

ver 

S

peed condition. This occurs when the actual 

treadbelt speed is faster than the desired selected speed. There is a potential for this to occur 
under the following circumstances: 
 
1.  User weight is over 200 lbs., treadmill elevation is set between 10% and 15% grade, and 

selected speed is set between .5mph and 3.0mph. 

2.  If user pushes against treadbelt causing it to go faster than speed set. 
3.  Defective MCB or mis-aligned speed sensor. 
 
Gravitational force will enable the user’s weight to move the treadbelt faster. The speed sensor will 
pick up this increase in flywheel speed and send this up to the display board electronics. The 
microprocessor will then compare the actual speed to the displayed speed, determine a runaway 
speed condition and shut the treadmill down. An OS or 05 will be displayed in the two-digit 
selectable display window. This is a safety feature built into all treadmills that utilize our closed 
loop speed circuitry (ALL current production treadmills).  
 
The only way to remedy an over speed condition due to gravity is to have the user decrease the 
treadmill elevation under 10% grade or increase the speed. 
 
If user is holding onto handrails and pushing the treadbelt (using it like a manual treadmill rather 
than a motorized one) it will cause an O5 error. Solution: Don’t push on the treadbelt.  
 
It’s possible a blown Motor Control Board is the problem. This occurs more frequently with PWM 
drives than SCR drives. However, this problem is becoming rare due to the PWM circuitry which 
senses this condition and shuts itself down before the Drive Motor receives any DC voltage at all. 
This means you’ll get an LS or L5 error if your PWM is blown, not an OS or 05 error. This is a 
safety feature on all Landice Home treadmills with PWM Motor Control Boards. The SCR Motor 
Control Boards also have internal protection to prevent an over speed condition from occurring due 
to an internal component failure.  
 

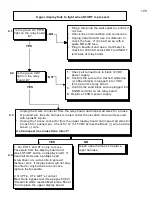
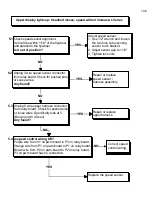
OS 

can also be caused by a maladjusted Speed Pot. Go into 

OLS 

and check speed. Adjust pots 

as necessary to bring up correct speed.  
 

Summary of Contents for Cardio Trainer L8

Page 1: ...11 Canfield Avenue Randolph New Jersey 07869 1 800 LANDICE FAX 973 927 0630 L Series Home and Commercial Treadmill Diagnostic and Service Manual 2003 Version C D 2 For Technical Service Call 1 800 LANDICE ...

Page 2: ...ge 30 L Series Motor Pan and Elevation Assembly Page 31 34 Parts Listing Page 35 Commercial Motor Pan Picture Page 36 37 Commercial Motor Pan Wire Schematics Page 38 39 LED lights on SCR Page 40 SCR Upper Wire Harness Wiring Diagram Page 41 Home Motor Pan Picture Page 42 Home Motor Pan Wire Schematic Page 43 PWM Voltage Readings and Paths Page 44 LED Lights on PWM Page 45 Relay Board Voltage Readi...

Page 3: ...arts Page 104 108 L7 L8 Home Diagnostic Flow Charts Page 109 116 L7 L8 Road Runner Diagnostic Addendum Page 117 118 Tracking and Tensioning Treadbelt and Drive Belt Page 119 121 Maintenance for Home and Commercial Treadmills Page 122 128 L Series Dealer Parts List Page 129 130 Sport Trainer Pro Trainer Upper Display Board Combinations Page 131 Appendix A Page 132 L Series CRT Display Control Panel...

Page 4: ... installation tools needed diagnostics removal and replacement of parts estimated time of repairs warranty forms Service Authorization forms wiring schematics and recommended maintenance We are including an Index to further aid you in quickly finding what you need If you find a problem not covered in this manual please call 1 800 LANDICE to talk to a Landice Service Technician ...

Page 5: ...5 ...

Page 6: ...iod of 1 year Landice will reimburse the selling dealer according to the terms rates and conditions in effect at the time of service A service authorization number must be obtained prior to performing service in order to qualify for service reimbursement This service warranty does not cover customer instruction installation setup or adjustments Note that treadbelt tensioning and tracking is the re...

Page 7: ...n authorized dealer prior to performing service in order to qualify for service reimbursement This service warranty does not cover customer instruction installation setup or adjustments Note that treadbelt tensioning and tracking is the responsibility of the user and is not covered by this warranty Instructions for treadbelt tensioning and tracking are located in the owner s manual This warranty i...

Page 8: ...s manual on a monthly basis A one year supply of Landice SlipCoat is included with the treadmill Bearing damage due to over tightened drive belts or treadbelts are not covered by this warranty Wear items specifically belts decks and motor brushes are pro rated over the five year period Landice will send you a complimentary Landice T Shirt upon receipt of your registration card Registration card mu...

Page 9: ...AR ITEM WARRANTY Light institutional treadmills LTD s are covered under parts warranty for 5 years or 5000 hours see standard warranty policy LTD treadmills are designed for commercial applications in which use is 5 hours a day or less CLUB Treadmills are covered under parts warranty for 5 years with unlimited hours CLUB treadmills are designed for heavy duty commercial applications and any pay fo...

Page 10: ...67 75 YEAR 2 DEALER 50 OFF 102 00 70 00 129 50 81 00 YEAR 2 RETAIL 50 OFF 170 00 117 00 216 00 135 50 YEAR 3 DEALER 33 OFF 136 68 93 80 173 53 108 54 YEAR 3 RETAIL 33 OFF 227 80 156 78 289 44 181 57 L Series LTD Treadmills sold after August 1 2002 carry a 5 year parts warranty Wear Items are pro rated as follows 0 6 MONTHS NO CHARGE NO CHARGE NO CHARGE NO CHARGE NO CHARGE 6 12 MONTHS DEALER 80 OFF...

Page 11: ... carry a 5 year parts warranty Wear Items are pro rated as follows Up to 6 months No Charge 6 12 months 80 off Year 2 60 off Year 3 50 off Year 4 40 off Year 5 30 off L Series LTD Treadmills sold prior to August 1 2002 and all CLUB Treadmills carry a 3 year parts warranty Wear Items are pro rated as follows Up to 6 months No Charge 6 12 months 75 off Year 2 50 off Year 3 33 off ...

Page 12: ...ments that may have been upset during shipping The dealer must call for a service authorization number prior to performing any service to verify the treadmill is under labor warranty It is advisable to call Landice from the treadmill location to successfully diagnose the problem This will insure that the correct part will be shipped out the first time Labor claim forms must be submitted within thr...

Page 13: ...ve parts are not returned within 30 days payment of invoice is expected in full WARRANTY PART ORDERING When ordering parts under warranty please have the following information available Warranty orders can not be processed without this information 1 Customer s name address and phone number 2 Treadmill serial number 3 Detailed description of failure PURCHASE PART ORDERING Serial numbers are recomme...

Page 14: ...5 hours use per day Before September 1 1996 1 Year 1 Year 1 Year After September 1 1996 3 Years 3 Years 1 Year August 1 2002 5 Years 5 Years 1 Year CLUB Treadmills pay for membership facilities Before November 15 1996 1 Year 1 Year 1 Year After November 15 1996 3 Years 3 Years 1 Year January 1 2003 5 years 5 Years 1 Year International Treadmills Before November 1 2001 13 Months 13 Months 0 After N...

Page 15: ...ATION Model Type Date of Service Frame Serial Date of Purchase DCP Serial if applicable Out of box problem Yes No CUSTOMER COMPLAINT SERVICES PREFORMED PARTS REPLACED TRAVEL LABOR Travel Time Labor Time TOTAL TIME _________ VALIDATION SIGNATURES Service Rep Signature Customer Signature Date PLEASE SUBMIT SERVICE CLAIMS VIA U S MAIL OR BY FAX DO NOT INCLUDE SERVICE CLAIMS WITH RETURNED WARRANTY PAR...

Page 16: ...elt 20 min Remove and Replace Elevation Motor 40 min Includes Pot Calibration Remove and Replace Upper Board 15 min Remove and Replace Membrane 15 min Remove and Replace PWM 15 min Remove and Replace SCR 15 min Remove and Replace Treadbelt 40 min Remove and Replace Deck 40 min Replace Belt and Deck 40 min Remove and Replace Front Roller 20 min Remove and Replace Rear Roller 30 min ...

Page 17: ...6 3 1 2 and 3 Philips head screwdriver or electric screwdriver 4 1 2 and 3 flat head screwdriver or electric screwdriver 5 Socket head cap screw wrench set multi Allen Wrench 6 Rubber mallet 7 Diagonal cutter dykes 8 Wire stripper 9 Wire crimper 10 Digital voltmeter We recommend Radioshack Pocket Digital Voltmeter Analog voltmeters are not recommended 11 Utility knife 12 Pulsemeter tester 13 AC Am...

Page 18: ...verses polarity periodically from plus to minus AC voltage is found in both residential and commercial dwellings Landice treadmills come in both 110VAC and 220VAC versions VDC Direct Current flows inone direction You must observe circuit polarity when measuring DC voltage Landice utilizes DC technology in our drive motors and circuit boards Multimeter use A multimeter is a device used to measure a...

Page 19: ...treadbelt Allow a minimum clearance of 18 inches on each side of the treadmill Allow a minimum clearance of 4 feet at the rear of the treadmill 4 Never stand on the treadbelt when starting the treadmill A sudden start could cause you to lose your balance Always stand with one foot on each side rail until the belt starts moving 5 Always wear the emergency stop safety strap securely around your wris...

Page 20: ...e being used or where oxygen is being administered 10 Connect this appliance to a properly grounded outlet only Do not use a GFI outlet 11 To disconnect press the OFF button remove the SAFETY LANYARD and unplug the unit from the wall outlet GROUNDING INSTRUCTIONS This product must be grounded If it should malfunction or break down grounding provides a path of least resistance for electric current ...

Page 21: ... a risk of electric shock Check with a qualified electrician or serviceman if you are in doubt as to whether the product is properly grounded Do not modify the plug provided with the product If it will not fit in the outlet have a proper outlet installed by a qualified electrician ...

Page 22: ... REQUIREMENTS 110 VAC 60 Hz 15 AMP DEDICATED CIRCUIT GROUND PLUG NEMA 5 15P PLUG RECEPTACLE NEMA 5 15R RECEPTACLE ABOVE IS DIAGRAM OF PLUG CONFIGURATION FOR 220V 110V MACHINES USING 3 PHASE VOLTAGE Each treadmill must have its own circuit breaker and be run on the same phase same power leg If 220v power is required then all treadmills must run on the same two phases power legs and on their own cir...

Page 23: ...e the strapping and remove the treadmill from the pallet Carefully remove the upright side cover from the upright assembly STEP 3 Mount the upright Slide the upright down onto the 8 side frame bolts Be sure the washers are located on the outside of the upright and against the head of the bolt Tighten bolts with a 3 8 extended socket For L8 models insert and tighten the top frame bolts These bolts ...

Page 24: ...he belt needs to be adjusted use a 7 16 socket and turn the bolt underneath the motor pan attached to the hook screw STEP 7 Route the wire harness HOME Route the wire harness UNDERNEATH the elevation motor and secure with tie wrap provided Plug connector into circuit board until it snaps into place COMMERCIAL Route the wire harness AROUND the elevation motor and secure with tie wrap provided Plug ...

Page 25: ... Verify proper alignment per step 3 If working with a second person one should hold the rack and maintain proper alignment per step 3 while the other person attaches reading rack with screws provided 8 Place plastic end caps on treadmill 9 Test 1 Begin by completely assembling the treadmill per the instructions in owners manual 2 Place upright on bed per main assembly instructions 3 Check that the...

Page 26: ...0 pounds L8 approx 380 pounds L9 approx 380 pounds Recommended clearance around unit for safe and functional operation in a home ALLOW A MINIMUM CLEARANCE OF 18 INCHES ON EACH SIDE OF THE TREADMILL ALLOW A MINIMUM CLEARANCE OF 4 FEET AT THE REAR OF THE TREADMILL ...

Page 27: ...27 Section 3 Parts Identification L8 L9 BED EXPLODED VIEW 18 ...

Page 28: ...28 L7 BED EXPLODED VIEW L Series Upright ...

Page 29: ...29 L SERIES UPRIGHT EXPLODED VIEW 112 ...

Page 30: ...30 L SERIES MOTOR PAN EXPLODED VIEW 111 ...

Page 31: ... UPROLLER 70289 14 L7 L8 L9 VFX DECK LOAD WASHER 70217 15 L8 L9 VFX DECK SPACER PVC 70298 16 L7 L8 L9 VFX DECK IMPACT ABSORBER 70221 17 L8 L9 VFX DECK POST 70297 18 L7 L8 L9 VFX DECK SLAT 70240 19 L8 L9 DRIVE ROLLER 70288 20 L7 ELEVATION LEG ASSEMBLY 70241 ELEVATION LEG ASSEMBLY WIDE 70367 L8 L9 ELEVATION LEG ASSEMBLY 70299 ELEVATION LEG ASSEMBLY WIDE 70374 21 L7 L8 L9 MOTOR PAN 70242 22 L7 L8 L9 ...

Page 32: ...48 40 L7 L8 L9 SAFETY LANYARD 71011 41 L7 L8 L9 LEFT UPRIGHT 70229 RIGHT UPRIGHT 70228 42 L7 L8 L9 UPRIGHT COVER SCREW 6 32_1 2_PFM 43 L7 DECK SCREW 20_1 75_TT 44 L7 L8 U RAIL SPACER 70347 46 L7 L8 LOCKWASHER 5 16_LW 47 L7 L8 RAIL BOLTS 3 5 16 18x3_HHMS 48 L7 L8 L9 UPRIGHT MOUNTING BOLTS 20x3 4_TT 49 L7 L8 L9 END CAP SCREW 8 32_1 2_MSZ 50 L7 L8 L9 UPRIGHT COVER L 70231 UPRIGHT COVER R 70230 51 L7 ...

Page 33: ...8 L9 FELT WASHER 70220 81 L7 L8 L9 BELT GUIDE SCREW 8x1_A_PPSTS_ZN 82 L7 BELT GUIDE 70208 83 L7 DRIVE ROLLER SCREW 20x3 4_HWFL 84 L7 VFX POST SCREW 20_9 16_MSZN 85 L8 L9 BELT GUIDE 70351 86 L7 L8 L9 WHEEL ELEVATION LEGS 4851 WHEEL WIDE ELEVATION LEGS 70358 87 L7 L8 L9 HITCH PIN FOR AXLE 221 HITCH PIN FOR AXLE WIDE 213 88 L7 L8 L9 WHEEL AXLE 70065 WHEEL AXLE WIDE 70359 89 L7 L8 L9 WASHER WIDE 70402...

Page 34: ...ISC 106 L7 L8 L9 MOTOR BRUSH 110V 70222 MOTOR BRUSH 220V 70223 107 L7 L8 L9 MOTOR BRUSH HOLDER MISC 108 L7 L8 L9 SPEED SENSOR BRACKET 70067 109 L7 L8 L9 SPEED SENSOR 71007 110 L7 L8 L9 FLYWHEEL FLAT WASHER 1 4x1_FLAT_WASHER 111 L7 L8 L9 ELEVATION CLEVIS 70049 112 L7 L8 RAM CONNECTOR 1 1 4 DIA SIDE RAIL 71038 ...

Page 35: ...35 COMMERCIAL MOTOR PAN SCR MOTOR CONTROL BOARD ...

Page 36: ...36 L SERIES 110V COMMERCIAL LOWER WIRE SCHEMATIC ...

Page 37: ...37 L SERIES 220V COMMERCIAL LOWER WIRE SCHEMATIC ...

Page 38: ... lights tell us if the elevation DN and UP relays are functioning properly When the LED lights it tells us that the relay has energized and is sending high voltage 110vac or 220vac to the elevation motor AC PWR green The AC PWR Alternating Current Power illuminates when AC line voltage is delivered to the treadmill It then passes through the in line fuse 110 s 220 and lights the AC PWR LED 12V gre...

Page 39: ... of calibration SERIAL red The SERIAL LED should NEVER come on It illuminates only when there is an interruption of the flow of data between the upper and lower boards This could be a loose or pushed pin on the main wire harness 5V green The 5V light comes on when there is power going to the Upper Display If the light is not on check wire harness for connections If it is not the wire harness then ...

Page 40: ...40 L SERIES SCR UPPER WIRE HARNESS WIRING DIAGRAM ...

Page 41: ... SERIES PWM MOTOR PAN PWM MOTOR CONTROL BOARD PWM LOWER BOARD RELAY BOARD 1 2V DC TRANSFORMER ELEVATION MOTOR SPARE FUSE DRIVE MOTOR FLYWHEEL SPEED SENSOR LINE CORD ELEVAT ION NUT ELEV AT ION POTENIOMET ER ...

Page 42: ...42 L SERIES HOME MOTOR PAN WIRING SCHEMATIC ...

Page 43: ...tage to drive t he motor The PWM is the doorway which AC changes to DC when it passes t hrough We vary the DC voltage output to vary t he drive moto r speed The L1 and L2 termi nals is where t he AC voltage from wall outlet comes in The A and A terminals is where DC voltage goes out to the drive motor The V P1 and P2 termi nals is where we control t he output of the PWM board Speed Calibr ation Po...

Page 44: ...k system or it can also light if the IR pot is out of adjustment The IR pot controls how the PWM board reacts to varying loads users weights If the IR pot is out of adjustment you will notice the treadbelt will surge and the red LED 1 will flash in unison with the belt surge LED 2 green This indicates proper line voltage is being supplied to the PWM board This line voltage is delivered to the PWM ...

Page 45: ...treadmills AC VOLTAGE OUTPU T TO DC TRANSFORMER NEUT HOT Line voltage 110VAC AC VOLTAGE OUTPUT TO MOTOR CONTROL BOARD L2 L1 Line voltage 110VAC 12 VDC INPUT FROM DC TRANSFORMER VDC 12vdc SGND Ground LOW DC VOLTAGE OUTPUT TO MO TOR CONTROL BOARD CON TROLS SPEED OF TREADMILL P3 TO P1 CONTINUOUS 6 5 7 0VDC P1 TO P2 VARIABLE FROM 0 7VDC ...

Page 46: ...ning properly When the LED lights it tells us that the relay has energized and is sending high voltage 110vac or 220vac to the elevation motor UPSW green This LED will illuminate when the low voltage dc is delivered from the upper display board to the elevation UP relay This low voltage dc is what energizes the coil of the relay DNSW green This LED will illuminate when the low voltage dc is delive...

Page 47: ...47 L SERIES HOME MOTOR PAN WIRING SCHEMATIC PWM MOTOR CONTROL BOARD W RELAY ASSEMBLY ...

Page 48: ...48 PWM MOTOR CONTROL BOARD W RELAY ASSEMBLY ...

Page 49: ...49 L SERIES PWM UPPER WIRE HARNESS WIRING DIAGRAM ...

Page 50: ...50 EXECUTIVE TRAINER LCD WIRING SCHEMATIC ...

Page 51: ...Home and Commercial LTD s and CLUB s Key Features Closed Loop Treadmill w speed sensor Safety Lanyard 0 5 12MPH Push Button Speed and Elevation Control 11MPH on LTD s and CLUB s L Series Sport Trainer Faceplate Models That Use This Faceplate L7 ST L8 ST L7 LTD ST L8 LTD ST L7 CLUB ST L8 CLUB ST Production Time Frame 1999 Present Electronics PWM motor pan on all Home Units 110V SCR commercial motor...

Page 52: ...fety Lanyard 0 5 12MPH Push Button Speed and Elevation Control 11MPH on LTD s and CLUB s 4 Built in Programs 2 User Defined Programs L Series Pro Trainer Membrane Models That Use This Membrane L7 PT L8 PT L7 LTD PT L8 LTD PT L7 CLUB PT L8 CLUB PT Production Time Frame 1999 Present Electronics PWM motor pan on all Home Units 110V SCR commercial motor pan for LTD s and 110V CLUB s 220V SCR commercia...

Page 53: ...Control 11MPH on LTD s and CLUB s 5 Built in Programs 5 User Defined Programs Standard Wireless Heart Rate Control L Series Executive Trainer Membrane Models That Use This Membrane L7 ET L8 ET L7 LTD ET L8 LTD ET L7 CLUB ET L8 CLUB ET L9 CLUB ET 110V L9 CLUB ET 220V Production Time Frame 1999 Present Electronics PWM motor pan on all Home Units 110V SCR commercial motor pan for LTD s and 110V CLUB ...

Page 54: ...Units See Wiring Diagrams Settings Used in Home Key Features Closed Loop Treadmill w speed sensor Safety Lanyard 0 5 12MPH Shifter Knob Speed and Elevation Control 3 Built in Programs 1 User Defined Program Standard Wireless Heart Rate Control Dot matrix LED Graphic Display 6 Disc CD changer w high tech Kenwood Full Range Sound Speakers Specially Designed Ignition Style Start Up Pause and Stop Fea...

Page 55: ...while your hands remain on the grips NOTE If you are wearing the wireless chest strap the AccuTrack system is automatically disabled NOTE You do not have to be viewing the PULSE display for the AccuTrack system to function The HRC programs will continue to make speed and elevation adjustments to keep you at your target heart rate while your hands remain on the grips If you remove your hands the HR...

Page 56: ...RT Reboots 3 MANUAL START Accesses Diagnostic Mode on CT s built prior to October 2001 DISPLAY UP START Accesses Diagnostic Mode on CT s built after October 2001 4 UP DOWN START Toggles 12 and 15 elevation selection 5 FAST START Open Loop Speed Mode PRO TRAINER 1 PAUSE START Displays software version 2 DOWN PAUSE START Reboots 3 DISPLAY UP START Accesses Diagnostic Mode 4 FAST START Open Loop Spee...

Page 57: ...ck with a phenolic coating Treadbelt rides over it Reversible DRIVE BELT This connects Drive Motor to Sheave Pulley on Drive Roller DRIVE MOTOR Provides power to Drive Belt to turn Pulley on Drive Roller to move Treadbelt This gets its power from the PWM or SCR Landice Drive motors are either 110v for 220v DRIVE ROLLER W SHEAVE This is the Roller at the front of the Treadmill The Sheave pulley is ...

Page 58: ... out as DC on terminals A and A Armature and Armature Since the PWM motor control switches at such a high frequency the DC voltage produced is clean and relatively free of electrical noise or static In other words it needs no external Capacitor or Choke Inductor to run the drive motor It receives its commands from the Upper Display Board via the Relay Board Generally these need the voltage coming ...

Page 59: ...tes the loop for Treadbelt movement and allows tracking and tension adjustment of Treadbelt TREADBELT This is the surface the user walks on It rides over the deck and rollers UPPER DISPLAY BOARD This controls information from the Membrane panel and Face Plate It then transmits it to the relay board on Home models and the SCR on Club or LTD models UPRIGHTS One on either side they house the wire har...

Page 60: ...ble the input voltage double the size of the drive motor For every mile per hour mph you spin the drive motor you will generate approximately 20 VDC output So at 1 0mph you will measure 20 VDC and at 9 0mph you will measure 180 VDC If you measure very low DC voltage or zero DC voltage first check the drive motor brushes for condition Motor brushes are the leading cause for drive motor failure If t...

Page 61: ...0 180VDC output If the PWM board is getting the proper AC voltage in but does not supply any DC voltage out it must be replaced This holds true as long as proper speed reference voltage is being supplied from relay board to PWM across the V P1 P2 terminals SEE PAGE 92 SCR MOTOR CONTROL The SCR board runs on AC voltage The AC voltage is delivered to the SCR board across two input terminals marked H...

Page 62: ... and does not light it must be replaced FACEPLATE The faceplate has no mechanical or electrical components that can fail However if you press a key and it fails to respond check for proper display board spacing The faceplate is designed as a passive panel When the user presses a key pushes through the faceplate they activate a switch mounted on the upper display board If the display board to face ...

Page 63: ...bypassing its functions The membrane panel has small micro switches laminated inside that transmit the user s commands into treadmill functions These functions can be simulated by means of a membrane bypass 1 Disconnect the silver foil ribbon cable from the membrane panel 2 Remove the membrane panel completely from the upper display board 3 Use a DRY towel or a terry cloth to wrap over the open ar...

Page 64: ...AINER ENGLISH METRIC ENGLISH METRIC START STOP PAUSE DISP DISP FAST SLOW UP DOWN MAN PROG CARDIO SPARE COM SHIELD GROUND ON OFF PAUSE DISP DISP FAST SLOW UP DOWN P1 P2 P3 P4 P5 GROUND STATIC JUMP EXECUTIVE TRAINER JUMP JUMP ...

Page 65: ...glazed and exhibits black streaks it s time to replace 3 If amp draw is high 8 amps or more on home it is advisable to check belt and deck for wear Tip If Red Current Lamp is lit then Amp Draw is high TREADBELTS AND DECK SURFACE SHOULD ALWAYS BE REPLACED TOGETHER IF EITHER IS WORN OUT Symptom Treadmill slows down when user steps onto treadbelt Possible Cause Worn out treadbelt or deck See above Po...

Page 66: ...ase call 1 800 LANDICE Symptom Treadmill speed is erratic and or surges Possible Cause Defective drive motor See Component Testing drive motor Possible Cause Loose drive belt or treadbelt Check for proper drive belt and treadbelt tension If one of these belts are not tight enough they will slip and create a treadbelt skip or surge This will usually be more apparent with heavier users See belt tens...

Page 67: ...screwdriver to rotate IR pot Make this adjustment while the treadmill is running surging Rotate the pot in small increments until the treadmill surge subsides and runs smoothly NOTE the IR pot can be rotated Clockwise or Counter Clockwise to achieve smooth operation With load belt surging LED1 may be flashing use a small screwdriver to rotate IR pot Make this adjustment while the user is walking o...

Page 68: ...bilize 3 Adjust the MAX potentiometer on the PWM motor control board accordingly See Picture on page 43 CW increase speed CCW decrease speed The actual speed will be displayed in the center display window 4 Decrease set speed to 2 0mph Let actual speed stabilize Adjust the MIN pot accordingly 1 9 to 2 1mph is acceptable 5 Before turning treadmill off check the MAX speed one more time for accuracy ...

Page 69: ...re from L1 This wire connects MCB to Relay Board 2 Remove White wire from L2 This wire connects MCB to Relay Board 3 Remove White wire from A This wire connects MCB to Drive Motor 4 Remove Black wire from A This wire connects MCB to Drive Motor 5 Remove Orange wire from P1 This wire connects MCB to Relay Board 6 Remove Brown wire from P2 This wire connects MCB to Relay Board 7 Remove Purple wire f...

Page 70: ...rmer Fast On connectors to a treadmill equipped with Pin Type connectors follow these instructions a Snip the DC output wires six inches from the harness plug with a pair of diagonal cutters b Snip the FAST ON connectors from the new DC transformer c Use solder less butt type connectors to splice the wires together d Use the information listed above to make sure the proper polarity is observed REL...

Page 71: ... disconnected from the display board Press Down Here 6 Reverse to install MEMBRANE PANEL 1 Remove screws from upright on either side of Display panel 2 Remove Caps from Display panel 3 Display is attached to upright with Velcro Pull from top of Display panel to remove 4 Disconnect main wire harness clip 5 Lay display on a clean towel on a workbench and carefully remove Display Board from Membrane ...

Page 72: ... 10 When re installing make sure to properly position foam block under motor 11 Reverse to install DRIVE MOTOR BRUSHES 1 Unplug Treadmill 2 Remove Motor Brush caps 2 with large flat head screwdriver 3 Remove Motor Brushes and inspect They should be replaced if 1 4 inch or less Inspect motor Commutator for wear Black scoring present on copper segments Try to dress out clean up Commutator with a Com...

Page 73: ...s process sets the elevation lower limit switch and MUST be done to obtain maximum elevation range E Hold the dia elevation screw to prevent it from turning and turn the elevation nut to line it up with the holes on the elevation assembly or just short of them NOTE Leave approximately 2 threads open at end of elevation nut to insure proper alignment Slide the two 2 dia pins through the elevation a...

Page 74: ...s after 11 7 00 Prior to 11 7 00 the potentiometer should be set to 0 4 to 0 6 NOTE Elevation window shows actual elevation Display shows potentiometer setting 3 If the setting is incorrect follow the steps below STEP 1 Turn the post of the potentiometer all the way CLOCKWISE STEP 2 Slowly turn the potentiometer COUNTER CLOCKWISE until the setting is correct NOTE If the setting seems stuck at 25 5...

Page 75: ... from Drive Roller by loosening tension screw on Drive Motor Bracket 6 Remove Drive Roller by loosening mounting bolts on left and right side 7 Lift Deck off of VFX mounting posts 8 Reverse to install Note Be sure to lubricate the VFX post with Lubriplate when re installing Deck L8 1 Unscrew Take Up Roller End Caps 2 Philips Head Screws 2 Loosen take up roller adjustment bolts 9 16 till treadbelt ...

Page 76: ...n Note See section on Tracking and Tensioning 6 Tilt motor toward rear of treadmill so Drive Belt is loose enough to come off Drive Roller Pulley 7 Remove Philips Head Screws 2 that hold Drive Roller in place 8 Remove Drive Roller 9 Reverse to install L8 10 Elevate treadmill to Maximum Elevation 11 Remove Motor Cover 4 Philips head screws 12 Remove Frame Rail Cap from left side 4 Philips head scre...

Page 77: ...racket in order to properly route this harness There is a notch in control panel frame for harness to pass through 3 Install the DCP control panel assembly into the control panel frame 4 Insert upper wire harness located on the right hand side upright into the display board The harness connection has a locking clip designed to keep the harness connection tight Make sure this clip is locked into pl...

Page 78: ... Step 3 Remove the left hand upright cover Step 4 Remove the membrane panel display board assembly Step 5 Mount the heart rate receiver board mounting bracket to the left hand upright leg The receiver is already secured to the bracket The bracket mounts to the upright leg utilizing the existing frame screw Existing frame screw ...

Page 79: ...ch the HRC harness to the upper display circuit board Step 8 Re secure the membrane panel display board assembly to the upper control panel frame NOTE Before assembling the rest of the treadmill check the operation of the HRC function Harness passes under end cap bracket Harness connects to upper circuit board ...

Page 80: ...nder warranty If the transmitter belt is functioning properly proceed with the following steps 1 UNPLUG THE TREADMILL 2 Remove the right hand upright cover to gain access to the heart rate components 3 Confirm the heart rate components are present and in good visual condition 4 Remove pulse cable from PCB board Check for loose wires or bent faulty pins If all looks good reconnect pulse cable to PC...

Page 81: ...re 1 5 16 from inside of upright leg Using the 5 16 drill bit punch and drill the new holes at the marked points directly below the original top mounting points of the U shaped handles C Use the white black plugs to fill the bottom holes left by the U shaped handles The new medical rails will conceal the top holes D Install the handrails to the upright legs This will allow you to mark the frame fo...

Page 82: ...ALLATION INSTRUCTIONS 1 Insert the side rail into the upper rail clamp and tighten the bolts using a 3 16 allen wrench 2 Fit the side rail to the bottom rail clamp 3 Use a soft mallet to firmly set the rails inside the clamp ...

Page 83: ...6 allen wrench to tighten the rail clamp bolts 5 Line up the upright side covers and firmly snap them into place 6 Place the plastic endcaps on the top corners of the control panel Use the two small philips head screws stapled to the owner s manual to secure the endcaps ...

Page 84: ...84 L9 HAND RAIL INSTALLATION INSTRUCTIONS 1 Remove upright side covers 2 Slide upright legs onto the three bolts on either side of the frame ...

Page 85: ...uctions PART 2 3 Insert the fourth bolt taped inside one of the upright legs on either side of the frame 4 Tighten the four bolts on each side using a 7 16 socket wrench 5 NOTE The two bottom holes on either side are unused on L9 models ...

Page 86: ...ion Instructions PART 3 6 Insert the side rail into the upper rail clamp and tighten the bolts using a 3 16 allen wrench 7 Fit the side rail to the bottom rail clamp 8 Use a soft mallet to firmly set the rails inside the clamp ...

Page 87: ...len wrench to tighten the rail clamp bolts 10 Line up the upright leg side covers and firmly snap them into place 11 Place the plastic endcaps on the top corners of the control panel Use the two small philips head screws stapled to the owner s manual to secure the endcaps ...

Page 88: ... i e the bearings located on either end of the roller The place to check for noise is on the shaft coming out of the roller since it is close to the bearings and doesn t move Many technicians will hold the blade end of screwdriver onto the shaft and their ear next to the handle end to be sure they are identifying the location of the noise The most common sound is a clicking that comes from a beari...

Page 89: ...is aligned end caps or deck Use automotive stethoscope and or process of elimination to be sure where noise is coming from 13 Check that Drive roller is parallel to Take Up roller If its not the belt will be tensioned unevenly Some adjustment is possible on front roller try side opposite motor and pulley first and should be enough to bring Drive and Take Up roller into correct alignment 14 Check t...

Page 90: ... is damaged 3 Always check that the motor itself is not damaged and making noises because of broken mounts etc Drive Motor The Drive Motor is an electric motor with a flywheel and pulley attached The only serviceable parts are the Drive Motor Brushes 1 Drive Motors can make a clicking noise if the bearings in the motor shaft are no longer round 2 Grinding noise if the bearings are shot 3 Thumping ...

Page 91: ...evation Motor 1 Check for fractured housing or broken motor mounts Replace if necessary Treadbelts 1 Check for fraying on sides of belt Likely cause is improper tracking Check if tracked correctly If minor cut frayed ends off If major replace belt 2 Lines or wear or top of belt one or two inches in from sides Caused by user standing on side rails and letting heel of shoe rub on belt Instruct user ...

Page 92: ...17 VDC plug into outlet output voltage from DC Transformer pack 3 Confirm 10 VDC for 110V and 20 VDC for 220V out of Motor Control Board per mile per hour See example Example SCR Measure between MTR and MTR PWM Measure between A and A In both of these examples we have should have a voltage reading of 30VDC for 110V and 60VDC for 220V 3mph 4 Confirm 12 17 VDC between Black and Green wires on main w...

Page 93: ...he treadmill down An OS or 05 will be displayed in the two digit selectable display window This is a safety feature built into all treadmills that utilize our closed loop speed circuitry ALL current production treadmills The only way to remedy an over speed condition due to gravity is to have the user decrease the treadmill elevation under 10 grade or increase the speed If user is holding onto han...

Page 94: ...evation Potentiometer is out of range See Flowchart for PO The following codes apply only to mills with SCR Control boards CE Communication Error resulting from upper lower board failure or harness connection problem When in Diagnostic mode and an error is detected the following codes will appear ERR 1 Upper board Ram error Replace board ERR 2 Upper board ROM error try replacing E Prom ERR 4 Upper...

Page 95: ...FETY SHUTDOWN Loss of signal NO belt movement Meaning upper display is not receiving signal from speed sensor because the drive motor is not moving Diagnostics refer to diagnostic guide LS error treadbelt does NOT move Error Code SAFETY SHUTDOWN Error detected in elevation controller Meaning Elevation potentiometer is out of calibration and or system failure Diagnostic Refer to diagnostic guide El...

Page 96: ...ters 2 0mph The treadmill will shut down and display an error in both upper displays Diagnostics Refer to diagnostic guide and proceed with checking the speed calibration Error Code SAFETY SHUTDOWN Replace Safety Key Meaning The display board does not sense the presence of the safety key Diagnostics Make sure the safety key is installed in the proper location OS will appear in the two digit speed ...

Page 97: ...usly 1 PREV 2 The third circular gray button down on the left side of the LCD screen 3 START Release the buttons after you see Booting show on the LCD screen This will reset the on board computer and all saved programs will be lost Executive Trainers with Version 2 1 Software and after after 12 2001 Follow the same procedure listed above but replace with these three buttons 1 DOWN 2 PAUSE 3 START ...

Page 98: ...m membrane STEP 2 A Top yellow LCD extension cable should be aligned with the top white LCD cable B Bottom yellow LCD extension cable should be aligned with the bottom white LCD cable STEP 3 A The ribbon cable connector should be placed on the LCD leaving the last two pins to the right open STEP 4 A Disconnect the brown LCD connector from the black LCD extension cable connector B Using a volt mete...

Page 99: ...e Randolph New Jersey 07869 800 LANDICE FAX 973 927 0630 L Series Commercial Diagnostic Flow Charts L7 L8 L9 EXECUTIVE TRAINER CARDIO TRAINER PRO TRAINER PRO SPORTS TRAINER SPORT TRAINER TECHNICAL SUPPORT CALL 1 800 LANDICE ...

Page 100: ...ill not stay mounted replace Faceplate ST s PST s ONLY 3 Conduct Membrane bypass test see pages 62 64 If treadmill starts up Replace Membrane Panel PT s CT s ET s 4 Replace SCR P N 70080 110V P N 70081 220V Upper display fails to light when START is pressed Press START button on membrane Is green 5V lamp on the SCR lit Is red SERIAL lamp on the SCR lit Replace SCR P N 70080 110V P N 70081 220V Rep...

Page 101: ...e treadmill run YES NO NO YES NO YES 5 1 5 2 5 3 5 4 5 5 NO 1 Check wiring harness connection between Upper display and SCR 2 Replace display board YES Place the treadmill in Speed Override Mode WARNING DO NOT STAND ON THE TREADBELT IN THIS MODE 1 L7 L8 ET Press MENU and START simultaneously 2 All other L7 L8 Press FAST and START simultaneously 3 Hold the fast button until the display reads 11 Byp...

Page 102: ... L5 error 1 Disconnect the speed sensor from the SCR 2 Is the yellow SPD lamp on the SCR lit Is speed sensor aligned squarely and within a credit card s thickness from the flywheel 1 Check speed sensor wires 2 Replace speed sensor Realign sensor NO YES NO 6 1 6 2 6 3 6 4 Replace speed sensor Replace SCR YES NO YES ...

Page 103: ...he yellow UP lamp on the SCR light when UP is pressed Does the yellow DOWN lamp on the motor control board light when DOWN is pressed Replace elevation motor 7 1 Replace SCR Replace SCR 7 3 7 2 7 4 7 5 YES NO YES YES NO NO NO NO YES YES Place the treadmill in Diagnostic Mode 1 Turn OFF the treadmill 2 L7 L8 Executive Trainer Press MENU and START simultaneously 3 For all other L7 L8 s Press DISPLAY...

Page 104: ...e Randolph New Jersey 07869 800 LANDICE FAX 973 927 0630 L Series Home Treadmill Diagnostic Flow Charts L7 L8 EXECUTIVE TRAINER CARDIO TRAINER PRO TRAINER PRO SPORTS TRAINER SPORT TRAINER TECHNICAL SUPPORT CALL 1 800 LANDICE ...

Page 105: ...he relay board and inspect all wires for a loose or pushed pin Be sure harness is routed under the elevation motor and secured with a plastic zip tie 2 Unplug the 12 wire connector from the upper display board and inspect all wires for a loose fit or pushed pin Check for 12 to 15VDC across the Black wire and the Green wire Are harness wire connections intact Is the green VDC light on the relay boa...

Page 106: ... OK Purple wire from V on pwm board to P3 on relay board Orange wire from P1 on pwm board to P1 on relay board Brown wire from P2 on pwm board to P2 on relay board P3 on pwm board has no connection Adjust speed sensor 1 Use 1 2 wrench and loosen the two lock nuts securing sensor to it s bracket 2 Adjust sensor gap to 1 16 3 Tighten lock nuts Repair or replace speed sensor harness assembly Repair o...

Page 107: ... Replace motor brushes 2 required Verify at least 90VDC from Black A wire and White A wire from PWM to Drive Motor Replace PWM Are the motor brushes OK UNPLUG treadmill and unscrew brush caps Verify brushes are at least 3 8 long and slide freely Verify brushes are curved and have no burns or cracks Check springs verify copper wire is not broken or burned Spin the motor shaft by hand Is the motor s...

Page 108: ...e connector on the relay board and the wire connector on the upper display board for loose connections or pushed pins 2 If all harness connections are intact then replace Upper Display Board Hold the UP button on the treadmill Is the yellow UP light on the relay board lit Hold the DOWN button on the treadmill Is the yellow DN light on the relay board lit Do both the UP DN light on the relay board ...

Page 109: ...109 111 Canfield Avenue Randolph New Jersey 07869 800 LANDICE FAX 973 927 0630 L Series Home Treadmill Road Runner Diagnostic Addendum L7 L8 Road Runner TECHNICAL SUPPORT CALL 1 800 LANDICE ...

Page 110: ...110 L SERIES ROAD RUNNER LOWER WIRING DIAGRAM ...

Page 111: ...111 L SERIES ROAD RUNNER UPPER WIRING SCHEMATIC ...

Page 112: ...he treadmill 1 The main harness 9 multicolored wires in a gray sheath should be routed under the elevation motor and secured with the supplied harness restraint clip or wire tie It is plugged into the circuit board partially hidden by the CD changer ______________________________________________________________________________ 2 Snap the DC power supply harness two black wires with a large snap on...

Page 113: ...vation motor then around the back of the CD changer 4 Insert the connector into the side of the changer It will snap when properly connected Examine all wires around the elevation motor and drive motor to be sure they will not contact any moving parts ...

Page 114: ...cs Hold speed lever in the SLOW position and turn key from OFF to PAUSE All LED s light up while the microprocessor performs a self check Any error codes in the format of Err indicate an upper board failure Then you can begin the switch test Activating the following switches displays a corresponding error code BUTTON DIAL LEVER KEY DISPLAY Off Turns unit off PAUSE PAUSE RUN RUN Button 1 Time 1 But...

Page 115: ...RUN there should be continuity across the green and red wires only If the key switch and harness check good the display is bad Voltage readings Switched to PAUSE GREEN with respect to WHITE 3 7vdc GREEN with respect to RED 5 0vdc Switched to RUN GREEN with respect to WHITE 3 7vdc GREEN with respect to RED 0vdc PHYSICAL SPEED OR ELEVATION DOES NOT INCREASE OR DECREASE Verify lever function in Gener...

Page 116: ...he cartridge in order from slot 1 to slot 6 so if you only have a CD in slot 6 it will take a while to get there before it begins to play Try another CD this one may be scratched Some but not all CD copies CDR CDRW will play in the changer If a copied CD is not playing try an original CD HOW TO REMOVE CD CHANGER To gain access to relay board and pwm motor control 1 Unplug treadmill from wall 2 Rem...

Page 117: ...y Adjustments are ONLY necessary when Drive Belt is slipping during use To test for tightness 1 Remove motor cover 2 With mill running at 2mph walk on treadbelt 3 If Drive Belt is moving front roller with no slippage then drive belt is correctly tensioned Check the tension on the Drive Belt by placing the Drive Belt between your thumb and forefinger and twisting The proper twist is 45 If the belt ...

Page 118: ...r tracking TENSION the Treadbelt To tighten Treadbelt turn both adjustment bolts clockwise exactly the same amount Failure to turn them equally will affect belt tracking You are moving the Take Up Roller closer or further away from the deck to tension the Treadbelt DO NOT OVER TIGHTEN TREADBELT DRIVE BELT If you can t reach the palm of your hand under the center of the Treadbelt if the edges of th...

Page 119: ...oth and mild soap and water Cloth should be damp not wet Once a week or as needed 3 Vacuum or wipe down the Deck area between treadbelt and frame Once a week Once a Month 1 Take off Motor cover and vacuum 2 Slide clean towel under Treadbelt and wipe deck and under the belt Rotate belt 180 degrees and repeat 3 Slipcoat under Treadbelt 4 Check Drive Belt Tension 5 Check Treadbelt Tension and Trackin...

Page 120: ...should still be checked every month Lubrication is not required for home usage but if desired should not be done more than once per year unless otherwise instructed by a Landice factory representative Only use SlipCoat by Landice Most standard greases waxes and silicon sprays will build up on the rollers and effect belt slippage and tracking How to Lubricate Lift up the edge of the treadbelt and s...

Page 121: ...ommutator stone or emery cloth 4 When you reinstall motor brushes make sure the brush does not bind up in its holder The motor brush must move freely the full length with zero resistance If resistance is present you must carefully dress out the brush until the correct tolerance is achieved Motor brushes should be checked every 6 months on institutional treadmills and after 6 years on home units SE...

Page 122: ...icture 38 Troubleshooting 92 12 VDC Power Supply Definition 57 Picture 41 42 Removal Replacement 70 Troubleshooting 102 Testing 62 92 Capacitor Definition 57 Picture 35 37 Removal Replacement 70 Troubleshooting 92 101 Wiring 36 37 CE Error Code 94 Choke Inductor Definition 57 Picture 35 37 Removal Replacement 70 Troubleshooting 92 101 Wiring 36 37 Components Definitions 57 59 Parts list 31 34 Test...

Page 123: ... 30 117 Tensioning 117 Troubleshooting 65 66 Drive Motor Definition 57 Picture Motor Pan 30 35 41 Removal Replacement 72 Testing 60 Troubleshooting 38 65 66 90 91 101 107 Drive Motor Brushes Maintenance 119 121 Removal Replacement 72 Troubleshooting 65 66 101 107 Drive Roller w Sheave Definition 57 Picture 27 28 Removal Replacement 75 Troubleshooting 66 88 89 118 Elevation Leg Assembly Definition ...

Page 124: ... 58 Removal Replacement 71 Testing 62 105 Frame Side Definition 58 Picture 27 28 Frame Covers Side Definition 58 Picture 27 28 Fuses Picture 35 41 48 Troubleshooting 100 105 Heart Rate Control Contact Heart Rate 55 Installation 78 79 Troubleshooting 80 IR Potentiometer Definition 67 Adjustments 58 Picture 41 42 43 44 47 Troubleshooting 66 67 L5 LS Error Code Definition 93 Troubleshooting 93 95 101...

Page 125: ...val Replacement 71 Testing 62 Troubleshooting 101 Noises 88 91 O5 OS Error Code 93 94 96 Parts List 31 34 PO Error Code 95 96 103 108 Power Cord Line Cord Removal Replacement 69 Troubleshooting 100 105 PWM Motor Control Board Definition 58 LED Lights 44 Picture 41 48 Removal Replacement 69 Testing 61 Troubleshooting 43 44 61 67 68 91 92 106 107 Wiring 42 47 110 Voltage 43 Rebooting Executive Train...

Page 126: ...rror Code 95 96 Executive Trainer Only SCR Motor Control Board Definition 58 LED Lights 38 39 Picture 35 Removal Replacement 69 Testing 61 Troubleshooting 92 93 94 101 103 Wiring 36 37 Slipcote Lubricant Definition 59 Use 120 Speed Calibration 68 Speed Sensor Definition 59 Picture 41 Testing 62 Troubleshooting 39 46 102 106 Wiring 36 37 42 47 110 Take Up Roller Definition 59 Picture 27 28 Removal ...

Page 127: ... 50 Picture 29 Removal Replacement 71 Troubleshooting 67 100 101 105 107 108 Testing 62 Uprights Frame Definition 59 Picture 29 Upper Wire Harness Definition 59 Troubleshooting 39 100 101 105 108 VFX System Definition 59 Picture 27 28 Removal Replacement 75 treadbelt deck Troubleshooting 90 Voltage Specifications 20 Requirements 22 Testing 92 Troubleshooting 60 62 66 68 Warranty Cards 6 9 Policy 1...

Reviews: