background image

FIRE OR EXPLOSION HAZARD

If you smell gas:

• Shut off gas to the appliance.

• Extinguish any open flame.

• If odor continues, leave the area 

immediately.

• After leaving the area, call your 

gas supplier or fire department.

Failure to follow these instructions 

could result in fire or

explosion, which could cause 

property damage, personal

injury, or death.

Do not store or use gasoline or 

other flammable vapors and liquids 

in the vicinity of this or any other 

applicance.
An LP-cylinder not connected for 

use shall not be stored in the vicinity 

of this or any other appliance.

If the information in this manual is not 

followed exactly, a fire or explosion 

may result causing property damage, 

personal injury, or loss of life.

Conforms to ANSI STD Z21.97-2017 

Certified to CSA STD 2.41-2017  

Outdoor decorative Gas Appliance

THIS APPLIANCE CAN PRODUCE

CARBON MONOXIDE WHICH HAS

NO ODOR.
USING IT IN AN ENCLOSED SPACE

CAN KILL YOU.
NEVER USE THIS APPLIANCE IN AN 

ENCLOSED SPACE SUCH AS A

CAMPER, TENT, CAR OR HOME.

Installation and service must be 
performed by a qualified installer, 
service agency, or the gas supplier.

INSTALLER: Leave this manual with the 
appliance.
CONSUMER: Retain this manual for future 
reference.

CARBON MONOXIDE HAZARD

DANGER

WARNING

WARNING: 

For Outdoor Use Only.

WARNING

WARNING

Assembly and Use

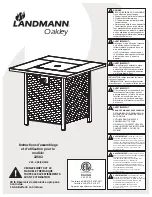
Instructions for Model:

22582

VER. 1, 08/02/2019

PLEASE READ ENTIRE
MANUAL AND NOTE ALL
WARNINGS BEFORE USING.

20 lb. Propane Fuel Tank not included.
1 AAA Battery not included.

Oakley

5005544

WARNING:


THIS PRODUCT CAN EXPOSE 

YOU TO CHEMICALS, INCLUDING LEAD 

COMPOUNDS, WHICH ARE KNOWN TO THE 

STATE OF CALIFORNIA TO CAUSE CANCER, 

BIRTH DEFECTS OR OTHER REPRODUCTIVE 

HARM.

For more information go to:  www.P65Warnings.

ca.gov

WARNING:


FUELS USED IN LIQUEFIED  

PROPANE GAS APPLIANCES, AND THE  

PRODUCTS OF COMBUSTION OF SUCH 

FUELS, CAN EXPOSE YOU TO CHEMICALS 

INCLUDING CARBON MONOXIDE, WHICH IS 

KNOWN TO THE STATE OF CALIFORNIA TO 

CAUSE BIRTH DEFECTS OR OTHER  

REPRODUCTIVE HARM. 

For more information go to: www.P65Warnings.

ca.gov

WARNING:


THIS PRODUCT CAN EXPOSE 

YOU TO CHEMICALS, INCLUDING DEHP, WHICH 

IS KNOWN TO THE STATE OF CALIFORNIA TO 

CAUSE CANCER, BIRTH DEFECTS OR OTHER 

REPRODUCTIVE HARM.

For more information go to: www.P65Warnings.

ca.gov

Summary of Contents for 22582

Page 1: ... service must be performed by a qualified installer service agency or the gas supplier INSTALLER Leave this manual with the appliance CONSUMER Retain this manual for future reference CARBON MONOXIDE HAZARD DANGER WARNING WARNING For Outdoor Use Only WARNING WARNING Assembly and Use Instructions for Model 22582 VER 1 08 02 2019 PLEASE READ ENTIRE MANUAL AND NOTE ALL WARNINGS BEFORE USING 20 lb Prop...

Page 2: ...atile fluids to start or restart fires 7 Do not store gasoline alcohol or volatile fluids in the vicinity of the fire table 8 Never use charcoal or any other solid fuel in this fire table 9 The outdoor gas fire table is for adult use only 10 Never allow children to use the outdoor gas fire table Children and pets must be closely supervised when they are anywhere near the fire table 11 Do not leave...

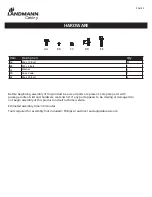
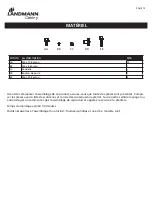
Page 3: ... part appears to be missing or damaged do not begin assembly of this product and call customer service Estimated assembly time 30 minutes Tools required for assembly not included Phillips screwdriver and adjustable wrench AA BB CC DD EE Item Description Qty 22 1 1 1 4 M6 x 10 Bolt M4 x 8 Bolt Washer Door Knob M6 x 20 Bolt HARDWARE AA BB CC DD EE Oakley ...

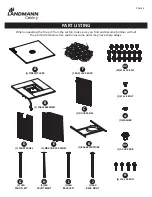
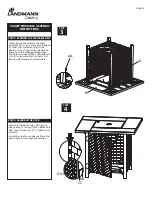
Page 4: ...tion as some parts may have sharp edges A F AA BB CC DD EE B C G H I J K D E 1 FIRE PIT COVER 1 BOX LAVA ROCK 22 M6 x 10 BOLT 1 M4 x 8 BOLT 1 WASHER 1 DOOR KNOB 4 M6 x 20 BOLT 1 TABLE ASSEMBLY 1 DOOR PANEL 1 LEG FRONT LEFT 1 LEG FRONT RIGHT 1 LEG BACK LEFT 1 LEG BACK RIGHT 1 BASE STRUCTURE 1 FRONT PANEL 2 SIDE OR BACK PANEL PART LISTING ...

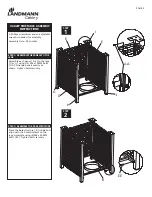
Page 5: ...ewdriver and an adjustable wrench is needed for assembly Assembly time 30 minutes Place the base structure K inside and align with the holes brackets on the legs Assemble using 4 M6 x 20MM bolts EE Tighten bolts securely D E E I H G J K AA EE OAKLEY FIRE TABLE ASSEMBLY INSTRUCTIONS STEP 1 ASSEMBLE THE PANELS TO THE LEGS STEP 2 ASSEMBLE THE BASE STRUCTURE Oakley ...

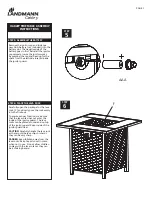
Page 6: ...Align the holes and use 8 M6 x 10MM bolts AA to assemble Start all bolts first before tightening all bolts securely Assemble the door knob DD to the door panel C using 1 M4 x 8MM bolt BB and 1 washer CC Tighten bolt securely Insert door shafts into sleeves Pivot the door closed to the magnetic catches STEP 3 ASSEMBLE THE TABLE ASSEMBLY STEP 4 ASSEMBLE THE DOOR OAKLEY FIRE TABLE ASSEMBLY INSTRUCTIO...

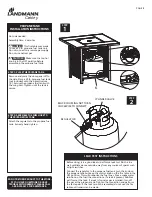
Page 7: ...ensure proper function make sure that the lava rock does not enter the inside of the ignitor guard The lava rocks can be placed around and on top of the ignitor guard Keep inside of the ignitor guard clear CAUTION Carefully handle the lava rock as there could be lava chips or shards they can be very sharp DANGER Keep children away from the lava rocks Keep fire pit cover in place when not in use Do...

Page 8: ...such as light switches Connect the regulator to the propane fuel tank turn the knob on the propane tank but keep the control knob on the fire table in the OFF position This will pressurize the fuel lines Pour a soapy water solution on the fuel line connections If a leak is present bubbles will form at the leak If a leak is found or gas is smelled turn off the gas at the propane tank Tighten the co...

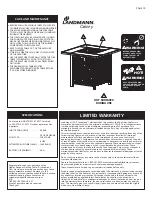
Page 9: ...t the burner Release control knob after 45 seconds 7 Adjust the flame to desired height with the control knob 8 To turn off turn the propane tank knob to CLOSE 9 Wait until the fire extinguishes to purge the lines of fuel before turning the control knob on the fire table to The fire table and lava rock become very hot Use caution around the fire table Keep the fire table area free and clear of com...

Page 10: ...ay the paint or stone finishes of this product or cover damage or deterioration due to any normal or severe weather conditions or to any chemical exposure These warranties do not cover surface scratches or heat damage which is considered to be normal wear These warranties do not cover the lava rocks or the faux firewood Chips cracks or breaks in the stone base caused by normal use are not covered ...

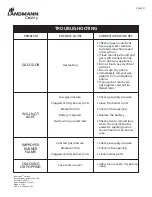
Page 11: ...t any appliance Do not touch any electrical switches Do not use any phone Immediately call your gas supplier from a neighbors phone If you cannot reach your gas supplier call the fire department Check gas supply pressure Clean the burner ports Check orifice opening Replace the battery Check all wire connections when the control knob is pressed a sparking action can be heard in the burner area Chec...

Page 12: ......

Page 13: ...DES MALFORMATIONS CONGÉNITALES OU D AUTRES NUIRE DE REPRODUCTION Pour plus d informations visitez www P65 Warnings ca gov AVERTISSEMENT COMBUSTIBLES UTILISÉS DANS LES APPAREILS À GAZ PROPANE LIQUÉFIÉ ET PRODUITS DE COMBUSTION DE CES COMBUSTIBLES PEUT VOUS EXPOSER À DES PRODUITS CHIMIQUES Y COMPRIS LE MONOXYDE DE CARBONE CE QUI EST CONNU DE L ÉTAT DE CALIFORNIE POUR CAUSER DES MALFORMATIONS CONGÉNI...

Page 14: ...tre effectuées par un agent de service qualifié L appareil doit être inspecté avant l utilisation et au mions tous les ans par un agent de service qualifié Un nettoyage plus fréquent peut être re quis si nécessaire Il est impératif que le compartiment de commande les brûleurs et les passages de circulation d air de l appareil soient maintenus propres 33 Soyez prudent après l extinction du feu les ...

Page 15: ...e partie semble manquer ou endommager ne commencez pas l assemblage de ceproduit et appelez le service à la clientèle Temps de montage estimé 30 minutes Outils nécessaires à l assemblage non inclus Tournevis phillips et une clé à molette sont Article La description Qté 22 1 1 1 4 M6 x 10 Boulon M4 x 8 Boulon Rondelle Bouton de porte M6 x 20 Boulon MATÉRIEL Oakley AA BB CC DD EE AA BB CC DD EE ...

Page 16: ... avoir des bords tranchants A F AA BB CC DD EE B C K D E 1 COUVERCLE D INCENDIE 1 BOÎTE PIERRE VOLCANIQUE 22 M6 X 10 BOULON 1 M4 X 8 BOULON 1 RONDELLE 1 BOUTON DE PORTE 4 M6 X 20 BOULON 1 TABLEAU ASSEMBLÉE 1 PANNEAU DE PORTE 1 STRUCTURE DE BASE 1 PANNEAU AVANT 1 PANNEAU LATÉRAL OU ARRIÈRE LISTE DES PIÈCES G H I J 1 PIED AVANT GAUCHE 1 PIED AVANT DROIT 1 PIED ARRIÈRE GAUCHE 1 PIED ARRIÈRE DROIT ...

Page 17: ...lé à molette sont nécessaires pour l assemblage Temps d assemblage 30 minutes Placez la structure de base K à l inté rieur et alignez vous avec les supports de trous sur les jambes Assembler en utilisant 4 boulons M6 x 20MM EE Serrez bien les boulons OAKLEY INSTRUCTIONS D ASSEMBLAGE DE LA TABLE DE FEU ÉTAPE 1 ASSEMBLER LES PANNEAUX AUX JAMES ÉTAPE 2 ASSEMBLER LA STRUCTURE DE BASE Oakley D E E I H ...

Page 18: ...M6 x 10MM AA pour assem bler Commencez tous les boulons avant de serrer fermement tous les boulons Assembler le bouton de porte DD au panneau de la porte C en utilisant 1 M4 x 8MM boulon BB et 1 rondelle CC Serrez bien le boulon Insérer les axes de porte dans les douilles Pivoter la porte fermée sur les loquets magnétiques ÉTAPE 3 ASSEMBLER L ASSEMBLAGE DE LA TABLE ÉTAPE 4 ASSEMBLER LA PORTE OAKLE...

Page 19: ...on fonctionnement assurez vous que la pierre volcanique ne pénètre pas à l intérieur de la protec tion de l allumeur Les pierres de verre peuvent être placées autour et au des sus de la garde de l allumeur Garder à l intérieur du garde de l allumeur clair ATTENTION Manipulez soigneusement la pierre volcanique car il pourrait y avoir des copeaux de verre ou des éclats ils peuvent être très précis D...

Page 20: ...rage Branchez le régulateur sur le réservoir de carburant propane tour nez le bouton sur le réservoir de propane mais gardez le bouton de commande sur la table anti incendie en position OFF Cela pressurisera les lignes de carburant Verser une solution d eau savonneuse sur les connexions de la ligne de carburant Si une fuite est présente des bulles se formeront lors de la fuite Si une fuite est dét...

Page 21: ...pour allumer le brûleur Relâcher le bouton de commande après 45 secondes 7 Régler la flamme à la hauteur souhaitée avec le bouton de com mande 8 Pour éteindre tourner le bouton du réservoir depropane sur FERMER 9 Attendez que l incendie s éteigne pour purger lesconduites de carburant avant d éteindre le bouton de commande sur la table anti incendie Le foyer et la pierre volcanique deviennent très ...

Page 22: ...s sur la surface du produit ni la détérioration due à toute exposition à des phénomènes météorologiques normaux ou violents ou à des produits chimiques Cette garantie ne couvre pas les marques sur la surface du foyer ni les dommages causés par la chaleur qui sont considérés comme de l usure normale Ces garanties ne couvrent pas le verre rock Les frappes les fissures ou les pauses dans la table par...

Page 23: ... aucun téléphone Appelez immédiatement votre fournisseur de gaz d un téléphone voisin Si vous ne pouvez pas joindre votre fournisseur de gaz appe lez le service des incendies Vérifier la pression d alimen tation en gaz Nettoyer les ports du brûleur Vérifier l ouverture des orifices Remplacez la batterie Vérifiez toutes les connexions filaires lorsque le bouton de commande est pressé une action d a...

Page 24: ......

Page 25: ...S DE NACIMIENTO Y OTROS DAÑOS REPRODUCTIVOS Para más información viste www P65Warnings ca gov ADVERTENCIA ESTE PRODUCTO PUEDE EXPONERLO A PRODUCTOS QUÍMICOS INCLUIDO DEHP QUE EL ESTADO DE CALIFORNIA RECONOCE COMO CAUSA DE CÁNCER DE MALFORMACIONES CONGENITAS O OTROS DAÑOS AL SISTEMA REPRODUCTOR Para más información viste www P65Warnings ca gov ADVERTENCIA COMBUSTIBLES UTILIZADOS EN LOS APARATOS DE ...

Page 26: ...servicio cualificado El aparato debe ser inspecciona do antes de su uso y al menos una vez al año por un téc nico de servicio cualificado Es posible que se requiera una limpieza más frecuente Es imprescindible que el comparti mento de control los quemadores y los conductos de aire circulante del aparato se mantengan limpios 33 Tenga precaución después de apagar el fuego las superficies seguirán ca...

Page 27: ...ezaparece estar ausente o dañada no comience a ensamblar este producto y llame al servicio de atención al cliente Tiempo estimado de montaje 30 minutos Herramientas necesarias para el montaje no incluido Destornillador phillips y una llave ajustable para Artículo Descripción Cantidad 22 1 1 1 4 M6 x 10 Perno M4 x 8 Perno Arandela Perilla de la puerta M6 x 20 Perno HARDWARE Oakley AA BB CC DD EE AA...

Page 28: ...r bordes afilados A F AA BB CC DD EE B C K D E 22 M6 X 10 PERNO 1 M4 X 8 PERNO 1 ARANDELA 1 PERILLA DE LA PUERTA 4 M6 X 20 PERNO LISTADO DE PIEZAS 1 CUBIERTA DE FUEGO 1 CAJA ROCA DE LAVA 1 ENSAMBLE DE LA MESA 1 PANEL DE LA PUERTA 1 ESTRUCTURA BASE 1 PANEL FRONTAL 1 PANEL LATERAL O TRASERO G H I J 1 PATA DELANTERA IZQUIERDA 1 PATA DELANTERA DERECHA 1 PATA TRASERA IZQUIERDA 1 PATA TRASERA DERECHA ...

Page 29: ...Phillips y una llave ajustable para el montaje Tiempo de montaje 30 minutos Coloque la estructura de la base K adentro y alinee con los soportes de los agujeros en las patas Montar usando 4 tornillos M6 x 20mm EE Apriete bien los pernos OAKLEY INSTRUCCIONES DE MON TAJE DE LA MESA DE INCENDIO PASO 1 MONTAJE DE LOS PANELES EN LAS PIERNAS PASO 2 MONTAJE DE LA ESTRUCTURA BASE Oakley D E E I H G J K AA...

Page 30: ...llos M6 x 10mm AA para montar Empiece todos los pernos antes de apretar todos los pernos de forma segura Monte el pomo de la puerta DD al pa nel de la puerta C usando 1 tornillo M4 x 8mm BB y 1 arandela CC Apriete bien el perno Introduzca las bisagras en los casquillos Pivote la puerta cerrada a las tomas magnéticas PASO 3 MONTAJE DEL ENSAMBLE DE LA MESA PASO 4 MONTAJE DE LA PUERTA OAKLEY INSTRUCC...

Page 31: ...se de que la rocas de lava no entre en el interior de la protección del encendedor Las rocas de lava se pueden colocar alrededor y encima de la protec ción del encendedor Manténgala en el interior de la protección del encende dor PRECAUCIÓN Manipule con cuidado la rocas de lava ya que podría haber frag mentos de rocas que pueden ser muy afilados PELIGRO Mantenga a los niños alejados de las rocas d...

Page 32: ...tores de luz Conecte el regulador al tanque de combustible de propano gire la perilla del tanque de propano pero mantenga la perilla de control en la mesa de fuego en la posición OFF Esto presurizará las líneas de combustible Vierta una solución de agua jabonosa en las conexiones de la línea de combustible Si hay una fuga se formarán burbujas en la fuga Si se detecta una fuga o se olfatea gas apa ...

Page 33: ...r el quemador Suelte el botón regulador al cabo de 45 segundos 7 Ajuste la llama hasta el nivel que desee con el botón regulador 8 Para apagar gire la perilla del tanque de propano a CLOSE 9 Espere hasta que el fuego se apague para purgar las líneas de combustible antes de girar la perilla de control de la mesa de fuego a El pozo de fuego y la rocas de lava se vuelven muy calientes Tenga precaució...

Page 34: ...iza de ningunamanera la pintura ni las terminaciones de piedras de este producto ni cubre los daños de las tapas ni el deterioro por condiciones climáticas normales o severas ni por cualquier exposición química Estas garantías no cubren los rayones en las superficies ni los daños por el calor que se considera el desgaste normal Estas garantías no cubren la rocas de lava Las virutas grietas o rotur...

Page 35: ...ico No utilice ningún teléfono Inmediatamente llame a su proveedor de gas de un teléfono de los vecinos Si no puede comunicarse con su proveedor de gas llame al departamento de bomberos Comprobar la presión de suministro de gas Limpie los puertos del quemador Compruebe la apertura del orificio Reemplace la batería Compruebe todas las cone xiones la perilla de control se presiona una acción de chis...

Page 36: ......

Reviews: