background image

DO NOT RETURN PRODUCT TO THE STORE.

IF YOU HAVE QUESTIONS OR HAVE

TROUBLE WITH ASSEMBLY, PLEASE CALL


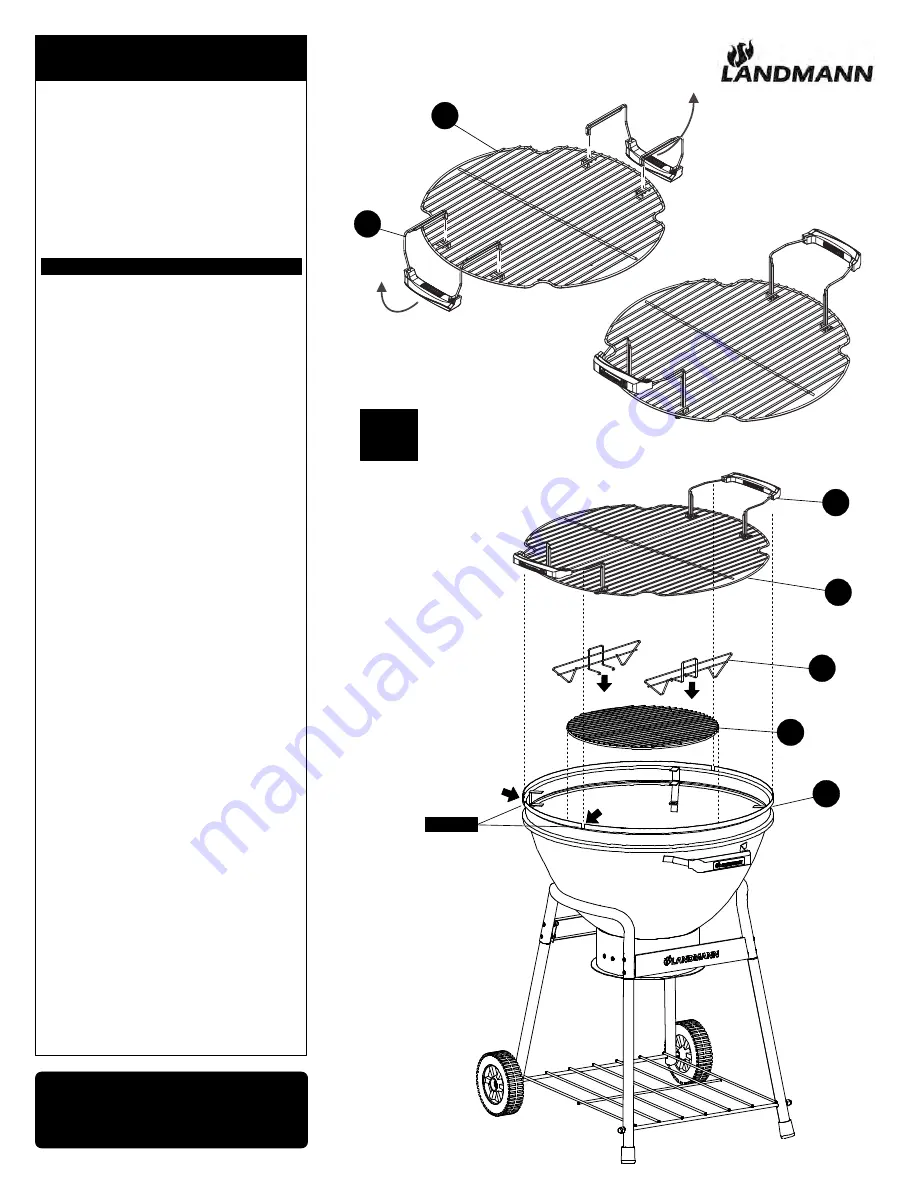
STEP 7:   ADD GRATES

Place the charcoal grate [ E ] on the 
bottom of the firebowl.   Place the 

 in the locking ring  [ C ] slots.

ASSEMBLY INSTRUCTIONS

E

C

SLOTS

7

STEP

PAGE 11

black pearl kettle

 FOR ASSISTANCE.

180  0  -79  9  -833 

BLCAK PEARL KETTLE

D1

D

D1

D

S

Place the cooking grate hand  le [ D1   ]        

onto the cooking grate [ D ] as shown.

coal d  iv  id  er [ S   ] onto the charcoal
grate [ D ].Place the cooking grate [ D ]

Summary of Contents for LMBPKL

Page 1: ...VER 5 7 11 2014 Assembly and Operating Instructions for Black Pearl Kettle Charcoal Grill PLEASE READ ALL RULES FOR SAFE OPERATION AND FOOD SAFETY BEFORE USING black pearl kettle Product Code LMBPKL ...

Page 2: ...NDLING RAW MEAT AND POULTRY FOOD SAFETY CARBON MONOXIDE HAZARD BURNING WOOD OR CHARCOAL PRODUCES CARBON MONOXIDE WHICH HAS NO ODOUR AND CAN CAUSE DEATH IF BURNED IN ENCLOSED AREAS NEVER BURN WOOD OR CHARCOAL INSIDE HOMES VEHICLES TENTS OR ANY OTHER ENCLOSED AREAS WARNING PAGE 2 READ FIRST RULES FOR KETTLE CHARCOAL GRILL SAFE OPERATION THE GRILL IS FOR ADULT USE ONLY DO NOT STORE LIGHTER FLUID OR O...

Page 3: ...NG CC 6 M5 x 10MM BOLT AA 8 M6 x 35MM BOLT PAGE 3 BB 6 M6 x 15MM BOLT DD 6 M5 HEXNUT EE 2 M8 LOCKING HEXNUT F F 2 M8 CAPNUT HH 2 16MM WASHER JJ 6 18MM WASHER x 8 x 6 x 6 x 6 x 2 x 2 x 2 x 6 KK 2 12MM WASHER x 2 GG 2 16MM WASHER x 2 ...

Page 4: ...PART LISTING PAGE 4 A 1 FIREBOWL B 1 LID C 1 LOCKING RING D 1 COOKING GRATE E 1 CHARCOAL GRATE F 1 BOTTOM SHELF black pearl kettle D1 2 COOKING GRATE HANDLE x 2 ...

Page 5: ... 5 H 2 WHEEL LEGS G 2 FRONT LEGS K 2 LEG BRACES J 2 TOP LEGS L 1 ASH CATCHER HOUSING AND VENT M 1 ASH CATCHER N 2 WHEEL P 1 LID HANDLE Q 1 LID HANDLE HEAT SHIELD x 2 x 2 x 2 x 2 black pearl kettle N1 2 WHEEL CAP x 2 x 2 ...

Page 6: ...PART LISTING PAGE 6 R 1 TEMPERATURE GAUGE WITH WINGNUT black pearl kettle S 2 C OAL DIVIDER x 2 AND BRAC KET ...

Page 7: ...ACE ASH CATCHER HOUSING VENT ASH CATCHER WHEEL LID HANDLE LID HANDLE HEAT SHIELD TEMPERATURE GAUGE black pearl kettle AA M6 x 35 MM BOLT 8 BB M6 x 15 MM BOLT 6 CC M5 x 10 MM BOLT 6 DD M5 HEX NUT 6 EE M8 LOCKING HEX NUT 2 FF M8 CAPNUT 2 GG 16 MM WASHER 2 HH 16 MM WASHER 2 JJ 18 MM WASHER 6 KK 12MM WASHER 2 CC AA BB x 8 x 6 x 6 DD EE F F x 6 x 2 x 2 HH JJ x 2 x 6 KK x 2 GG x 2 D1 1 D1 COOKING GRATE ...

Page 8: ...lf F onto the legs making sure the longer end is on the wheel leg Tighten the bolts securely STEP 2 ASSEMBLE THE WHEELS Slide 1 16MM washer HH onto each wheel axle Slide the wheels N onto the wheel axle and assemble using 1 16MM washer GG and 1 M8 locking hexnut EE for each side Don t over tighten Assemble the bottom shelf F to the front legs G using 2 M8 capnuts FF Tighten securely DO NOT RETURN ...

Page 9: ...cing the front Align the holes and assemble the firebowl using 4 18MM washers JJ and 4 M6 x 15MM bolts BB Hand start all bolts before tightening STEP 4 ASSEMBLE THE ASH CATCHER HOUSING Assemble the ash catcher housing L to the bottom of the firebowl A using 2 M6 x 15MM bolts BB and 2 18MM washers JJ Tighten securely ASSEMBLY INSTRUCTIONS A PAGE 9 L BB BB JJ 3 STEP 4 STEP A JJ black pearl kettle FO...

Page 10: ... ASSEMBLE THE LOCKING RING AND TOOL HOOK STEP 6 ASSEMBLE THE LID Assemble the lid handle P and heatshield Q to the lid B using 2 M5 x 10MM bolts CC 2 M5 hexnuts DD and 2 12MM washers K K The handle assembles first and then the heatshield assembles on top See STEP 6A assembled Assemble the temperature gauge R to the lid with the included wing nut ASSEMBLY INSTRUCTIONS A C PAGE 10 CC DD 5 STEP 6 STE...

Page 11: ...ate E on the bottom of the firebowl Place the in the locking ring C slots ASSEMBLY INSTRUCTIONS E C SLOTS 7 STEP PAGE 11 black pearl kettle FOR ASSISTANCE 180 0 79 9 833 BLCAK PEARL KETTLE D1 D D1 D S Place the cooking grate hand le D1 onto the cooking grate D as shown coal d iv id er S onto the charcoal grate D Place the cooking grate D ...

Page 12: ... HAVE TROUBLE WITH ASSEMBLY PLEASE CALL STEP 8 PLACE ASH CATCHER AND LID Slide the ash catcher M onto the housing L and lock by turning right into slot ASSEMBLY INSTRUCTIONS PAGE 12 M L black pearl kettle BLCAK PEARL KETTLE FOR ASSISTANCE 180 0 79 9 833 8 STEP ...

Page 13: ...grate Pour desired amount of charcoal or briq uette 2 to 4 kg on the charcoal grate and light Make sure ash catcher vent is open full Leave cooking grate and lid off until the fire has died aw ay to j ust hot coals The coals should be gray after about 30 minutes STEP 2 SETUP TO GRILL Place the cooking grate on the grill and make sure it locks in the locking ring slots Place lid on grill and adjust...

Page 14: ...lightly to get the ashes to fall into the ash catcher cooking grate push down any leftovers Remove dispose of cooled receptacle The stainless steel and enamel surfaces can be cleaned with soap and water Clean only when the grill is cool to the touch COOLED ASHES black pearl kettle tap and shake If necessary remove the and charcoal grate to remaining ash or grill the ash catcher and ashes in proper...

Page 15: ... Turkey Chicken Poultry Medium rare Medium Well done Beef Medium rare Medium Well done Lamb Use a high quality meat thermometer with probe to measure the meat temperature Push probe into the thickest part of the meat to get an accurate measurement The temperature gauge on the grill measures the air temperature of the grill cooking chamber not the food temperature PAGE 15 black pearl kettle 63 C 71...

Page 16: ... may be required Thank you PAGE 16 HOT SURFACES DURING USE HANDLES BECOME WARM TO HOT WITH EXTENDED USE DO NOT STORE LIGHTER FLUID OR OTHER FLAMMABLE LIQUIDS OR MATERIALS ON THE STORAGE SHELF HOT WARNING HOT SURFACES DURING USE USE MITTENS OR GLOVES ON THESE PARTS NEVER USE GASOLINE ALCOHOL OR VOLATILE FLUIDS TO START OR RESTART FIRES WARNING DO NOT OPERATE GRILL WITHOUT ASH CATCHER IN PLACE DO NO...

Page 17: ...on to providing the consumer with a refund replacement product or repairing the product 4 For major failures as the term is defined in the CCA you are entitled to a replacement or refund and for compensation for any other reasonably foreseeable loss or damage 5 To implement this warranty please return the product to the place of purchase or nominated service agent otherwise a service call out fee ...

Page 18: ...atute common law or otherwise relating to this warranty that are not contained in it are excluded to the fullest extent permitted by law Nothing in this warranty excludes restricts or modifies any condition warranty statutory guarantee right or remedy implied or imposed by common law statute or regulation which cannot be lawfully excluded restricted or modified For Customer Reference file in a saf...

Reviews: