3-17 WORK LIGHT (OPTION)
The
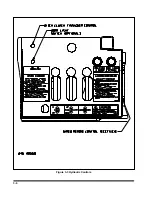
WORK LIGHT SWITCH
is on the hydrau-
lic control panel
(See Figure 3-3).
It illuminates the
hydraulic control panel and controls the optional
work lights mounted on the bulkhead. The work
lights illuminate the upper deck.
3-18 WINCH CONTROLS (OPTION)
DANGER
1. THE WINCH IS NOT DESIGNED OR
INTENDED TO BE USED FOR LIFTING
OR MOVING PEOPLE. USING IT THIS
WAY CAN CAUSE SERIOUS INJURY
OR DEATH.
2. MAKE CERTAIN THE WINCH CABLE
SPOOL CLUTCH IS SET TO ENGAGE
AND CLUTCH IS FULLY ENGAGED BE-
FORE LOAD TENSION IS APPLIED TO
WINCH CABLE. NEVER ATTEMPT TO
DISENGAGE THE WINCH CABLE
SPOOL WHEN THE CABLE IS UNDER
TENSION. LOSS OF LOAD CONTROL,
PROPERTY DAMAGE, INJURY OR
DEATH CAN RESULT.
3. FAILURE TO LEAVE AT LEAST FIVE
WINCH CABLE WRAPS ON THE WINCH
CABLE SPOOL COULD ALLOW THE
CABLE TO COME OFF THE SPOOL,
RESULTING IN SERIOUS PERSONAL
INJURY OR DEATH.
WARNING
DO NOT HANDLE THE WINCH CABLE
WHEN THE WINCH IS IN THE ENGAGE
POSITION. HANDS OR CLOTHING
COULD GET CAUGHT IN THE CABLE
AND BE PULLED INTO THE SPOOL
CAUSING SERIOUS PERSONAL IN-
JURY.
3-18.1
The
WINCH HYDRAULIC
lever
(See
is the top lever located
on the control panel. It is a three position
control:
UP
This position will cause the winch to
reel cable onto the winch spool when
the winch clutch handle is engaged.
CENTER
This is the neutral position. This po-
sition will not operate the winch.
DOWN
This position will cause the winch to
reel cable off of the winch spool
when the winch is engaged.
3-16
Summary of Contents for 825A
Page 8: ......
Page 12: ......
Page 14: ...3 2 Figure 3 1 Model 825 Trailer Terminology Figure 3 2 Service Hookups...
Page 18: ...3 6 Figure 3 3 Hydraulic Controls...
Page 22: ...3 10 Figure 3 5 Swingout Outrigger Platform Extension...
Page 24: ...3 12 Figure 3 6 Gooseneck Attachment to Frame...
Page 34: ......
Page 36: ...4 2 Figure 4 1 Lubrication Points...
Page 40: ...4 6 Figure 4 2 Model 825A Wiring Diagram...
Page 43: ...4 9 Figure 4 4 Tandem Axle Air Ride Suspension System...
Page 44: ...4 10 Figure 4 5 Tandem Axle W Flip Air Ride Suspension System...
Page 47: ...4 13 Figure 4 8 Checking Axle Alignment Figure 4 9 Examples of Camber...
Page 52: ...4 18 Figure 4 12 Axle and Brake Assembly...
Page 59: ...4 25 Figure 4 18 Mounting Tires and Wheels Figure 4 19 Stud Tightening Sequence...
Page 69: ...NOTES 5 9...
Page 70: ......


