4-7 ALIGNMENT
4-7.1
Wheel Alignment
DANGER
TO PREVENT A LIFE THREATENING
ACCIDENT:
1. SUPPORT TRAILER AND UNDER-
CARRIAGE SO TIRES ARE OFF THE
GROUND.
2. SUPPORT THE TRAILER AND UN-
DERCARRIAGE ON JACK STANDS
WITH SUFFICIENT CAPACITY TO SUP-
PORT THE TOTAL WEIGHT OF THE
TRAILER AND ANY LOAD WHICH IT
MAY BE CARRYING.
When trailer tires show signs of scuffing,
feather-edging or uneven wear, examine the trailer
for damaged suspension (frame, shocks, linkage,
etc.), axle, wheel bearings and wheels. Proper
wheel alignment and wheel bearing adjustment is
essential for proper tire wear. The simplest form of
checking wheel alignment “toe” is by running the
trailer over a “SCUFF GAUGE”. A scuff gauge
reading of 16 feet or less per mile is considered
satisfactory. If a scuff gauge is not readily avail-
able, or edge wear on one side of a tire is occur-
ring signifying positive or negative camber, align-
ment can be checked as follows:
a.
Remove wheel, hub and bearing assem-
blies.
b.
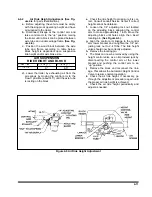
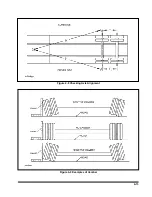
Place a 3-point axle gauge against the front
side of the axle, and adjust each axle gauge
point to the axle. (Double point end against
the inner and outer wheel bearing surfaces of
the spindle being checked and the other point
on the inner bearing surface on the other
spindle.)
(See Figure 4-7).
c.
Move the axle gauge and place against the
back side of the axle. If either of the points of
double point end fails to touch the axle sur-
face, a bent spindle is evident. A point gap of
.015" or more is considered excessive tire
“toe” and the axle must be replaced
(See Fig-
ure 4-7)
.
d.
Follow the same procedures as in
Section
except place the axle gauge
above and below the axle. If gauge point gap
is found, the axle has positive or negative
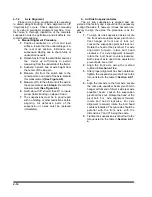
camber. The trailer axle has no camber from
the factory. If it is found to have positive or
negative camber, axle replacement is neces-
sary
(See Figure 4-9
for examples of cam-
ber).
4-12
Figure 4-7 Checking Axle for Bend
Summary of Contents for 825A
Page 8: ......
Page 12: ......
Page 14: ...3 2 Figure 3 1 Model 825 Trailer Terminology Figure 3 2 Service Hookups...
Page 18: ...3 6 Figure 3 3 Hydraulic Controls...
Page 22: ...3 10 Figure 3 5 Swingout Outrigger Platform Extension...
Page 24: ...3 12 Figure 3 6 Gooseneck Attachment to Frame...
Page 34: ......
Page 36: ...4 2 Figure 4 1 Lubrication Points...
Page 40: ...4 6 Figure 4 2 Model 825A Wiring Diagram...
Page 43: ...4 9 Figure 4 4 Tandem Axle Air Ride Suspension System...
Page 44: ...4 10 Figure 4 5 Tandem Axle W Flip Air Ride Suspension System...
Page 47: ...4 13 Figure 4 8 Checking Axle Alignment Figure 4 9 Examples of Camber...
Page 52: ...4 18 Figure 4 12 Axle and Brake Assembly...
Page 59: ...4 25 Figure 4 18 Mounting Tires and Wheels Figure 4 19 Stud Tightening Sequence...
Page 69: ...NOTES 5 9...
Page 70: ......


