MAINTENANCE AND LUBRICATION
4-13
Air Ride Height Adjustment
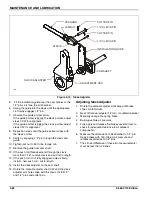
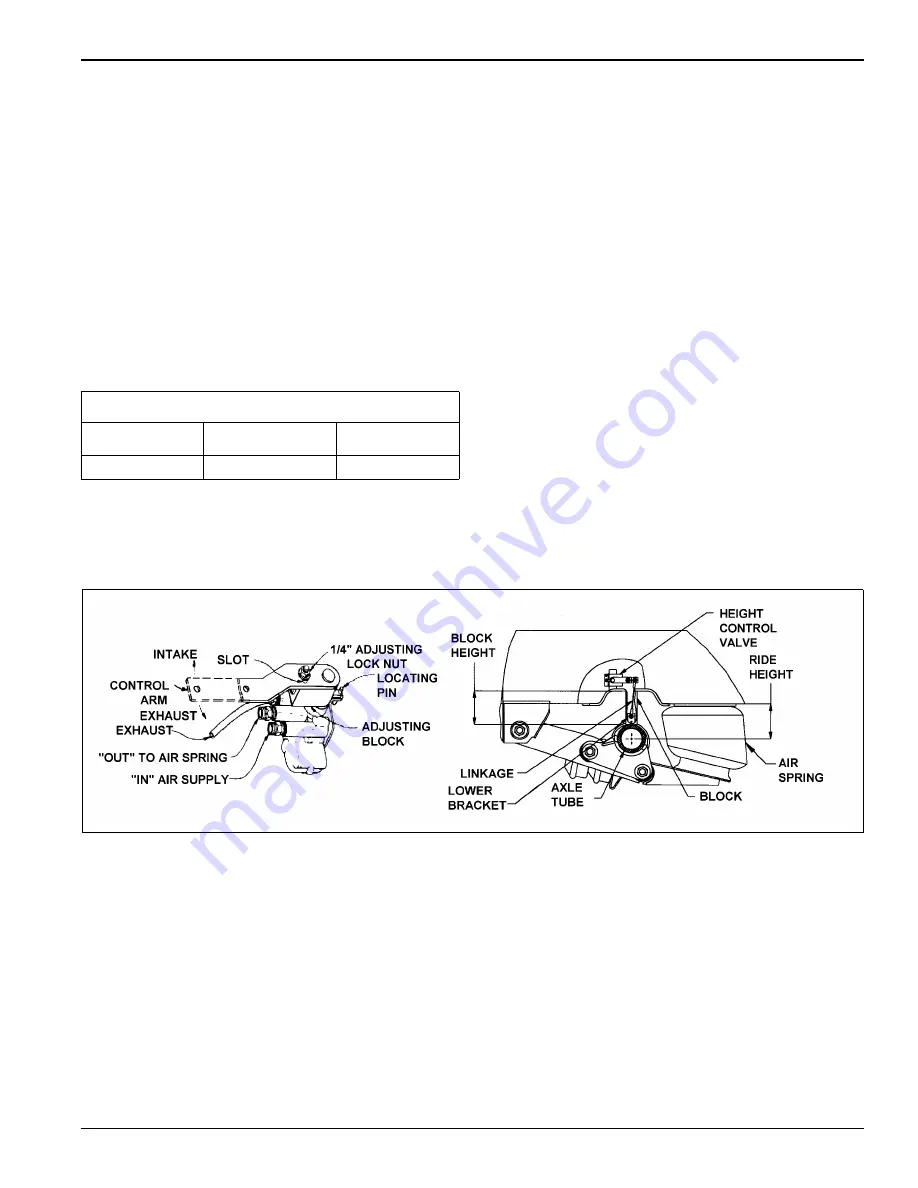
(See Figure 4-6 for parts identification.)
1.
Before adjusting, the vehicle must be empty with the
kingpin at operating height and have air supplied to
the trailer.
2.
Disconnect linkage at the control arm and raise
control arm to the “up” position, raising the trailer until
a block can be placed between axle tube and
undercarriage frame
3.
Position the wood block between the axle tube and
frame according to table below. Block height is
dependent upon suspension ride height and/or axle
brake size.
4.
Lower the trailer by exhausting air from the air
springs by moving the control arm to the “down”
position (about 45°) until the axle tube is resting on
the block.
5.
Check the ride height to make sure it is correct.
Consult Landoll Service Center if correct height
cannot be obtained.
6.
Loosen the 1/4” adjusting lock nut located on the
adjusting block, allowing the control arm to move
approximately 1 inch. Move the adjusting block until
holes align, then insert locating pin.
(See
7.
Align the control arm linkage to the control arm lower
bracket and re-tighten the 1/4" adjusting lock nut to
2-4 ft.lbs. The ride height valve should now be
correctly adjusted.
8.
Remove the locating pin.
9.
The block can now be removed by using the height
control valve as an improvised jack by disconnecting
the control arm at the lower bracket and pushing the
control arm to an “up” position.
10. Remove the block and reconnect the linkage. This
allows the Automatic Height Control Valve to resume
normal operation.
11. Check the air ride height. If necessary, go through
the adjustment procedure again until the proper air
ride height is achieved.
12. Check the air ride height periodically and adjust as
needed.
Figure 4-6: Air Ride Height Adjustment
Air Suspension Ride Height and Block
Brake Size
Ride Height
Block Height
16-1/2” Dia.
9"
6.5"
Summary of Contents for 855C HD Series
Page 2: ......
Page 6: ...iv F 669 0113 Edition...
Page 48: ...4 20 F 669 0113 Edition MAINTENANCE AND LUBRICATION Figure 4 12 Axle and Brake Assembly...
Page 65: ...TROUBLESHOOTING GUIDE 5 9 Notes...
Page 66: ...5 10 F 669 0113 Edition TROUBLESHOOTING GUIDE...
Page 67: ......


