2-22
1P342
ASSEMBLY INSTRUCTIONS
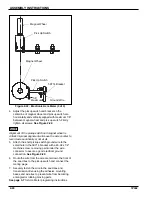
S-Tine Tire Track Remover
(Optional)
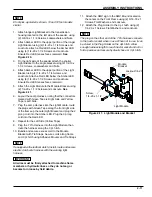
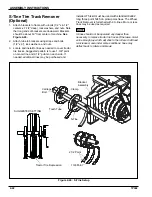
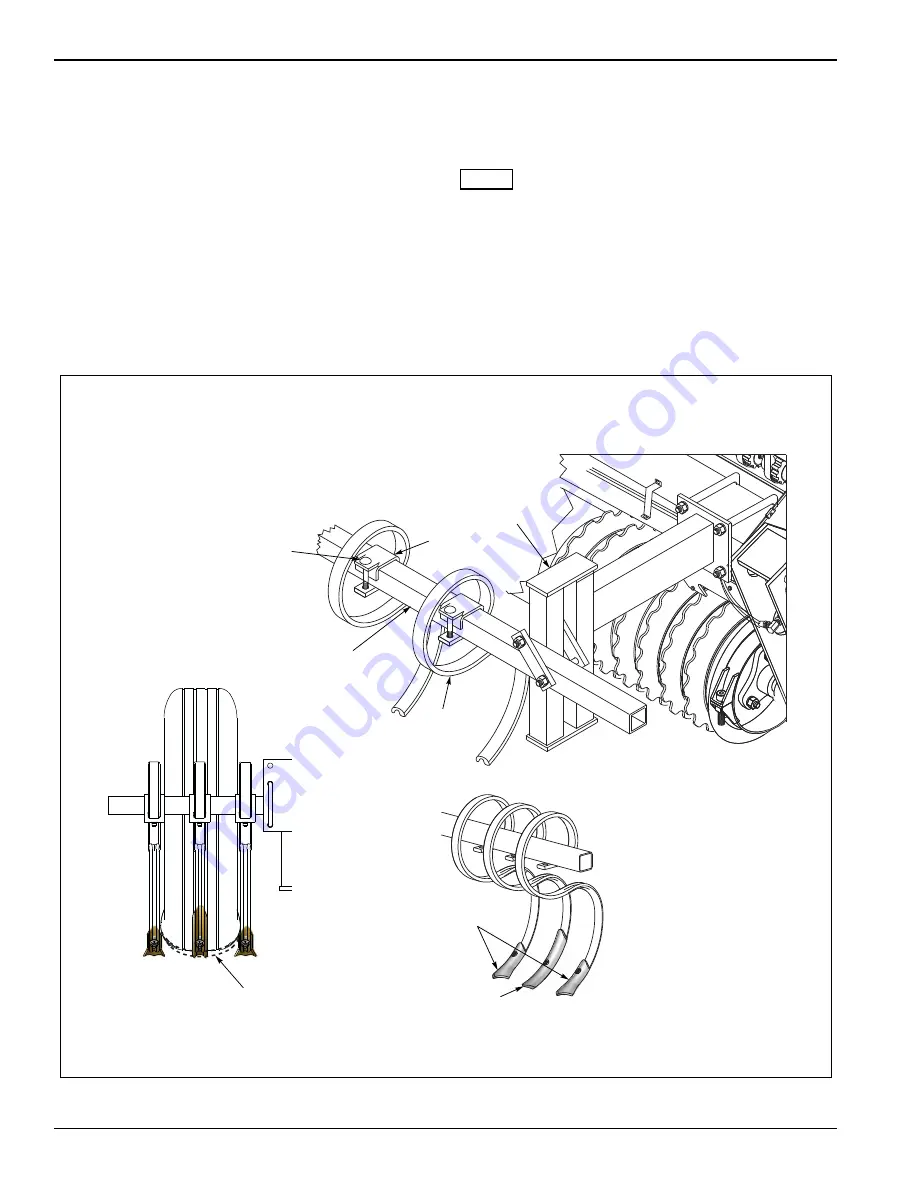
1. Attach brackets to frame with u-bolts (1/2” x 4-1/2”
centers x 7-1/2” deep), lock washers, and nuts. Note
that long ends of brackets are downward. Brackets
should be about 53” from center of machine.
2. Attach tube to brackets using straps and bolts
(1/2” x 6”), lock washers, and nuts.
3. Locate and install S-tines as needed to cover tractor
tire tracks. Suggested pattern is to use 1-3/8” point
on center tine and 2-1/2” points on each side. If
needed, additional tines may be purchased and
installed.
This kit must be used with standard 9J442
long three point hitch on pickup machines. The Wheel
Track Remover is furnished with 6 S-tines. More or less
tines may be used as required.
NOTE
S-tines should not be operated any deeper than
necessary to remove tractor tire tracks. Otherwise, moist
soil is brought up which will stick to the rollers, draft load
is increased, and under some conditions, tines may
deflect back to rollers and break.
Figure 2-24: S-Tine Setup
Tractor Tire Depression
Tooth Tube
Bracket
Assembly
S-Tine
Clamp
Carriage
Bolt
2 1/2 Point
1 3/8 Point
SUGGESTED SETTING
Summary of Contents for BRILLION SL Series
Page 2: ......
Page 9: ...SAFETY INFORMATION 1 5 Decals Figure 1 3 8 Ft Model Decals 1 1 2 10 11 5 5 6 3 4 3 4 8 8 7 9...
Page 10: ...1 6 1P342 SAFETY INFORMATION Figure 1 4 10 Ft Model Decals 10 11 1 2 5 5 6 3 4 3 4 7 8 8 1 9...
Page 11: ...SAFETY INFORMATION 1 7 Figure 1 5 12 Ft Model Decals 11 2 1 10 3 4 5 5 6 3 4 9 8 1 7 8...
Page 12: ...1 8 1P342 SAFETY INFORMATION Figure 1 6 Hitch Decals 12 13...
Page 14: ...1 10 1P342 SAFETY INFORMATION Table provided for general use NOTES...
Page 21: ...ASSEMBLY INSTRUCTIONS 2 7 Table provided for general use NOTES...
Page 40: ...2 26 1P342 ASSEMBLY INSTRUCTIONS Table provided for general use NOTES...

